Iron Father Ferrum Posted August 25, 2010 Author Share Posted August 25, 2010 So I went through several different ideas, iterations, and modelling concepts for Mathias. In the end, being a Techmarine, I decided to forgo an action pose and instead spring for one of the hand-held auspices that come in every box. To reinforce the tech-and-gun-loving that is me, I embellished his bolter by using the plated, master-crafted one from the command squad sprue with optics and a bayonet. Normally, I prefer my Marines to be wearing helmets, but I needed an excuse to use an Errant-pattern chest piece and helmeted heads just don't fit inside the collar ring. He got the purity seal-festonned commander legs and spare mag belt pouches, and he's going to get a servo-arm after I'm done painting him up. Here's the final model prior to paint: http://i62.photobucket.com/albums/h96/DTRI/PICT0188.jpg http://i62.photobucket.com/albums/h96/DTRI/PICT0189.jpg Link to comment Share on other sites More sharing options...
Iron Father Ferrum Posted August 27, 2010 Author Share Posted August 27, 2010 So I finally got cracking on painting mini-me, not that I've gotten very far. We're running ranges right now, and as an NCO, the honor of standing in the sun for eight hours re-training soldiers on how to fire their weapons goes to me. http://i62.photobucket.com/albums/h96/DTRI/PICT0190.jpg http://i62.photobucket.com/albums/h96/DTRI/PICT0191.jpg Link to comment Share on other sites More sharing options...
Iron Father Ferrum Posted August 30, 2010 Author Share Posted August 30, 2010 So! For those few who still swing by to take a look, some progress has been made. I decided to try my hand at freehanding some checkerboard since lots of previous Legio minis had it on there, but I decided to stick it on the shoulderpad "behind" the Deathwatch symbol. For a first try, I think it came out decent though I doubt I'll win any awards with it. As for the rest, I've started getting all of my layering and highlighting done though the model as a whole is still very much a WIP. http://i62.photobucket.com/albums/h96/DTRI/PICT0209.jpg http://i62.photobucket.com/albums/h96/DTRI/PICT0210.jpg http://i62.photobucket.com/albums/h96/DTRI/PICT0211.jpg Link to comment Share on other sites More sharing options...
Iron Father Ferrum Posted August 31, 2010 Author Share Posted August 31, 2010 Well, the main piece of the model is done! I'm going to whip up a desert-style base, I think, and get cracking on his servo-arm all of which shouldn't take more than a day or two. Maybe three, 'cause I have a headache now. http://i62.photobucket.com/albums/h96/DTRI/PICT0212.jpg http://i62.photobucket.com/albums/h96/DTRI/PICT0213.jpg http://i62.photobucket.com/albums/h96/DTRI/PICT0214.jpg Link to comment Share on other sites More sharing options...
Epistolary_Kalphanian Posted August 31, 2010 Share Posted August 31, 2010 Totally dig the chequered =][= shoulderpad. Looks fantastic. I was going to ask you whether or not you could still get that Iron Father model since I want him for a conversion, but my question's already been answered. Sigh. So where to from here? Link to comment Share on other sites More sharing options...
Iron Father Ferrum Posted August 31, 2010 Author Share Posted August 31, 2010 I'm waiting impatiently for a full squad of Mk.III suits from ForgeWorld so I can do up a new Sternguard Squad. Hopefully they'll get here soon. Plus, that Iron Father figs show up a bunch on eBay, so their availability depends upon how much money you're willing to spend. Link to comment Share on other sites More sharing options...
sword brethren Posted August 31, 2010 Share Posted August 31, 2010 looking bloody brilliant, really clean model with great details like the shoulder pad. well done :D Link to comment Share on other sites More sharing options...
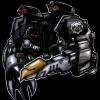
Iron Father Ferrum Posted September 1, 2010 Author Share Posted September 1, 2010 I'm wigging out waiting on my Mk.III suits, so I set aside mini-me for a moment to convert up a combi-flamer for my Sternguard. I didn't have any spare combi-meltas or -plasmas to convert, so I chopped up a stock bolter using the Night Lord Captain's combi-flamer as inspiration. It ain't pretty, but I think it came out decent. I cut away the bolter's foreguard, then clipped off and repositioned the magazine to a top-mount. Then I took the flamer snout and promethium bottle off of a standard SM flamer and glued them in place as shown. Not pretty, but functional. http://i62.photobucket.com/albums/h96/DTRI/PICT0217-1.jpg Link to comment Share on other sites More sharing options...
sword brethren Posted September 1, 2010 Share Posted September 1, 2010 it looks very good, a clean conversion. maybe the flamer nozzle is a bit large but its still looking good :) Link to comment Share on other sites More sharing options...
Captain Mick Posted September 2, 2010 Share Posted September 2, 2010 Fantastic paintjob again, good job :rolleyes: . Link to comment Share on other sites More sharing options...
Kassill Posted September 2, 2010 Share Posted September 2, 2010 These are fantastic! I really dig the look of that first guy with the servo arm! Oh, and thanks for your service! :verymad: Link to comment Share on other sites More sharing options...
Iron Father Ferrum Posted September 3, 2010 Author Share Posted September 3, 2010 Thanks for all the replies, guys. I figured if I kept on posting some more folks would eventually take notice! ;) So, an update! I added a few minor details and cleaned up some flubs I noticed, then whipped up that desert base I was talking about earlier. I flocked the base with sand (GW type, not the crap outside, ha!), primed it black. I struggled for a while on how to paint it, and decided that I wanted it to have a really sort of alien feel to it, something beyond the pale. So I basecoated it with Iyanden Darksun, then drybrushed with Kommando Khaki, Bleached Bone, and a light final coating of Skull White. Looking at it, I think I caught the not-Terran-norm feel I wanted because I've seen a lot of sand in my day, but it NEVER looks that. It still looked a little plain to me, so I went ahead and painted up a red helmet for him and glued it at his feet. It sort of gives the feeling that he's taken off his helmet to get a better look at the auspex in his hand. All that's left now is his servo-arm. Another 24 hours at most, and he's done like a steak. Let me what you think, especially about the base. I'm curious to see other reactions to it. Side shot http://i62.photobucket.com/albums/h96/DTRI/PICT0218.jpg I was trying to get a good shot of the helmet and sand. Came out a little blurry. http://i62.photobucket.com/albums/h96/DTRI/PICT0223.jpg One of those little details I mentioned? The auspex screen. I usually just hit 'em with a flat blue and call it a day; this time I tried the technique used by GW to due to the screen on the targeter of the Thunderfire Cannon -- A little bit of green highlights and some white dots for track indicators. http://i62.photobucket.com/albums/h96/DTRI/PICT0222.jpg So? Link to comment Share on other sites More sharing options...
Iron Father Ferrum Posted September 5, 2010 Author Share Posted September 5, 2010 So here he is, fully complete! I'm going to start piecing together a Tactical Squad until the Army gets around to giving me my mail with the FW order in it. Harrumph! http://i62.photobucket.com/albums/h96/DTRI/PICT0224.jpg http://i62.photobucket.com/albums/h96/DTRI/PICT0227.jpg http://i62.photobucket.com/albums/h96/DTRI/PICT0228.jpg Link to comment Share on other sites More sharing options...
Iron Father Ferrum Posted September 11, 2010 Author Share Posted September 11, 2010 Mk. III suits have finally arrived! Turns out that they shut down the roads in Iraq for the holy month of Ramadan, so our mail trucks weren't moving for a couple of weeks. Pics will be up as soon as I start getting these guys together. Link to comment Share on other sites More sharing options...
Dosjetka Posted September 11, 2010 Share Posted September 11, 2010 I really like the DW marine :lol: Can't wait to see those MKIII suits! ;) Ludovic Link to comment Share on other sites More sharing options...
Iron Father Ferrum Posted September 12, 2010 Author Share Posted September 12, 2010 Well, I started piecing these guys together and my impression -- beside the inevitable "They. Look. AWESOME!" -- was that there is a metric :P-ton(ne) of ridges, rims, and plate-junctions that are going to make detail work a pain. I was getting frustrated priming them since it was rough getting every little crack. I decided to assemble them only as far as as the base, legs, torso, and head, paint the pieces seperately, then assemble them after that. As far as the models themselves go, the quality is very nice and I noticed no immediate warpage in the resin like I've had in some of the dreadnoughts and the Aurora-class cruisers Iv'e bought from FW in the past. Mold lines were minimal overall, but one of my leg sprues apparently came from the retarded mold because it actually had some pronounced and visible mold lines that it took me a while to completely trim down. Overall though, very good production quality and I recommend them to any and all! So here's my Sternguard Sergeant in Mk.III Iron-pattern power armor, armed with a power fist and Medusa-pattern combiflamer. The right army was done by taking the regular throwing-a-grenade-arm from the Tactical Squad sprue and cutting everything off at the top of the elbow armor, trimming off the top of one of the Iron armor's right shoulders, and mating the two pieces together. My cutting off a tad so there is a small gap on one side that is quite fixable with Green Stuff (not available at the moment), but the overhang of the pauldron should probably cover it. Without any further ado, here he is in his humble, beginning stages: http://i62.photobucket.com/albums/h96/DTRI/PICT0230.jpg http://i62.photobucket.com/albums/h96/DTRI/PICT0231.jpg http://i62.photobucket.com/albums/h96/DTRI/PICT0232.jpg Link to comment Share on other sites More sharing options...
Dobermann Posted September 12, 2010 Share Posted September 12, 2010 Please go ahead, I'm planning working with Mk3 and Mk5 suits, and I am looking for inspiration for the pose and the weapons to arm them. I love how the powerfist fits to the sergeant. Link to comment Share on other sites More sharing options...
Dosjetka Posted September 12, 2010 Share Posted September 12, 2010 Excited :) Link to comment Share on other sites More sharing options...
Iron Father Ferrum Posted September 16, 2010 Author Share Posted September 16, 2010 Right, so, found some time to do some painting. And it took a while to brush-prime them all, and of course I had to finish them the day before my spray primer arrives in the mail. :P In any case. I decided that since they're Veterans, they deserve a little extra color than my normal marines and besides -- they lack any sort of skull or aquila decoration on the breatplates, so they look pretty bland even after I gave them their Codex Gray drybrush. The heads especially struck me as needing *something* so I painted all their faceplates in metallics. I was about to give them the obligatory red eyes, but I forgot about it and did three of them before I remembered. Looking at it, I decided that they actually look better this way; having empty sockets, especially in those knight-style face-plates, gives them a sort of empty feeling and reinforces the soulless, hard-hearted, machine-like quality of the Iron Hands. Another change (and way to impart some extra color to what is a jet-black model) that I made was to paint the bolter casing white as is pictured in their IA article (but not the attendant miniatures). I tried this once before and it didn't look too good, but that was before I figured out how to paint white. I think it's coming on just fine on Sarge there, so I'll be doing it for the rest of my Hands from now on and will probably pull the bolters off all my other guys when I get back State-side and fix them up, too. And yes, I know I didn't finish the sides of the bases; those'll get done last when I'm done pawing at them which has a tendency to wear the paint away. Sarge-front: http://i62.photobucket.com/albums/h96/DTRI/PICT0234.jpg Sarge-side: http://i62.photobucket.com/albums/h96/DTRI/PICT0233.jpg The armless wonders (holy crap, my hands were shaking!) http://i62.photobucket.com/albums/h96/DTRI/PICT0235.jpg Link to comment Share on other sites More sharing options...
Gaz1858 Posted September 16, 2010 Share Posted September 16, 2010 Looking good mate. I like how you try to stick to the fluff when ot comes to building and painting the models. Always adds a little somethig in my mind Link to comment Share on other sites More sharing options...
Pork Chop Express Posted September 16, 2010 Share Posted September 16, 2010 DXF, I like what you're doing here with your Iron Hands. I can also appreciate your role in a staff shop....thankless but necesary; monotonous, but somehow there's always a fire to put out RIGHT NOW!!! I am currently in the Hood of central TX. I have accumulated a large amount of IH bits myself over the years in preparation for completing an entire company. I think I'm there, but what are your thoughts on spreading the bionic bits around the force? Those helmets are cool, but does every squad need some, and if so how many per squad etc.??? Link to comment Share on other sites More sharing options...
Iron Father Ferrum Posted September 17, 2010 Author Share Posted September 17, 2010 I try, Gaz. I'm a writer at heart, so everything has a story and sticking it to the story is very important in my mind. Always nice to meet a fellow soldier, Espon. In regards to spreading out the bitz, that's what I do. The bolter arms in the pack come as a matched set, but I split 'em up because it gives me extra bits to spread around. I usually try to put two bionic bits of some sort on my Sergeants, and then squeeze in around four or five for the rest of the squad. This lets you stretch the bits out a little bit and cover down on more squads with fewer bits so you can stack the extras on Sergeants and scratch-built characters. You end up with some Marines who lack bionic bitz, but then again, not every Iron Hands joins a Tactical Squad as a brain and a beating heart in an armored jar. Link to comment Share on other sites More sharing options...
lord gunthar Posted September 17, 2010 Share Posted September 17, 2010 I like those sternguard, If I had enough money I would buy several sets, probly mk3 or 5. By the way how big is the squad ?, it looks like 10 man, but the photos so blurry that it might be 5. Link to comment Share on other sites More sharing options...
Iron Father Ferrum Posted September 17, 2010 Author Share Posted September 17, 2010 I splurged and bought ten of them, so its a full squad. Here's a question: should the Sergeant get a back-banner? I usually don't put them on my squad leaders, but these guys are the elite of the clan. Link to comment Share on other sites More sharing options...
Dosjetka Posted September 17, 2010 Share Posted September 17, 2010 Here's a question: should the Sergeant get a back-banner? I usually don't put them on my squad leaders, but these guys are the elite of the clan. I think that you should find another way of showing he's the leader of an elite squad. Maybe...I dunno...something? A servo-arm? But NOT a back-banner. Ludovic Link to comment Share on other sites More sharing options...

Recommended Posts
Archived
This topic is now archived and is closed to further replies.