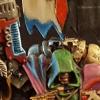
Brother-Captain Sharp Posted November 14, 2011 Share Posted November 14, 2011 Well, I've been working on this model for a while. The painting had a bit of a break in it as I tried to figure out how I wanted to do the weathering. After deciding that there's no teacher like actual experience, I dove into it and decided he was gonna look like he's been to Hell and back. ;) If I'm going to learn chipping, more of it means more practice. http://i273.photobucket.com/albums/jj236/sesharp/7ec71251-1.jpg http://i273.photobucket.com/albums/jj236/sesharp/d6c88408-1.jpg http://i273.photobucket.com/albums/jj236/sesharp/4b619378-1.jpg http://i273.photobucket.com/albums/jj236/sesharp/283a43ba-1.jpg Freehand: Laurel on helmet, Imperial Fist symbol on left knee, army badge on right knee, company number on right shoulder, "Vengeance" on right shoulder, "For Dorn" on left shoulder. I had a lot of fun on this model. The weathering was new for me and it was blast. Time consuming though. Here's what he looked like before the final stages for comparison to pre-weathering. http://i273.photobucket.com/albums/jj236/sesharp/80dc4e98-1.jpg http://i273.photobucket.com/albums/jj236/sesharp/e126dbcc-1.jpg What do you guys think? Comments and criticism always welcome, as always. Link to comment https://bolterandchainsword.com/topic/241933-imperial-fists-contemptor/ Share on other sites More sharing options...
VAGABOND Posted November 14, 2011 Share Posted November 14, 2011 Sorry but I think it looked better without the weathering and t's a great looking mini though dude so keep it up. I've also just recently finished a Contemptor Dreadnought but it was for my Pure Sanguinary Guard army. Link to comment https://bolterandchainsword.com/topic/241933-imperial-fists-contemptor/#findComment-2923554 Share on other sites More sharing options...
Jaegar Bloodfang Posted November 14, 2011 Share Posted November 14, 2011 Nah looks way better without trust me it looked quite plain the weathering before it gives it character Good work Link to comment https://bolterandchainsword.com/topic/241933-imperial-fists-contemptor/#findComment-2923596 Share on other sites More sharing options...
Grimdarkness Posted November 14, 2011 Share Posted November 14, 2011 Thats the trouble with weathering when to stop. It looks good but a little to bet up. Link to comment https://bolterandchainsword.com/topic/241933-imperial-fists-contemptor/#findComment-2923608 Share on other sites More sharing options...
winterdyne Posted November 14, 2011 Share Posted November 14, 2011 The weathering's fine to my eye, but I'm a bit confused by the paint stripes on the base - road markings? They're messy, and don't seem to make sense. I'd get rid. Nice job on the dread itself though. :-) Link to comment https://bolterandchainsword.com/topic/241933-imperial-fists-contemptor/#findComment-2923636 Share on other sites More sharing options...
Aqatone Posted November 14, 2011 Share Posted November 14, 2011 Really good weathering but the strips on the base detract and look messy and unnecessary. Link to comment https://bolterandchainsword.com/topic/241933-imperial-fists-contemptor/#findComment-2923716 Share on other sites More sharing options...
zxyogi Posted November 14, 2011 Share Posted November 14, 2011 Good job on the battle damage/weathering!! Agree with the others on the base! Good work,keep it up!! ;) Link to comment https://bolterandchainsword.com/topic/241933-imperial-fists-contemptor/#findComment-2923838 Share on other sites More sharing options...
styygens Posted November 14, 2011 Share Posted November 14, 2011 I'm torn. You've done some excellent weathering. And while some may say you've gone too far with the weathering, I can easily imagine how a Contemptor Dread on campaign would endure a lot of abuse to look that way. (Although maybe he should be more dented up?) OTOH I really like the unweathered version too. It's a little flat, but it's obvious not fully painted yet either, as you left some purity seals unpainted. With a little more detail work, it could look crisp and awesome. My preference is for "comic book clean perfection" in my models. I don't weather much of anything at all. I like that factory fresh look; as if the Marines all just arrived from orbit ready to bring the hurt to the enemies of the Emperor. YMMV. Link to comment https://bolterandchainsword.com/topic/241933-imperial-fists-contemptor/#findComment-2924070 Share on other sites More sharing options...
NemFX Posted November 15, 2011 Share Posted November 15, 2011 I like the weathering, any chance of a tutorial? Link to comment https://bolterandchainsword.com/topic/241933-imperial-fists-contemptor/#findComment-2924355 Share on other sites More sharing options...
Lachdannan Posted November 15, 2011 Share Posted November 15, 2011 Love the weathering! Great job! Link to comment https://bolterandchainsword.com/topic/241933-imperial-fists-contemptor/#findComment-2924358 Share on other sites More sharing options...
esinhorn Posted November 17, 2011 Share Posted November 17, 2011 Looking great but the chips would look way better if you hightlighted the bottom of them,time consuming but the effect is worth it Link to comment https://bolterandchainsword.com/topic/241933-imperial-fists-contemptor/#findComment-2925916 Share on other sites More sharing options...
Brother-Captain Sharp Posted November 18, 2011 Author Share Posted November 18, 2011 Thanks for the comments guys! Looking great but the chips would look way better if you hightlighted the bottom of them,time consuming but the effect is worth it They are highlighted. My camera phone just had a hard time picking it up. I think the outside of the left leg demonstrates it the best. I suppose it could do with just a bit more brightness though. Hmm... As for the base, yes they are road markings. I wanted something to break up the empty expanse under him. I might go back and get rid of them and throw on more rubble. Probably when I'm basing some other models. I was a little surpised to get multiple comments about them as I didn't think they were that bad. But I think 3 comments on it suffices a need for a change. I've got some time to get back to my painting table today, so I hope to have some other models to post tonight. As for a tutorial, I don't really know if I'm the one to be giving it. All I did was follow the basic chipping tutorials out there. It's really quite simple. Use a sponge to apply Scorched Brown (to randomize the chips) concentrating on areas where the model would see the most damage ( the torso front for this model is a good example). After applying the scorched brown, put a think line of black on the upper edge of it, while doing a highlight with a brighter mix than your main color (one of your last hightlights works for this). After that, just put a little Boltgun Metal in the larger chips or on edges. Hit hard edges in chips (like on a corner) with Chainmail. Like I said, simple. :rolleyes: Link to comment https://bolterandchainsword.com/topic/241933-imperial-fists-contemptor/#findComment-2926464 Share on other sites More sharing options...
Recommended Posts
Archived
This topic is now archived and is closed to further replies.