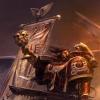
appiah4 Posted February 7, 2012 Share Posted February 7, 2012 I assembled and converted this figure based on the Techmarine drawing in the Blood Angels codex entry. Here he is, for all your comments and criticism. http://www.bolterandchainsword.com/uploads...6215_134060.jpg http://www.bolterandchainsword.com/uploads...6215_103357.jpg http://www.bolterandchainsword.com/uploads..._6215_39903.jpg Link to comment https://bolterandchainsword.com/topic/246785-painted-techmarine/ Share on other sites More sharing options...
Gv0zD Posted February 7, 2012 Share Posted February 7, 2012 Wow! Very good job! Especially the lenses and the cloth! :lol: I notice the head is from Baal pred set, I like it ;) It is good to see that you used bits from devastator set to create a very good techmarine. Well done! Also, what red did you use? Link to comment https://bolterandchainsword.com/topic/246785-painted-techmarine/#findComment-2987370 Share on other sites More sharing options...
Mithrilforge Posted February 8, 2012 Share Posted February 8, 2012 Nice techmarine...and all plastic too,that gets a double :) :) for that!! as mentioned good lenses. only crits are he needs basing and the axe head looks a bit shabby compared to the rest! cheers mithril Link to comment https://bolterandchainsword.com/topic/246785-painted-techmarine/#findComment-2987952 Share on other sites More sharing options...
igotsmeakabob!! Posted February 8, 2012 Share Posted February 8, 2012 I love him for the most part, but I think the mechadendrite should be attached to the Marine, not his power pack. Also, where'd you snag the sweet mechadendrite? Link to comment https://bolterandchainsword.com/topic/246785-painted-techmarine/#findComment-2987954 Share on other sites More sharing options...
Gv0zD Posted February 8, 2012 Share Posted February 8, 2012 I think it's from the devastators box, the backpack with servoarm to load missiles :) Link to comment https://bolterandchainsword.com/topic/246785-painted-techmarine/#findComment-2987955 Share on other sites More sharing options...
appiah4 Posted February 8, 2012 Author Share Posted February 8, 2012 Thanks for the comments :) I will base him, but later, with the rest of the army. Bitz I used, as I remember them: MK5 Torso and Legs, Left Arm, Loincloth, Auspex, Backpack from Tactical Squad box Right chainsaw arm from the Assault Squad box Missile Backpack from AOBR Power Axe from 2nd Ed Special Weapons Sprue Head from Baal Predator Shoulderpads from Land Raider Servoskull from Devastator Squad Purity Seals from.. somewhere :) Missed anything? Oh, the servo skull is actually attached to the armpit, not the backpack. Also, here's how I painted the red: 1. Duplicolor Grey Primer, light coat spray 2. 2 layers of FolkArt Lipstick Red (GW Blood Red) (1:1 watered down) 3. 1 wash of GW Ogryn Flesh (2:1 GW Ogryn Flesh, water) 4. 1 wash of GW Baal Red 5. Ogryn Flesh into recesses that need more shades 6. Highlight with FolkArt Lipstick Red (GW Blood Red) 7. Highlight with FolkArt Red Light (1:1 GW Blood Red, GW Blazing Orange) 8. Very slight highlight with FolkArt Pure Orange (GW Blazing Orange) I'm not 100% happy with my metallics either, any tips on how to improve? Always happy to hear more (and more!) comments! Link to comment https://bolterandchainsword.com/topic/246785-painted-techmarine/#findComment-2987969 Share on other sites More sharing options...
Gv0zD Posted February 8, 2012 Share Posted February 8, 2012 Thanks for the red recipe :) I think I'll try to implement it :) As for the metal parts, I also struggle with them. I try to use the good old dry rushing to give those part metallic look and not apply excessive paint... Still not happy with it :-/ Link to comment https://bolterandchainsword.com/topic/246785-painted-techmarine/#findComment-2987974 Share on other sites More sharing options...
Recommended Posts
Archived
This topic is now archived and is closed to further replies.