
Lamenter
-
Posts
271 -
Joined
-
Last visited
5 Followers


About Lamenter

Lamenter's Achievements
")


-

Modelling: Doghouse Pattern Truescale Marines
Lamenter replied to Doghouse's topic in + Modelling Tutorials +
I like your approach with the arms, I was thinking of resculpting the terminator arms to be more accurately power armour, but I may try your approach in future. Looks good. -
Modelling: Doghouse Pattern Truescale Marines
Lamenter replied to Doghouse's topic in + Modelling Tutorials +
Awesome. Looking forward to it, especially an "easier" way to do shoulder pads, they're a pain. -
You're most welcome. You've created something rather inspiring yourself (stop trying to lead me away from Blood Angels ^_^ )
-
To be honest I'm not sure. I tend to mix a lot of colours to get the shades I want. If I wanted to reproduce that shade of purple I'd guess at a roughly equal mix of blue and red and then use black or white to darken or lighten. I always wash out old paint pots to reuse and mix my own colours. I know I keep saying it but experimentation is really the key... at least the way I do things anyhow.
-
Modelling: Doghouse Pattern Truescale Marines
Lamenter replied to Doghouse's topic in + Modelling Tutorials +
WOOHOO! I think that says it all. :tu: -
I've not tried it on vehicles, but I would imagine a slightly different approach would be needed. Too many large flat areas would lead to lots of odd looking pooling I guess. Maybe someone else will try it and find out.
-
That happens to me on a daily basis. I'm forever having my mind changed about which chapter or race to collect. Anyhow, here's a quick guide to checkered shoulder pads. Shouldn't require any explanation I don't think. Just paint on the checks once the guidelines are penciled on. http://i7.photobucket.com/albums/y291/lamenter76/yellow%20guide/checks-tutorial.jpg
-
Published! Awesome... :rolleyes: Sure, I'll try and post some picks tonight when I get back from work.
-
I'd say try it! Sounds like a good idea. Through I'd also comment that you should be careful not to lose the translucency of the yellow. Yellow as it is (especially when watered down) allows the white to show through nicely, some colours will ruin the translucency I think. This is really something you should play around with. One of the things I love about painting is the experimentation and chance to develop your own techniques and approaches. Don't be afraid to try new ideas.
-
The wash doesn't change they yellow to look like sunburst, it creates a unique/new colour that provides all the shading you need. The sunburst and badmoon are then used for highlights. The only reason for using sunburst and badmoon is that they are progressively lighter shades of yellow. That's it. To be honest, there's not much difference between them. I only stuck with sunburst on the second tutorial because I think badmoon yellow is no longer in production. I think traditionally lamenters have a darker yellow than fists, I've heard the term mustard thrown around a bit, but I would say just use a yellow you like. Me, I prefer these deeper, richer shades rather than the oft-used bright yellow.
-
Like Arch Angel says there's no need. My basic technique for battle damage is to paint little marks of black. Any of the larger marks will have chainmail painted over the top, but leaving black on the edges. I'm sure there are plenty of tutorials that deal with panting battle damage. Please feel free.
-
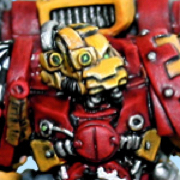
Hi folks, I've had a number of people ask how I painted the yellow on my Lamenters test minis, so I've a couple of tutorials for you all. The first is one I posted on Warseer ages ago using the old inks. The second I've just knocked together using the new inks. I've kept it as simple as possible. Please note the colour isn't quite perfect representation in the second tutorial (poor lighting), but it's ok. I'll also mention now that a clean white base/undercoat is key to this approach. Spraying first and applying a watered down skull white brushed on after to brighten would be my recommendation (though I didn't do that on these examples). ______________________________ USING OLD INKS & PAINTS Sprayed white. http://i7.photobucket.com/albums/y291/lamenter76/yellow%20guide/guide2.jpg Badmoon Yellow thinned with an equal amount of water (1 part to 1 part). Thinning it allows a bit of the brightness of the white to show through. http://i7.photobucket.com/albums/y291/lamenter76/yellow%20guide/guide3.jpg Next comes the wash. 2 parts Yellow ink + 1 part flesh wash + 1 part water. You'll need quite a bit of this mix. Liberally coat the entire model in it. Just soak the damn thing. Allow time to dry. http://i7.photobucket.com/albums/y291/lamenter76/yellow%20guide/guide4.jpg After the wash has dried, you may find some problem areas on flat surfaces where the wash has pooled and dried uneven. These areas have to be painted over using Sunburst Yellow. http://i7.photobucket.com/albums/y291/lamenter76/yellow%20guide/pooled.jpg Finally the highlights were painted in the usual manner, Badmoon Yellow first and Skull White second. http://i7.photobucket.com/albums/y291/lamenter76/yellow%20guide/guide6.jpg ______________________________ USING NEW INKS First undercoat white. I put together this mini with whatever spare bits I had, that I knew I wouldn't need. Normally I would spray undercoat for a good finish. I painted this by hand so it's a little rough. http://i7.photobucket.com/albums/y291/lamenter76/yellow%20guide/step1.jpg Painted in a thinned down sunburst yellow. 1 part paint and 1 part water. http://i7.photobucket.com/albums/y291/lamenter76/yellow%20guide/step2.jpg Coated thoroughly with Ogryn Flesh. http://i7.photobucket.com/albums/y291/lamenter76/yellow%20guide/step3.jpg Highlight of Sunburst Yellow. http://i7.photobucket.com/albums/y291/lamenter76/yellow%20guide/step4.jpg Highlight of Sunburst & White. Shown with comparison original test mini. http://i7.photobucket.com/albums/y291/lamenter76/yellow%20guide/step5.jpg
-
Modelling: Doghouse Pattern Truescale Marines
Lamenter replied to Doghouse's topic in + Modelling Tutorials +
Gasp! Italics! :tu: Can't wait, specially as I just started my own TrueScale army. -
Modelling: Doghouse Pattern Truescale Marines
Lamenter replied to Doghouse's topic in + Modelling Tutorials +
Inspiring work. Can't wait to see more. -
Modelling: Khorne Berzerker Helmet
Lamenter replied to Brother Nihm's topic in + Modelling Tutorials +
Thanks, I never thought of doing that. It looks really quite cool.