Volcatus
-
Posts
289 -
Joined
-
Last visited
5 Followers


About Volcatus

Volcatus's Achievements
")


-
 Silas7 reacted to a post in a topic:
Oregon, USA
Silas7 reacted to a post in a topic:
Oregon, USA
-
Kierdale reacted to a post in a topic:
Tutorial - HK Missile to Missile Launcher for Devastators
-
Completed Painting and Conversion Projects.
-
-
Greylocke reacted to a post in a topic:
Tutorial - HK Missile to Missile Launcher for Devastators
-
Welcome, Cirrius. A Klamath Falls gamer here, and I can tell you that you're fortunate enough to have Astral Games Medford in your neck of the woods. Plenty of tables and a good stock of models and supplies. Astral Games Medford 207 E Barnett Rd Medford, OR 97501 Phone: (541)776-7888 If you make it over the hill at some point and are looking for a game, stop in and see our crew in Klamath. Astral Games Klamath 737 Main St Klamath Falls, OR 97601 Phone: (541)882-3030
-
Tutorial - HK Missile to Missile Launcher for Devastators
Volcatus replied to Volcatus's topic in + Modelling Tutorials +
I find it easier to do it right-handed, due to the availability of left arms with open hands. It's much easier to swap the targeter box to the other side of the launcher, than it is to sculpt open right hands. Additionally, one of the goals was to make them look as similar as possible to the standard ML from the Tac Squad box. -
Flesh Tearer's Drop Pod WIP
-
-
Tutorial - HK Missile to Missile Launcher for Devastators
Volcatus replied to Volcatus's topic in + Modelling Tutorials +
Thanks guys. :) -
Tutorial - HK Missile to Missile Launcher for Devastators
Volcatus replied to Volcatus's topic in + Modelling Tutorials +
Yeah, I'll never understand some of GW's modelling decisions. And don't sweat it bud. We'll get that game in. :) -
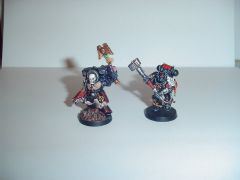
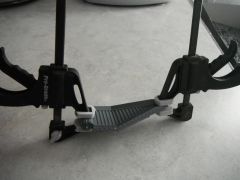
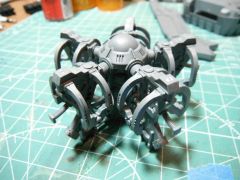
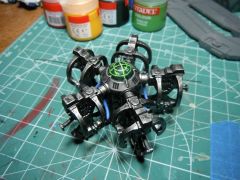
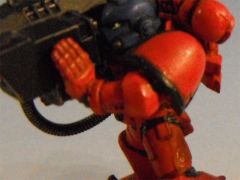
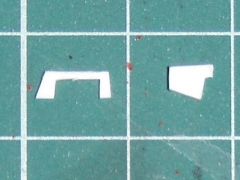
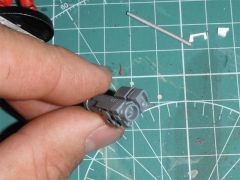
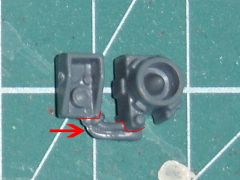
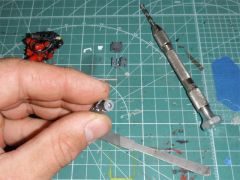
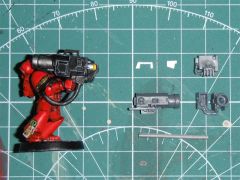
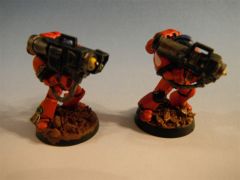
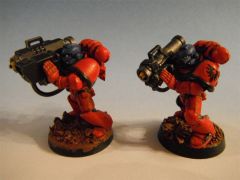
Introduction Missile Launchers are a popular and effective choice for Devastator Squads, as we all know. Buying them, however, isn't always practical. Here's a simple method for converting Tactical Marines and all of those HK missile bits that you have lying around into proper Missile Launchers Devastators. In the following images, the converted HK Missile is on the left, and a Tactical Squad Missile Launcher is on the right. Required Items Tools: -Hobby knife with a brand new, very sharp blade -Pin vise with 1/8" (3mm) drill bit -Files -Sculpting tool Parts: -One complete Tactical Marine, minus Bolter -One complete Space Marine Hunter Killer Missile -0.060" (1.5mm) plasticard -Suitable power cable. I use the 0.065" from Dragon Forge Design. -Green Stuff or equivalent Modify and Assemble the Launcher Begin by removing any flashing and clean all mold lines, as best as you can. Next, drill a 1/8" (3mm) hole in the rear end of the launcher tube. In order to imitate the look of the Tactical Squad Launcher, the optics box must be moved to the other side of the launcher assembly. To achieve this, start by removing the cabling section (denoted by the red arrow in the following picture) between the launcher muzzle and the optics plate. At this stage, you will also need to shave the skull from the side of the launcher tube. If you're careful, you can retain the skull and glue it to the opposite side. Glue the muzzle to the launcher tube, and the optics plate to the optics box. Glue the optics box to the side of the launcher tube, aligning the face of the muzzle with the face of the hood of the optics plate. Cut the following shapes (carrying handle and power cable connection point) from plasticard: Use the Tactical Squad Launcher as a guide for the dimensions of each piece. Glue the plasticard pieces and the power cabling to the launcher, fill in any holes with Green Stuff, and allow everything to dry before proceeding. Final Assembly In the preceding picture, the launcher has been attached to a standard Marine Bolter arm. The only modification involves cutting off the hand at the wrist, and gluing it to the launcher assembly. Cut off the forearm, just above the elbow pad. Reattach the forearm, so it is in the right position to match up to the hand, and allow the launcher to rest on the shoulder pad. Once everything is dry, you can glue the launcher and arm together, and attach the power cable to the gap between the arm and shoulder pad. Green Stuff the wrist joint, using the sculpting tool to create the folds in the joint. The left arm is more challenging: Again we're using a standard Tactical Marine Bolter arm. Begin by scoring the hand, palm side, across the top of the palm. Score again across the middle joints of the fingers. Carefully open the fingers to create a flat, open hand as seen in the picture. Cut the hand away from the arm. Cut the arm again at the elbow, above the elbow pad. Green Stuff the gaps in the backs of the fingers, and attach the hand to the side of the launcher. Attach the shoulder to the Marine's torso. Glue the forearm piece between the shoulder and the hand. Green Stuff the wrist joint, using the sculpting tool to create the folds in the joint. NOTE: The arm portion of the build is a bit of a balancing act. Dry fit as much as possible before gluing to ensure proper alignment. Thanks for reading. I hope that you find this tutorial to be helpful. Please post or PM any question you might have.
-
Steps to convert a HK Missile Launcher into a shoulder Missile Launcher for a Devastator Marine.
-
-
Blood Angels showcase The Blood Angels Showcase
Volcatus replied to OwlandMoonGuy's topic in + BLOOD ANGELS +
http://i49.photobucket.com/albums/f289/Razzuran/DSCF0679.jpg Forge World Mk V Assault Marine. I'm using them as Vanguard Veterans. -
Blood Angels showcase The Blood Angels Showcase
Volcatus replied to OwlandMoonGuy's topic in + BLOOD ANGELS +
Awe inspiring Land Raider there, Mortarion. -
Blood Angels showcase The Blood Angels Showcase
Volcatus replied to OwlandMoonGuy's topic in + BLOOD ANGELS +
Commander Dante http://i49.photobucket.com/albums/f289/Razzuran/Commander-Dante.jpg -
Blood Angels showcase The Blood Angels Showcase
Volcatus replied to OwlandMoonGuy's topic in + BLOOD ANGELS +
Sanguinary Priest: http://i49.photobucket.com/albums/f289/Razzuran/Sang-Priest-1.jpg -
Klamath Falls finally has a game store. Astral Games of Medford has opened a sister store here in K-Town. Located at 737 Main St., they are open Tuesday through Sunday. They have a nice space, with 4 tables set up for play. Good folks behind the counter too (even if one of them plays Greenskins).
-
I recently played at Knightfall Games (my first 40k game in several years), and I was impressed. Very nice people, and excellent gaming tables. I'm not native to the Portland area though. If there is anyone in the Klamath Falls area that has a group going, let me know. <_<