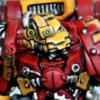
Lamenter Posted September 14, 2008 Share Posted September 14, 2008 (edited) Hi folks, I've had a number of people ask how I painted the yellow on my Lamenters test minis, so I've a couple of tutorials for you all. The first is one I posted on Warseer ages ago using the old inks. The second I've just knocked together using the new inks. I've kept it as simple as possible. Please note the colour isn't quite perfect representation in the second tutorial (poor lighting), but it's ok. I'll also mention now that a clean white base/undercoat is key to this approach. Spraying first and applying a watered down skull white brushed on after to brighten would be my recommendation (though I didn't do that on these examples). ______________________________ USING OLD INKS & PAINTS Sprayed white. http://i7.photobucket.com/albums/y291/lamenter76/yellow%20guide/guide2.jpg Badmoon Yellow thinned with an equal amount of water (1 part to 1 part). Thinning it allows a bit of the brightness of the white to show through. http://i7.photobucket.com/albums/y291/lamenter76/yellow%20guide/guide3.jpg Next comes the wash. 2 parts Yellow ink + 1 part flesh wash + 1 part water. You'll need quite a bit of this mix. Liberally coat the entire model in it. Just soak the damn thing. Allow time to dry. http://i7.photobucket.com/albums/y291/lamenter76/yellow%20guide/guide4.jpg After the wash has dried, you may find some problem areas on flat surfaces where the wash has pooled and dried uneven. These areas have to be painted over using Sunburst Yellow. http://i7.photobucket.com/albums/y291/lamenter76/yellow%20guide/pooled.jpg Finally the highlights were painted in the usual manner, Badmoon Yellow first and Skull White second. http://i7.photobucket.com/albums/y291/lamenter76/yellow%20guide/guide6.jpg ______________________________ USING NEW INKS First undercoat white. I put together this mini with whatever spare bits I had, that I knew I wouldn't need. Normally I would spray undercoat for a good finish. I painted this by hand so it's a little rough. http://i7.photobucket.com/albums/y291/lamenter76/yellow%20guide/step1.jpg Painted in a thinned down sunburst yellow. 1 part paint and 1 part water. http://i7.photobucket.com/albums/y291/lamenter76/yellow%20guide/step2.jpg Coated thoroughly with Ogryn Flesh. http://i7.photobucket.com/albums/y291/lamenter76/yellow%20guide/step3.jpg Highlight of Sunburst Yellow. http://i7.photobucket.com/albums/y291/lamenter76/yellow%20guide/step4.jpg Highlight of Sunburst & White. Shown with comparison original test mini. http://i7.photobucket.com/albums/y291/lamenter76/yellow%20guide/step5.jpg Edited July 14, 2009 by The Angelus Sanctus Link to comment Share on other sites More sharing options...
BrotherAtrox Posted September 14, 2008 Share Posted September 14, 2008 The disparity in the different techniques shows up pretty well. I appreciate this tutorial man - I definitely know my next project is going to be some Lamenters. For battle damage do you take a knife to the mini? Link to comment Share on other sites More sharing options...
Arch«•»Angel Posted September 14, 2008 Share Posted September 14, 2008 The disparity in the different techniques shows up pretty well. I appreciate this tutorial man - I definitely know my next project is going to be some Lamenters. For battle damage do you take a knife to the mini? as far as it looks, there is no need to do that. simply painting on battle dmg will be sufficient enough as long as its done right. Link to comment Share on other sites More sharing options...
Sigismund Himself Posted September 14, 2008 Share Posted September 14, 2008 Lamenter, can we put this into the Librarium? Link to comment Share on other sites More sharing options...
Lamenter Posted September 14, 2008 Author Share Posted September 14, 2008 For battle damage do you take a knife to the mini? Like Arch Angel says there's no need. My basic technique for battle damage is to paint little marks of black. Any of the larger marks will have chainmail painted over the top, but leaving black on the edges. I'm sure there are plenty of tutorials that deal with panting battle damage. Lamenter, can we put this into the Librarium? Please feel free. Link to comment Share on other sites More sharing options...
nurglespuss Posted September 14, 2008 Share Posted September 14, 2008 Great tutorial :> I have a question or two me-self though: Why mix bad moon and sunburst yellow? especially on the first model, where mistakes over a badmon basecoat are touched up with sunburst? if the wah changes the yellow to look like sunburst, why not start with that colour (sorry I'm a fists player and have a very similar technique that uses paint washes instead of inks). I'm just curious! Secondly, I have to paint a lamenter soon, how would you describe the yellow? is it more badmoon or sunburst? I've looked at several mini's but they are all painted differently. Cheers!! Link to comment Share on other sites More sharing options...
Lamenter Posted September 14, 2008 Author Share Posted September 14, 2008 Great tutorial :> I have a question or two me-self though: Why mix bad moon and sunburst yellow? especially on the first model, where mistakes over a badmon basecoat are touched up with sunburst? if the wah changes the yellow to look like sunburst, why not start with that colour (sorry I'm a fists player and have a very similar technique that uses paint washes instead of inks). I'm just curious! Secondly, I have to paint a lamenter soon, how would you describe the yellow? is it more badmoon or sunburst? I've looked at several mini's but they are all painted differently. Cheers!! The wash doesn't change they yellow to look like sunburst, it creates a unique/new colour that provides all the shading you need. The sunburst and badmoon are then used for highlights. The only reason for using sunburst and badmoon is that they are progressively lighter shades of yellow. That's it. To be honest, there's not much difference between them. I only stuck with sunburst on the second tutorial because I think badmoon yellow is no longer in production. I think traditionally lamenters have a darker yellow than fists, I've heard the term mustard thrown around a bit, but I would say just use a yellow you like. Me, I prefer these deeper, richer shades rather than the oft-used bright yellow. Link to comment Share on other sites More sharing options...
nurglespuss Posted September 14, 2008 Share Posted September 14, 2008 cheers :> to my eye bad moon looks like 'tennis ball yellow' and sunburst like 'custard yellow' :yes: but thats just me!! HMMmmm mustard eh? I was thinking of adding dheneb stone to sunburst to create a slightly 'off' but strong yellow... what do you think? Link to comment Share on other sites More sharing options...
Lamenter Posted September 14, 2008 Author Share Posted September 14, 2008 cheers :> to my eye bad moon looks like 'tennis ball yellow' and sunburst like 'custard yellow' :D but thats just me!! HMMmmm mustard eh? I was thinking of adding dheneb stone to sunburst to create a slightly 'off' but strong yellow... what do you think? I'd say try it! Sounds like a good idea. Through I'd also comment that you should be careful not to lose the translucency of the yellow. Yellow as it is (especially when watered down) allows the white to show through nicely, some colours will ruin the translucency I think. This is really something you should play around with. One of the things I love about painting is the experimentation and chance to develop your own techniques and approaches. Don't be afraid to try new ideas. Link to comment Share on other sites More sharing options...
nurglespuss Posted September 14, 2008 Share Posted September 14, 2008 quite quite right :> thanks. It will be a challenge to paint over a dark background, even if I brush prime the surfaces white :> But I look forward to finishing my current salamander so I can get on with him... Speaking of which , I'm off to sculpt a green stuff heart... Link to comment Share on other sites More sharing options...
BrotherAtrox Posted September 15, 2008 Share Posted September 15, 2008 I'm working on my first test mini right now. Could you give us a picture of the checkered shoulder pad? I'm still pondering how to paint it effectively. Link to comment Share on other sites More sharing options...
nurglespuss Posted September 15, 2008 Share Posted September 15, 2008 cool, don't forget to post pics!! Also, just had a chat with my mate, I didn't realise they changed the look of badmoon yellow, from its acid tint, to essentially a lighter sunburst. damn. Link to comment Share on other sites More sharing options...
Sigismund Himself Posted September 15, 2008 Share Posted September 15, 2008 Now it's published, it gets... ^Click to view article^ Link to comment Share on other sites More sharing options...
Lamenter Posted September 15, 2008 Author Share Posted September 15, 2008 Published! Awesome... :rolleyes: I'm working on my first test mini right now. Could you give us a picture of the checkered shoulder pad? I'm still pondering how to paint it effectively. Sure, I'll try and post some picks tonight when I get back from work. Link to comment Share on other sites More sharing options...
arutha Posted September 15, 2008 Share Posted September 15, 2008 Everytime i pick a chapter/color scheme I find somthing awesome like this!!!! Link to comment Share on other sites More sharing options...
nurglespuss Posted September 15, 2008 Share Posted September 15, 2008 Yes that is indeed sods law matey!! Link to comment Share on other sites More sharing options...
Lamenter Posted September 16, 2008 Author Share Posted September 16, 2008 Everytime i pick a chapter/color scheme I find somthing awesome like this!!!! That happens to me on a daily basis. I'm forever having my mind changed about which chapter or race to collect. Anyhow, here's a quick guide to checkered shoulder pads. Shouldn't require any explanation I don't think. Just paint on the checks once the guidelines are penciled on. http://i7.photobucket.com/albums/y291/lamenter76/yellow%20guide/checks-tutorial.jpg Link to comment Share on other sites More sharing options...
BrotherAtrox Posted September 16, 2008 Share Posted September 16, 2008 (edited) I love you Lamenter. ;) Edit: Here is the first test mini. In great need of some cleaning stray brush marks but overall I'm happy with this method. The first time I used a bit too much water in the ink mix and it messed up some of the coverage, but this is why we do test minis. I should have the rest of him done some time tomorrow-ish. This is the first time I really painted yellow so that should be a testament to Lamenter's recipe. Awesome stuff. Edited September 16, 2008 by BrotherAtrox Link to comment Share on other sites More sharing options...
Brother Captain Aruis Posted September 16, 2008 Share Posted September 16, 2008 You should really do a tutorial on your style of battle damage.... next time Im home I so trying this out. Link to comment Share on other sites More sharing options...
odinswolf Posted September 17, 2008 Share Posted September 17, 2008 have you tried this method with vehicles? I would love to see a tutorial on a rhino if possible? if that looks as good as the test termy then I am going fists!! Link to comment Share on other sites More sharing options...
Lamenter Posted September 18, 2008 Author Share Posted September 18, 2008 have you tried this method with vehicles? I would love to see a tutorial on a rhino if possible? if that looks as good as the test termy then I am going fists!! I've not tried it on vehicles, but I would imagine a slightly different approach would be needed. Too many large flat areas would lead to lots of odd looking pooling I guess. Maybe someone else will try it and find out. Link to comment Share on other sites More sharing options...
odinswolf Posted September 18, 2008 Share Posted September 18, 2008 (edited) challenge accepted! I will build a rhino and get it undercoated later, just need to grab a tin of white under coat. should be ready by the weekend! if it goes well I will try the black reach dread too. If it look's bad I can strip the paint of easily.. I am lucky that were i work i have a wet blaster machine ( think sand blaster but with lighter medium in the water, tried it on every type of model before and it doesnt damage at all) Edited September 18, 2008 by odinswolf Link to comment Share on other sites More sharing options...
odinswolf Posted September 20, 2008 Share Posted September 20, 2008 ok I am putting a series of pic on the WIP section to show you what happened with the stuff I was working on.. lets just say I got a suprise.. Link to comment Share on other sites More sharing options...
Syriel Posted September 21, 2008 Share Posted September 21, 2008 Hey great minis you got there :P I was just wondering how a Golden Yellow base coat + Gryphonne Sepia Wash would work with this :P Thanks in advance :P Link to comment Share on other sites More sharing options...
Billy Butcher Posted September 21, 2008 Share Posted September 21, 2008 Hey great minis you got there :) I was just wondering how a Golden Yellow base coat + Gryphonne Sepia Wash would work with this :P Thanks in advance ^_^ Over a white undercoat it's working very well :D Link to comment Share on other sites More sharing options...


Recommended Posts
Create an account or sign in to comment
You need to be a member in order to leave a comment
Create an account
Sign up for a new account in our community. It's easy!
Register a new accountSign in
Already have an account? Sign in here.
Sign In Now