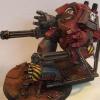
Filantropolo Posted June 3, 2009 Share Posted June 3, 2009 Some people have asked me about my miniature’s bases, I have prepared a little tutorial abut it. We start from a plastic sheet I suppose that plasticard would be the ideal material, I use the sheet that protect packages of virgin x-rays sheets, in most hospitals they throw them to the rubbish With a coin and cd´s marker we drew circumferences in the plastic. http://img40.imageshack.us/img40/5170/peanas1.jpg We trimmed the circumferences with scissors http://img36.imageshack.us/img36/3226/peanas2.jpg We used those circumferences, cutting bits and sticking them to the bases we give them volume and we created different panel effects. http://img33.imageshack.us/img33/5350/peanas3.jpg With cut pliers we cut pins to create the sorter ones, we are going to use those sorter pins as rivets. http://img132.imageshack.us/img132/2018/peanas4.jpg We dril the holes where rivets will be placed . http://img32.imageshack.us/img32/1365/peanas5.jpg We place the rivets, fixing them to base back with cyanoacrylate http://img43.imageshack.us/img43/3968/peanas6.jpg http://img40.imageshack.us/img40/7306/peanas6bid.jpg We created different details for the bases in this case I have used cylindrical plastic rod both to create bolter shells like cables that cross some bases, all these details are glued to base with cyanoacrylate . We use a file to scratch a little the surface of the bases to give a slightly irregular aspect to them. http://img40.imageshack.us/img40/4436/peanas7.jpg We print bases with black spray.. http://img30.imageshack.us/img30/9885/peanas8.jpg We paint the base with a dark metalic color, gun metal bolter for example . http://img40.imageshack.us/img40/5551/peanas9.jpg With a piece of foam and a little color bronze, dark brown and shining steel we stained the metallic surface, unloading most of painting on a paper. http://img36.imageshack.us/img36/1734/peanas10.jpg We paint de base´s details. http://img33.imageshack.us/img33/5476/peanas11.jpg We mix orange brown and water for applying a rush mark to each rivet. http://img132.imageshack.us/img132/2264/peanas12.jpg Devlan mud wash to all the base. It gives uniformity and oldy look. http://img32.imageshack.us/img32/957/peanas13.jpg We hightlight rivet´s heads and base edge http://img30.imageshack.us/img30/1729/peanas14.jpg Link to comment Share on other sites More sharing options...
rat of vengence Posted June 3, 2009 Share Posted June 3, 2009 WOW! The Royal Family posts on the B&C!!!!! Sorry, that was the royal 'we' wasn't it? :D Anyway, seriously though, nice work. They come out with a very grimy gothic feel, I like it a lot. Other than clipping the pins (which is a good idea) it wouldn't take to long to churn out quite a few of these I guess. :) RoV Link to comment Share on other sites More sharing options...
Brother Nihm Posted June 3, 2009 Share Posted June 3, 2009 Quick, to the Librarium Mo-bile!. Cheap and efficient, I love it. :blink: Link to comment Share on other sites More sharing options...
onipunk Posted June 3, 2009 Share Posted June 3, 2009 Agreed, an excellent tutorial. I may use this in the future. Link to comment Share on other sites More sharing options...
Ferrus Manus Posted July 27, 2009 Share Posted July 27, 2009 Mind if we put this in the Librarium, Filantropolo? EDIT: Excuse my eyesight, it's already there... :) Link to comment Share on other sites More sharing options...
TeamLando Posted July 29, 2009 Share Posted July 29, 2009 Really nice tutorial! Too bad many of us won't ever get the chance to play on a surface representing the looks of the bases :/ It's mostly itadel mat for me T_T Link to comment Share on other sites More sharing options...

Recommended Posts
Archived
This topic is now archived and is closed to further replies.