Olis Posted July 30, 2011 Share Posted July 30, 2011 A quick picture I forgot to post of the same model with an alternate bolter equipped with a chain-bayonet.http://i51.photobucket.com/albums/f390/augustmanifesto/IMG_0094.jpg Very nice, I quite like this marine. Also: I love it how bolter stripes are in vogue - it breaks up the boxy shape. :cuss Link to comment Share on other sites More sharing options...
Lady_Mournival Posted July 31, 2011 Share Posted July 31, 2011 greetings, I'm coming from 40k0. Been lurking B&C painting/modelling section for a while and I thought i'd start posting and sharing my work. here's my start on the Imperial Fists 5th company. This project is looking pretty exciting, I'm looking to really bring these guys to life and develop the Chapter a bit more. hopefully I'll have more to share as I finish some modeling and christen my handy-dandy new airbrush with craploads of yellow. Sorry for the bad pictures, believe or not these were the best ones of the batch... Just looking to share and fishing for C&C. http://i51.photobucket.com/albums/f390/augustmanifesto/imperial%20fists/102.jpg So I love your guys, love the paint, love the battle damage but I just have one question..... well it's clear that it's fairly rocky where they are (or it could be rubble) so shouldn't their legs be coated in a wee bit of grey dust? just my to cense; great models anyway. Link to comment Share on other sites More sharing options...
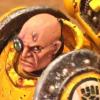
augustmanifesto Posted July 31, 2011 Author Share Posted July 31, 2011 @ Battle Brother Mecharius -- those were my old Imperial Fists. I agree, they could use some dust on their legs -- but they've been stripped down to the plastic and repainted so its too late for that another loose photo I had laying around. I'll try and get hold of the models I have finished (they're at my local GW now) and give a group picture to stop this one-at-a-timing. ha. Again, poor picture -- sorry! http://i51.photobucket.com/albums/f390/augustmanifesto/IMG_0102.jpg Link to comment Share on other sites More sharing options...
hushrong Posted July 31, 2011 Share Posted July 31, 2011 http://i51.photobucket.com/albums/f390/augustmanifesto/IMG_0102.jpg THIS is what an Imperial Fist should look like! Even the Blood Angel behind him is captivated by the awesomeness, just look at his face. Link to comment Share on other sites More sharing options...
deathnid Posted July 31, 2011 Share Posted July 31, 2011 teach uz how to weather please your awesomeness :P Link to comment Share on other sites More sharing options...
Metal Apostle Posted July 31, 2011 Share Posted July 31, 2011 Perfect weathering. Could you describe the weathering process you used a bit more? Link to comment Share on other sites More sharing options...
Dark Apostle Thirst Posted July 31, 2011 Share Posted July 31, 2011 If this were Facebook, I'd like this thread :( Link to comment Share on other sites More sharing options...
augustmanifesto Posted July 31, 2011 Author Share Posted July 31, 2011 (edited) Group photo of the better part of Tactical Squad Irpa, 3rd Squad. The Sergeant, heavy weapons trooper and one more marine are missing. PS: MODS, maybe this should be moved to WIP? http://i51.photobucket.com/albums/f390/augustmanifesto/IMG_0116.jpg http://i51.photobucket.com/albums/f390/augustmanifesto/IMG_0132.jpg http://i51.photobucket.com/albums/f390/augustmanifesto/IMG_0124.jpg http://i51.photobucket.com/albums/f390/augustmanifesto/IMG_0120.jpg @ Metal Apostle & Deathnid -- I use scorched brown on a bit of left-over blister sponge. A corner piece works best. Dab it on the armor where you want battle damage. I then come back with a brush and develop the patterns of sponged-on brown a little, usually adding line-like scrapes, working the edges of the armor a bit more and sometime putting yellow back over some areas. The technique is very simple but just requires some practice to get a sense of how to use a sponge as a tool. I then go and highlight the sponged-on scorched brown with a mix of sunburst yellow and white -- my extreme highlight color on these guys. As a rule of thumb, concentrate more on the edges of the armor and use your judgement as to where else on the armor would receive what degree of damage. Other than that, the brown-streaks and stains are used with watered down bestial brown -- different ratios of water-to-paint produce different results. There are two techniques here. First, creating streaks. These are done generally to be vertical relative to the position the given limb or piece of armor would be in most of the time. Here, you don't want too much paint on the brush. Usually, the brush is just a step of wetness above the amount of paint required for heavy dry brushing. But if you're going over a color darker than yellow, you may want more paint on your brush (over yellow, the best effect is a semi-translucent one, so little paint is required, but the optimum effect may be different on different colors, perhaps requiring more paint). Once you play around with this you will see what I mean instantly. Second, pools of dirt-grime are made by simply slapping the same watered-down bestial brown in the areas you want it, generally areas that would collect stuff. here, I hit some of the recesses in the armor, area between armor plates, etc. EDIT: sorry this explanation was so rushed. there are some tutorials on the internet for this, but none of them very good. There is a great tutorial in the Forgeworld Masterclass book. my brown-streaking thing is an adaptation, though -- But if you want some help with how this all works I can do a picture tutorial when I get the time, let me know. Edited August 1, 2011 by augustmanifesto Dosjetka 1 Back to top Link to comment Share on other sites More sharing options...
MRCHAOS Posted July 31, 2011 Share Posted July 31, 2011 Your first post and way of painting was brilliant, your new way of painting Fists is :D Semper Fortis 1 Back to top Link to comment Share on other sites More sharing options...
Inquisitor Engel Posted July 31, 2011 Share Posted July 31, 2011 The yellow is brilliant. I'm not 100% on the super chipped scheme, but it's pulled off nicely here. Well done. Link to comment Share on other sites More sharing options...
augustmanifesto Posted August 1, 2011 Author Share Posted August 1, 2011 (edited) Thought to take a quick picture of one of the many pages of design notes I scribbled in preparation for this project. First are the notes on displaying markings on various armor variants that will be used in the tactical squads. The Imperial Fists are described in the background material as being obsessed with rigid order and discipline, so I assume each Company (perhaps the chapter) would have a strict systems for markings, which I thought merited a quick and dirty note. http://i51.photobucket.com/albums/f390/augustmanifesto/IMG_0134.jpg Second are some thoughts on planning the composition of the squad. The basic notion was to define the sorts of variations from battle-brother to battle-brother which would be modelled and to distribute the variations in a relatively even way -- names were added for effect. To do this, a table turned out be a a simple, helpful heuristic. There was still a lot of work to do to plan the squad out in its entirety, but I'll post additional notes latter if anybody cares to read them. http://i51.photobucket.com/albums/f390/augustmanifesto/IMG_0139.jpg I'll post more of these as the project progresses Edited August 1, 2011 by augustmanifesto Link to comment Share on other sites More sharing options...
Xenith Posted August 2, 2011 Share Posted August 2, 2011 Great work, really nice looking marines - If I were to do IF, this is the yellow I would go for. Link to comment Share on other sites More sharing options...
Grizzly_bear Posted August 2, 2011 Share Posted August 2, 2011 These are better than the 'Evy metal teams, fact, the realism is outstanding and the battle damage is on point. Well done sir Link to comment Share on other sites More sharing options...
alejandrinus Posted August 4, 2011 Share Posted August 4, 2011 Awesome Fists and very realistics battle damages. Top work August Link to comment Share on other sites More sharing options...
HJL Posted August 4, 2011 Share Posted August 4, 2011 so i clicked on the link expecting some avg work, turned away to answer the phone, came back and took a look. I literally said wow! your work is amazing!!! Link to comment Share on other sites More sharing options...
augustmanifesto Posted August 5, 2011 Author Share Posted August 5, 2011 (edited) Just a close up of a Mk6 Astartes. I have some other stuff posted on my blog -- linked to in my signature -- including design notes, planning, etc. If anybody wants more details on stuff posted there, let me know and i'd be more than happy to elaborate on whatever. Thanks for the kind replies, dudes. http://i51.photobucket.com/albums/f390/augustmanifesto/IMG_0154.jpg Edited August 5, 2011 by augustmanifesto Dosjetka 1 Back to top Link to comment Share on other sites More sharing options...
ephrael Posted August 5, 2011 Share Posted August 5, 2011 These are some seriously well painted marines August. You just gained yourself a follower on your blog. Keep posting these beautiful minis. Link to comment Share on other sites More sharing options...
MRCHAOS Posted August 5, 2011 Share Posted August 5, 2011 The guy without a helmet is the only one letting these down with the brown streak marks on his right lower leg, they just dont look natural, on the other hand. These are looking like Golden Daemon standard my friend. Link to comment Share on other sites More sharing options...
brother varen Posted August 7, 2011 Share Posted August 7, 2011 August, all i can say is amazing. Your Imperial Fists look like they were at the siege of the Imperial Palace with all that battle damage. That is the look i would like to have for my army. Link to comment Share on other sites More sharing options...
Rob_Loken Posted August 7, 2011 Share Posted August 7, 2011 Those Fists are astounding. Good work mate. Link to comment Share on other sites More sharing options...
alejandrinus Posted August 8, 2011 Share Posted August 8, 2011 Mk6 IFist goodness!! Awesome august Link to comment Share on other sites More sharing options...
augustmanifesto Posted August 10, 2011 Author Share Posted August 10, 2011 WIP of a decals sheet I'm working on. Wanting to render some Codex insignias (Iron Halo, Laurel), the Company insignia (a castle piece from chess, company name: "Palace Guard), Imperial Fists sayings) and other random stuff. Next to do is replace the squad numbers on the knees with the company insignias (I'm making a goal of the project to represent company and squad identity, which has been underrepresented in the fluff, IMHO -- more on that later). thanks for the replies guys! http://i51.photobucket.com/albums/f390/augustmanifesto/decals.jpg Link to comment Share on other sites More sharing options...
Lord Commander Vulkus Dorn Posted August 10, 2011 Share Posted August 10, 2011 Love your weathering, its very nice. Some damn nice looking Imperial Fists indeed Link to comment Share on other sites More sharing options...
augustmanifesto Posted March 31, 2012 Author Share Posted March 31, 2012 I've added new custom decals and settled on a basing method. I haven't had time for any good photographing, so these two quick, fairly crappy shots will have to do. Lots of other progress has been made, but I'm short on time ;) Again, sorry for the poopy photos. Also, the bolters are missing (obviously) because I have other plans for those ^_^ http://i51.photobucket.com/albums/f390/augustmanifesto/IMG_0350.jpg http://i51.photobucket.com/albums/f390/augustmanifesto/IMG_0349.jpg Bases: Using green stuff, secret weapon miniatures razor wire and some plasticard bits, I added debris to the bases. Then I applied two layers of mud using a kit also from by Secret Weapon Miniatures, including some water effects to simulate puddles. I'm really pleased with the results: the muddy terrain with debris gives the sense of assaulting (or defending) entrenched positions and implies some really intense combat -- both of which articulate the Imperial Fists' specialty in siege warfare and stubborn nature. The dark, wet mud also ties together the mud streaks and battle damage on the armor, I think, creating an overall coherent atmosphere. I still have to paint some black around the edges to cover up the sloppy mud applications, but oh well. Decals: I replaced the squad number on the knees with the 5th Company insignia. Now, there is no official background on Companies having their own insignia, but its an effective way to add to the feel of the force, creating a sense of culture and history. The insignia itself is a crenelated tower, similar to the silhouette of a rook chess piece. This seems appropriate for the the Chapter, especially given the Imperial Fists' prominent role in defending the Emperor's Palace during the Horus Heresy. Also, the symbol may have a legitimate claim at canonicity, as it is depicted on an Imperial Fists Terminator in Index Astartes (below). While I may be reaching a bit, notice that the Terminator features black reliefs, perhaps implying that he is attached to 5th Company and that, therefore, the crenelated insignia may be that of 5th Company as well. Also, like, you know, it looks cool. http://i51.photobucket.com/albums/f390/augustmanifesto/Imperial_Fists_Terminator.jpg Dosjetka 1 Back to top Link to comment Share on other sites More sharing options...
Dosjetka Posted March 31, 2012 Share Posted March 31, 2012 (edited) I really like those bases, very nice and gritty (and very Imperial Fist-like, of course). And welcome back mate, glad to see you active again! ^_^ Ludovic Edited March 31, 2012 by Battle-Brother Ludovic Link to comment Share on other sites More sharing options...

Recommended Posts
Create an account or sign in to comment
You need to be a member in order to leave a comment
Create an account
Sign up for a new account in our community. It's easy!
Register a new accountSign in
Already have an account? Sign in here.
Sign In Now