EPK Posted February 9, 2011 Author Share Posted February 9, 2011 Actually, I have no plans for an extended Consecrators force beyond this tactical squad, I simply wanted to add some deversity and didn't want to paint anymore green. My overall army is simply Dark Angels scheme, the Deathwing in bone. I just threw that terminator into this thread as a sneak peak since I had been working on him with the others. Link to comment Share on other sites More sharing options...
EPK Posted February 14, 2011 Author Share Posted February 14, 2011 Finally done building. Here is one last group shot before they get primed, the packs are being painted separate (glued to sprues) and attached when all is ready. Link to comment Share on other sites More sharing options...
krewl Posted February 15, 2011 Share Posted February 15, 2011 Only 3 heads are no beakies, thats kinda a waste. I'd feel they should all have those helmets for the old school feel. I recall you had 2 more and maybe you can use a naked head for the last one? Also model wise you can drill out the barrels of the guns for detailing and watch for moldlines (I can't see them on the picture but they should be removed before the painting afterwards is a pain). Link to comment Share on other sites More sharing options...
EPK Posted February 15, 2011 Author Share Posted February 15, 2011 Only 3 heads are no beakies, thats kinda a waste. I'd feel they should all have those helmets for the old school feel. I recall you had 2 more and maybe you can use a naked head for the last one? Also model wise you can drill out the barrels of the guns for detailing and watch for moldlines (I can't see them on the picture but they should be removed before the painting afterwards is a pain). Nope, that's all 10. But I might do an 11th just so I have fill in bolter marine when the ML isn't needed. The helmets are as follows (in order of Mk): 1x Mk3 - custom for the sarge 1x Mk4 - Meltagunner 6x Mk6 - "beakies" (not 7) as the Consecrators are known for 2x Mk7 - the younger members of the sqaud I tossed in those two newer helmets for some diversity and because the only two beakie helmets I had left were the DA icon on the nose version (thought I'd save them). I'll note that they all have the Corvus style legs and studded left pad and most have the trim cut of of their right pad as per the Corvus style. The exception to those with trim are the Sarge, Melta, and ML. The first two were on purpose as I wanted them to represent Mk4 shoulder pads and the ML guys pad is actually attached to the ML, so I figured I'd call that Mk4 as well. 6 of them also use Mk5 torsos and I actually converted the Meltagunner's torso to look like Mk4. I felt 60% beakies would suffice, it is only a tactical squad after all. Though the Consecrators inherited much of the oldest and revered armor and weapons, surely not all of those would be Corvus. Hasn't even the more current issue Mk7 been in production for thousands of years technically? They don't have much fluff as it is, I thought I would expand on it with a mix of all Mks - with a majority in Mk6. With this mix of Mks, I really don't think they are hurting for that old school feel - unless aof course you are simply speaking of the old RT era stuff, but I planned this squad out around current fluff, most notably Forge World's line of armor variants and this lexicanum power armor page. Also, I decided there would be no bare headed marines in this squad - I thought it added to the mystique of them as they are noted for. From that explanation alone you might be able to guess I did put a lot of thought into them. And trust me, I took care of the mold lines - the gun barrels are another story though - I need to invest in a drill for that. Link to comment Share on other sites More sharing options...
krewl Posted February 15, 2011 Share Posted February 15, 2011 It's not meant to be negative, just my opinion. As always you are free to ignore all I suggest (Nothing more than suggest aswell.) And you still need to paint them that would pull them more together anyways. Drilling barrels looks nice as an added touch, I've done it on mine aswell. The mold lines comment was just a precaution, you don't want to see one on your finished model.. Link to comment Share on other sites More sharing options...
EPK Posted February 16, 2011 Author Share Posted February 16, 2011 It's not meant to be negative, just my opinion. As always you are free to ignore all I suggest (Nothing more than suggest aswell.) I did not see it as negative at all and thank your for your comments. I just figured I'd give you my reasoning for doing things the way I did. That is of course why this WIP thread is here rather than in the actual WIP forum, because I planned for it to be based a lot around fluff (and my own expanding of it) and of course appreciate the feedback from my fellow Dark Angels. I usually just give the gun barrels a black dot - as sure it's noticeable in a larger than life size photo on here, but not really as much on a gaming table. However, I'd love to drill out gun barrels. What do you use, a pin vice? My experiment with a standard electric drill (holes for pinning) was kind of pain. Link to comment Share on other sites More sharing options...
Grand Master Neo Posted February 16, 2011 Share Posted February 16, 2011 pin vice with a 1mm drill bit does the job perfectly Link to comment Share on other sites More sharing options...
EPK Posted February 16, 2011 Author Share Posted February 16, 2011 pin vice with a 1mm drill bit does the job perfectly Thanks. I guess the GW one is perfect than. Not a bad price either if I just go to the store (considering I see cheaper ones online but I would have to pay shipping). Suppose I can go back and drill out my other models as well and touch them up as needed. The website notes it is good for pinning metal models, is the metal much harder to drill into? I have some older metal terminators (and various other models) that could use some drilling as well. Is it easy enough to drill by simply holding the model, or do you really need a vise as well? Link to comment Share on other sites More sharing options...
Grand Master Neo Posted February 17, 2011 Share Posted February 17, 2011 i picked one up just after the FAQ release and have drilled out lysander and calgar for conversions. did it all by hand sitting in front of the tv so no vice needed really it's really simple to use due to it's design. all parts spin in your hand which makes it easier Link to comment Share on other sites More sharing options...
EPK Posted February 17, 2011 Author Share Posted February 17, 2011 Sweet, thanks for the input Neo. Suppose I can wait to prime these guys until after they are drilled. In the meantime I can get my Deathwing Command squad going. Link to comment Share on other sites More sharing options...
krewl Posted February 17, 2011 Share Posted February 17, 2011 Yup just use the GW drill I have it aswell. Yeah it takes a bit more time then an electric drill, but it has 2 benefits in that, namely that your drill does not have the bigger size and wegth so it's a lot easier to use and manouvre. And also it's non powered so you have more nuance in using it where a powered drill can be to harsh.. Link to comment Share on other sites More sharing options...
EPK Posted February 17, 2011 Author Share Posted February 17, 2011 Came across this awesome thread over on warseer while trying too look for interesting ways to detail the sarge and perhaps meltagunner's right pad rather than just the standard Consecrators icon. I'm liking the green pad with checkered stripe. I think I will go with that come painting time. The Sarge also has a cloth hanging from that shoulder which I will than paint the Consecrators icon as previously planned. That thread, along with some older DA artwork I found with a google search has convinced me to also go with a similar scheme for bolters (minus the NMM painting technique though) as opposed to the standard red casing. I'll be doing the red stripe down the helmets though, the Sarge getting a red and yellow stripe. Found this nice reference as well, but I don't think I'll be painting any of the other stripe variations. I know, I know, I talk a lot... need to do more modeling/painting and less talking. Link to comment Share on other sites More sharing options...
EPK Posted March 10, 2011 Author Share Posted March 10, 2011 Sorry, no pics at the moment. But I did finally get a GW hobby drill and drilled out all the barrels. For the melta, I drilled a hole than decided it needed to be slightly bigger so I sort of rotated the whole drill bit on an angle around the hole to make it wider. I do have a slightly larger bit which I was going to use on the melta from the start, but realized that the GW drill only seems to take that one size - bummer, or am I mistaken? Buuut, what do you use for missile launchers holes? Also, some sad news is that I primed them and must have been a tad too close at times or didn't shake the can long enough, but in some isolated areas the primer seemed slightly too thick. I scraped some of it off, used a tooth brush to "sand" some other spots and I think I'm just going to roll with it as much as it drives me crazy. Has anyone run across this before and just went with rather than bother to strip the primer? It's probably not really all that bad, but I'm pretty anal. I'm at work now and I'm just trying to get it out of my head. Basicaly I just want someone to tell me it will be alright, lol. Link to comment Share on other sites More sharing options...
Grand Master Neo Posted March 10, 2011 Share Posted March 10, 2011 drill: you can remove the nose from the drill and turn around the clamp inside to add a larger drill bit paint too thick: if you do find that the paint is too thick then a little dettol anti-septic cleaner (the brown stuff) strips paint amazing well. (on the other side i thin all of my paints with the clear stuff. i was talking to a guy in uni who was ding a chemistry degree and swears blind it has the perfect chemical makeup to thin the paints but make them stick just as well as if you didn't) Link to comment Share on other sites More sharing options...
EPK Posted March 10, 2011 Author Share Posted March 10, 2011 Thanks Neo - good to know about the drill. As for the primer, I'm in the U.S. so I don't think I can get that locally. Simple Green seems to be the recommended remover if I decide to go that route. Link to comment Share on other sites More sharing options...
Brother Kovash Posted March 10, 2011 Share Posted March 10, 2011 I know a few people who used Castrol super clean to remove primer from figures. I haven't tried it yet myself, but they swear by it. Since I don't really have anything I need to clean up yet I can't say when I'll get around to trying a few myself to make it the super clean doesn't destroy the plastic, but maybe it will work for you? Link to comment Share on other sites More sharing options...
EPK Posted March 11, 2011 Author Share Posted March 11, 2011 Some product Dove makes is another one I see recommended, but honestly, I did a little bit more brushing and took a light sand paper stick to the problem areas and I think I've got them looking okay. Suppose the best way to find out is to give one a black basecoat and see how it sits. Link to comment Share on other sites More sharing options...
EPK Posted March 11, 2011 Author Share Posted March 11, 2011 Heh, a thought just occurred to me while on the way to work... what if I were to spin the Consecrators as the Pre-Heresy Word Bearers of the Dark Angels. That is they would have heavily engraved armor and numerous prayer sheets and such - of course they would be preaching the word of the Lion. Each marine would have the zeal of a Chaplain... Considering how little is said about them, this could be a nice bit of flavor. Since these are already built, I can probably just apply a few more purity seals, sheets, etc. here and there and paint on the "engravings". It seems to fit the "consecrator" feel - no? Link to comment Share on other sites More sharing options...
Brother Kovash Posted March 11, 2011 Share Posted March 11, 2011 That angle could definitely work. Seeing how there is so little info about them available, you could create some fiction for yourself to use. Link to comment Share on other sites More sharing options...
EPK Posted March 12, 2011 Author Share Posted March 12, 2011 Okay, following through with the Word-Bearer-eque attributes for the Consecrators, I sculpted some extra purity seals up and added a couple oath papers. Not a great picture, and obviously the black primer doesn't photograph so well, but you can see the new additions: EDIT: Apparently the Guardians of the Covenant (I did not recall there write up in the dex, just reread it) would already be this word-bearer type style chapter of the Unforgiven. But I still feel the Contractors would dress up the relics of the Legion with purity seals and such, so I think those are fine. At the very least they will break up the black armor paint scheme well. Maybe I just will not play up the inscriptions as much. I guess they could share some common ground with the Guardians. Link to comment Share on other sites More sharing options...
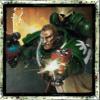
EPK Posted March 14, 2011 Author Share Posted March 14, 2011 Here is a WIP of how the painting is going. To highlight the armor I decided to go with the blue tone method. Wanting to be very subtle, I started with a mix of Black/Fenris Grey for the first pass than a thinner line of straight Fenris Grey on the more extreme highlights. The more I look at it though, I realize I need maybe one more very thin extreme highlight of grey - I believe my other grey is Astronomican Grey, which would work with the cool tones of the Fenris I suppose. I can barely see the highlights at all in the photos (and I suppose the lightning isn't helping). I also noticed after the fact that the Consecrators have like a yellow shade of eye lens so I'll probably be going back to them. What do you guys think? I know they aren't much too look at yet - the black is just so black. I think I need to get a better picture taking method for them. I can't really make out any of the highlights... the reds have mechrite, blood and blazing orange which I can't really see now (sans the helmet stripe, that's only mechrite at the moment). I think I might just skip the black/fenris layer for the rest and simply go with two thin highlights, Fenris then Astronomican. Link to comment Share on other sites More sharing options...
Brother Kovash Posted March 14, 2011 Share Posted March 14, 2011 The model looks pretty good. For the highlights on the armor, maybe you need a "brighter" gray tone, like fortress gray? That might make it stand out a little bit more. Of course, it could be the lighting. Link to comment Share on other sites More sharing options...
EPK Posted March 15, 2011 Author Share Posted March 15, 2011 Yea, the highlights definitely needed to be bumped up and the lightning wasn't helping I've retouched the main highlights all with straight fenris grey and the more extreme highlight with codex grey, I'm pleased with the result. The photos are still iffy (taken from a camera phone) but I did try my best to make sure the light was hitting the side of the mini I was taking the photo of. Link to comment Share on other sites More sharing options...
EPK Posted March 24, 2011 Author Share Posted March 24, 2011 Have these three basically finished, except for the chapter icon which I think I might wait until the end and do them all around the same time. Maybe get some practice first if I go the freehand route. Link to comment Share on other sites More sharing options...
Tanhausen Posted March 24, 2011 Share Posted March 24, 2011 Looks good, keep it up! ... ... ... B) Now seriously, I like the red stripe a lot, you've got it just right. The highlights seem a bit...dark? You don't see the that much, but that might be because of the phone cam. And I don't quite like the rim of the bases, the brown looks too flat... maybe a simple glazing with a lighter colour? Link to comment Share on other sites More sharing options...

Recommended Posts
Archived
This topic is now archived and is closed to further replies.