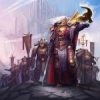
Kizzdougs Posted April 28, 2016 Author Share Posted April 28, 2016 Alpha Legion step by step I've been a fan of the metallic Alpha Legion colour scheme for a while but without an airbrush it's never really seemed achievable, especially not in a large quantity. I'd previously tried my hand at painting the metallic scheme by hand using the Tamiya Clear range that was used by the FW team to airbrush their Alpha Legion, but it was a pretty challenging and frustrating process. So while I was fairly happy with the finally result, it wasn't something that I was willing to try again anytime soon. http://i1122.photobucket.com/albums/l522/kizzdougs/DSCN3210_zpsdzgapb1l.jpg Because I painted the Alpha legionnaire well before I started working on the other Legions for my mini 'March of the Legions', he felt more and more out of place the further I went. For example unlike the other marines he is unweathered, and the 25mm base is a clear sign of his vintage. When I came across the Tamiya metallic spray range my prayers were answered :P The metallic spray will never give you the same effect as a proper airbrush job, but it's good enough if you're not too fussy. I started off by under coatign the mini with Tamiya Light Metallic Blue spray. http://i1122.photobucket.com/albums/l522/kizzdougs/DSCN4347_zpsytam25qc.jpg Next up I gave the armour a coat of thinned down Tamiya Clear Green, applied by brush. It doesn't really show up very well in the photos, but the green hue is much more noticeable in person. http://i1122.photobucket.com/albums/l522/kizzdougs/DSCN4348_zps1wxrwh7f.jpg I then 'black lined' the armour with some watered down Abaddon Black and the armour was finished. Definitely the quickest and easiest of my schemes so far. I also painted all of the non armour areas with Abaddon Black. http://i1122.photobucket.com/albums/l522/kizzdougs/DSCN4349_zpsowftrbo5.jpg Next up I painted all of the Leadbelcher areas. http://i1122.photobucket.com/albums/l522/kizzdougs/DSCN4350_zps7cxjvhc0.jpg http://i1122.photobucket.com/albums/l522/kizzdougs/DSCN4351_zpsi18mne0b.jpg I then use Balthazar Gold to pic out some of the details. http://i1122.photobucket.com/albums/l522/kizzdougs/DSCN4352_zpsycdjq6hh.jpg http://i1122.photobucket.com/albums/l522/kizzdougs/DSCN4353_zpsmnrbmcpc.jpg The Leadbelcher was washed with Nuln Oil and the Balthazar Gold with Agrax Earthshade. http://i1122.photobucket.com/albums/l522/kizzdougs/DSCN4354_zpsbi7gfc2y.jpg http://i1122.photobucket.com/albums/l522/kizzdougs/DSCN4355_zps76gv1bsf.jpg See the next post for Pt. 2 Cant wait for the first legion Not sure when I'll get around to the I and X Legions. Probably after the ETL :) Kurgan the Lurker, Dosjetka, Ramell and 6 others 9 Back to top Link to comment https://bolterandchainsword.com/topic/236305-the-sekhmethh-emperors-children-heresy-eldar-26425/page/73/#findComment-4378403 Share on other sites More sharing options...
Iron Hands Fanatic Posted April 28, 2016 Share Posted April 28, 2016 Not sure when I'll get around to the I and X Legions. Probably after the ETL *twitch* Legio Draconis 1 Back to top Link to comment https://bolterandchainsword.com/topic/236305-the-sekhmethh-emperors-children-heresy-eldar-26425/page/73/#findComment-4378408 Share on other sites More sharing options...
Kizzdougs Posted April 28, 2016 Author Share Posted April 28, 2016 Alpha Legion Pt. 2 The 'white' strips are a 1/1 mix of White Scar and Celestra Grey. http://i1122.photobucket.com/albums/l522/kizzdougs/DSCN4356_zpsved32lzq.jpg The eyes were painted in the same way as the other legionnaires: Blood Red, Slayer Orange, Golden Yellow, Tamiya Clear Red. http://i1122.photobucket.com/albums/l522/kizzdougs/DSCN4357_zpshvmgum2y.jpg The Leadbelcher and Balthazar Gold were highlighted with Runefang Steel. http://i1122.photobucket.com/albums/l522/kizzdougs/DSCN4358_zpsfnqact5y.jpg http://i1122.photobucket.com/albums/l522/kizzdougs/DSCN4359_zpsrcdzzdzf.jpg The black leather holster was highlighted with a 1/1 mix of Mechanicus Standard Grey and Abaddon Black. The green stripes on the helmet and knee pad are Snot Green. http://i1122.photobucket.com/albums/l522/kizzdougs/DSCN4361_zpswav901od.jpg The mini was finished off using the same basing and weathering techniques that I've been using on the other legionnaires. http://i1122.photobucket.com/albums/l522/kizzdougs/DSCN4365_zpshkdbkag5.jpg Thanks for looking ;) Ramell, Augustus b'Raass, Hellath and 7 others 10 Back to top Link to comment https://bolterandchainsword.com/topic/236305-the-sekhmethh-emperors-children-heresy-eldar-26425/page/73/#findComment-4378409 Share on other sites More sharing options...
Thousand Eyes Posted April 28, 2016 Share Posted April 28, 2016 Great guides, so many more steps than I even used on Horus. Bravo. Quick question is black lining just carefully using a black wash or ink on the armour lines? Link to comment https://bolterandchainsword.com/topic/236305-the-sekhmethh-emperors-children-heresy-eldar-26425/page/73/#findComment-4378439 Share on other sites More sharing options...
Spangle Posted April 28, 2016 Share Posted April 28, 2016 Those eyes, those eyes! Link to comment https://bolterandchainsword.com/topic/236305-the-sekhmethh-emperors-children-heresy-eldar-26425/page/73/#findComment-4378529 Share on other sites More sharing options...
Kizzdougs Posted April 28, 2016 Author Share Posted April 28, 2016 Great guides, so many more steps than I even used on Horus. Bravo. Quick question is black lining just carefully using a black wash or ink on the armour lines? Yeah, pretty much, but I use watered down Abaddon Black instead of an ink or wash because I find that it's easier to control and I can make it as thin or as thick as I like. I use it in the lines of the armour, to seperate the different colours, and to pic out any battle damage that I've cut into the mini :) Those eyes, those eyes! Haha, glad you like them bro :) Fenbain and Thousand Eyes 2 Back to top Link to comment https://bolterandchainsword.com/topic/236305-the-sekhmethh-emperors-children-heresy-eldar-26425/page/73/#findComment-4378965 Share on other sites More sharing options...
SickSix Posted April 29, 2016 Share Posted April 29, 2016 Those eyes indeed! He looks really sharp man. Link to comment https://bolterandchainsword.com/topic/236305-the-sekhmethh-emperors-children-heresy-eldar-26425/page/73/#findComment-4379106 Share on other sites More sharing options...
Augustus b'Raass Posted April 29, 2016 Share Posted April 29, 2016 Nice to see you've used one of the tamiya metallic sprays. Theyve always intrigued me when I used to see them in a hobby store I frequent, but never tried one. Thanks for another great tut. Link to comment https://bolterandchainsword.com/topic/236305-the-sekhmethh-emperors-children-heresy-eldar-26425/page/73/#findComment-4379203 Share on other sites More sharing options...
Kizzdougs Posted May 1, 2016 Author Share Posted May 1, 2016 I've done some more preparation work on the Palatine Breacher unit. The plan is to have ten built and ready to paint by the start of this year's ETL challenge. Definitely not the best balance of points per model/painting time, but that's not really the point of the ETL anyway. http://i1122.photobucket.com/albums/l522/kizzdougs/DSCN4380_zps7brf5jhm.jpg http://i1122.photobucket.com/albums/l522/kizzdougs/DSCN4382_zpsfm9xartv.jpg http://i1122.photobucket.com/albums/l522/kizzdougs/DSCN4383_zpsk5r7qvow.jpg Those eyes indeed! He looks really sharp man. Thanks a lot bro! :) Nice to see you've used one of the tamiya metallic sprays. Theyve always intrigued me when I used to see them in a hobby store I frequent, but never tried one. Thanks for another great tut. Yeah, I wasn't sure how they'd turn out, but I'm pretty happy with the result. It'll never produce a finish of the quality possible with an airbrush, but it's okay for people without an actual airbrush :) Thanks for looking ;) Hellath, GrandMagnus, Bob Hunk and 12 others 15 Back to top Link to comment https://bolterandchainsword.com/topic/236305-the-sekhmethh-emperors-children-heresy-eldar-26425/page/73/#findComment-4381045 Share on other sites More sharing options...
Daemon2027 Posted May 1, 2016 Share Posted May 1, 2016 I like the standard sword and shield guy, great movement. The power dust guy feels a bit static compared to him although I not sure what you can do about that. Link to comment https://bolterandchainsword.com/topic/236305-the-sekhmethh-emperors-children-heresy-eldar-26425/page/73/#findComment-4381058 Share on other sites More sharing options...
KBA Posted May 1, 2016 Share Posted May 1, 2016 Wonderful tutorials, Kizz! Bookmarked for when I have the guts to paint :) Link to comment https://bolterandchainsword.com/topic/236305-the-sekhmethh-emperors-children-heresy-eldar-26425/page/73/#findComment-4381251 Share on other sites More sharing options...
Burias-Drak'shal Posted May 1, 2016 Share Posted May 1, 2016 Thanks for the guides it was very interesting seeing how you went about getting such great looking models. Link to comment https://bolterandchainsword.com/topic/236305-the-sekhmethh-emperors-children-heresy-eldar-26425/page/73/#findComment-4381376 Share on other sites More sharing options...
GhostMalone Posted May 1, 2016 Share Posted May 1, 2016 Aren't you happy that we suggested this!? They are looking amazing bud like truly one of a kind Link to comment https://bolterandchainsword.com/topic/236305-the-sekhmethh-emperors-children-heresy-eldar-26425/page/73/#findComment-4381592 Share on other sites More sharing options...
Augustus b'Raass Posted May 2, 2016 Share Posted May 2, 2016 That vexila! Wow, such a great idea. Also, that power fist toting guy is looking hella regal. Link to comment https://bolterandchainsword.com/topic/236305-the-sekhmethh-emperors-children-heresy-eldar-26425/page/73/#findComment-4381785 Share on other sites More sharing options...
Pearson73 Posted May 2, 2016 Share Posted May 2, 2016 Loving the breachers, they have the perfect balance of both beautiful nobility and menace . Link to comment https://bolterandchainsword.com/topic/236305-the-sekhmethh-emperors-children-heresy-eldar-26425/page/73/#findComment-4381904 Share on other sites More sharing options...
Lord Commander Eidolon Posted May 2, 2016 Share Posted May 2, 2016 Those 3 guy look awesome, sufficiently detailed and characterful not to be just palatine blades with shields. Good use of the crests and plumes to add something a little different! I really think I need to get some shields...... Will look forward to seeing what you do for the ETL! Link to comment https://bolterandchainsword.com/topic/236305-the-sekhmethh-emperors-children-heresy-eldar-26425/page/73/#findComment-4381953 Share on other sites More sharing options...
Fire Golem Posted May 2, 2016 Share Posted May 2, 2016 Those breachers are freakin sharp. They look amazing. Link to comment https://bolterandchainsword.com/topic/236305-the-sekhmethh-emperors-children-heresy-eldar-26425/page/73/#findComment-4382101 Share on other sites More sharing options...
Kizzdougs Posted May 6, 2016 Author Share Posted May 6, 2016 (edited) The shields are finished and ready for painting as soon as the ETL is launched. Edit: Thanks again to EdT for the Romanesque etched brass :tu: http://i1122.photobucket.com/albums/l522/kizzdougs/DSCN4384%201_zpswvbdusnu.jpg I'm still working on a few details such as the crests for the rest of the unit. I like the standard sword and shield guy, great movement. The power dust guy feels a bit static compared to him although I not sure what you can do about that. Thanks bro Yeah, it's pretty difficult to get some of the poses right because the torsos and legs of the Palatine Blade minis are in one piece. I like my III Legion characters to look confident and a little imperious... Wonderful tutorials, Kizz! Bookmarked for when I have the guts to paint Thanks a lot dude! Glad you like the tutes. Thanks for the guides it was very interesting seeing how you went about getting such great looking models. No worries, bro. I'm always happy to share. Aren't you happy that we suggested this!?They are looking amazing bud like truly one of a kind Hahaha, yeah they're coming along nicely, but they're definitely a lot more labour intensive than any other III Legion unit that I've worked on so far. The paint job will be even more involved That vexila! Wow, such a great idea.Also, that power fist toting guy is looking hella regal. Thanks a lot bro! Glad you like the Sergeant and vexila. Loving the breachers, they have the perfect balance of both beautiful nobility and menace . I'm glad to hear you say that! Sometimes it's difficult to get the balance right with the Emperor's Children. Those 3 guy look awesome, sufficiently detailed and characterful not to be just palatine blades with shields. Good use of the crests and plumes to add something a little different! I really think I need to get some shields...... Will look forward to seeing what you do for the ETL! Thanks a lot bro! I'm planing to paint the breachers and maybe some Phoenix Guard for the ETL. Those breachers are freakin sharp. They look amazing. Thanks a lot bro! Thanks for looking Edited May 6, 2016 by kizzdougs Augustus b'Raass, Thousand Eyes, Fire Golem and 7 others 10 Back to top Link to comment https://bolterandchainsword.com/topic/236305-the-sekhmethh-emperors-children-heresy-eldar-26425/page/73/#findComment-4386836 Share on other sites More sharing options...
GrandMagnus Posted May 6, 2016 Share Posted May 6, 2016 Looking forward to seeing your work during the ETL. Good luck with it! Kizzdougs 1 Back to top Link to comment https://bolterandchainsword.com/topic/236305-the-sekhmethh-emperors-children-heresy-eldar-26425/page/73/#findComment-4386901 Share on other sites More sharing options...
Dantioch Posted May 6, 2016 Share Posted May 6, 2016 Been an absolute pleasure spending some time to catch up kizz, those breachers are going to be incredible man! Link to comment https://bolterandchainsword.com/topic/236305-the-sekhmethh-emperors-children-heresy-eldar-26425/page/73/#findComment-4387104 Share on other sites More sharing options...
Wendigo Posted May 6, 2016 Share Posted May 6, 2016 I love the way the shields' brass etch details in the pic with the three Breachers are a pretty close match to the Forge World armor detailing -- I'm looking at the plastron on the left and the shield in the middle. I also really like the Alpha Legionnaire done with Light Blue Metallic spray washed with Clear Green. And the weathering really ties that whole model together. Keep up the good work! Wendigo Link to comment https://bolterandchainsword.com/topic/236305-the-sekhmethh-emperors-children-heresy-eldar-26425/page/73/#findComment-4387194 Share on other sites More sharing options...
ChaptermasterDemon7 Posted May 7, 2016 Share Posted May 7, 2016 After finally slogging through all 74 pages of this, I never thought I would say this, but I am in love with your EC's. The purple and white are gorgeous and the poses and bases bring them all together. I kinda want to see what you do with the Phoenix Guards and how the rest of your EC breachers come out. All in all, 10/10 army for the EC. I also love what you have done with the models representing each legion. Keep up the good work and.... MOAR EC!! Link to comment https://bolterandchainsword.com/topic/236305-the-sekhmethh-emperors-children-heresy-eldar-26425/page/73/#findComment-4388187 Share on other sites More sharing options...
Varangian Posted May 11, 2016 Share Posted May 11, 2016 Can we get some links to each tutorial? Like this:http://www.bolterandchainsword.com/topic/236305-the-sekhmet-hh-emperors-children-breacher-shields-7516/page-53?do=findComment&comment=4256337 Augustus b'Raass 1 Back to top Link to comment https://bolterandchainsword.com/topic/236305-the-sekhmethh-emperors-children-heresy-eldar-26425/page/73/#findComment-4391553 Share on other sites More sharing options...
jimbo13 Posted May 11, 2016 Share Posted May 11, 2016 Dying to see how you paint these bad boys up. Have you considered a dark metallic for them like the reaper adamantium black kind of color? Link to comment https://bolterandchainsword.com/topic/236305-the-sekhmethh-emperors-children-heresy-eldar-26425/page/73/#findComment-4391576 Share on other sites More sharing options...
Augustus b'Raass Posted May 11, 2016 Share Posted May 11, 2016 Can we get some links to each tutorial? Like this: http://www.bolterandchainsword.com/topic/236305-the-sekhmet-hh-emperors-children-breacher-shields-7516/page-53?do=findComment&comment=4256337 I second this! I can't find your Iron Warriors tut.... Link to comment https://bolterandchainsword.com/topic/236305-the-sekhmethh-emperors-children-heresy-eldar-26425/page/73/#findComment-4391774 Share on other sites More sharing options...
Recommended Posts
Create an account or sign in to comment
You need to be a member in order to leave a comment
Create an account
Sign up for a new account in our community. It's easy!
Register a new accountSign in
Already have an account? Sign in here.
Sign In Now