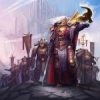
Kizzdougs Posted March 11, 2018 Author Share Posted March 11, 2018 Just thought I'd share this fantastic piece of art from one of my favourite artists on Instagram, @mikhailsavier. If Games Workshop released Emperor's Children minis like this I would lose my mind! I'd drop everything else and start a late Heresy EC force straight away. Thrillhouse, Sandlemad, Fire Golem and 11 others 14 Back to top Link to comment https://bolterandchainsword.com/topic/236305-the-sekhmethh-emperors-children-heresy-eldar-26425/page/111/#findComment-5029894 Share on other sites More sharing options...
KrautScientist Posted March 12, 2018 Share Posted March 12, 2018 Excellent work on the Sons of Horus conversions so far -- judging by your previous projects, this should once again be a treat! :) Seeing how you like - and linked - that EC artwork, do you know the Emperor's Children models converted by David de Abreu/Daouide? Because they are really close in design to those illustrations. hushrong, bloodhound23 and Kizzdougs 3 Back to top Link to comment https://bolterandchainsword.com/topic/236305-the-sekhmethh-emperors-children-heresy-eldar-26425/page/111/#findComment-5029918 Share on other sites More sharing options...
Lord Commander Eidolon Posted March 12, 2018 Share Posted March 12, 2018 I agree with you mate, I might have to give up on my loyalist EC if these bad boys hit. I think it is highly likely we will get new EC plastics, given the art of the DG codex matched in well with the mini's this is a good start!! I'm hoping the release will be akin to the DG range, as opposed to the lacklustre TS codex! Exciting times ahead methinks!! Kizzdougs 1 Back to top Link to comment https://bolterandchainsword.com/topic/236305-the-sekhmethh-emperors-children-heresy-eldar-26425/page/111/#findComment-5029921 Share on other sites More sharing options...
Kizzdougs Posted March 12, 2018 Author Share Posted March 12, 2018 Excellent work on the Sons of Horus conversions so far -- judging by your previous projects, this should once again be a treat! Seeing how you like - and linked - that EC artwork, do you know the Emperor's Children models converted by David de Abreu/Daouide? Because they are really close in design to those illustrations. Thanks a lot bro! I'm pretty excited about this project so hopefully I'll be able to build up some momentum and then keep it going. Yeah, I've seen that awesome Emperor's Children project. It was actually the first thing that came to mind when I saw the artwork. If I had that level of sculpting skill/ability I'd love to do something similar. As it is I'll live in eternal hope that GW will eventually give the Emperor's Children the attention they deserve... I agree with you mate, I might have to give up on my loyalist EC if these bad boys hit. I think it is highly likely we will get new EC plastics, given the art of the DG codex matched in well with the mini's this is a good start!! I'm hoping the release will be akin to the DG range, as opposed to the lacklustre TS codex! Exciting times ahead methinks!! How cool is that picture?! I think it's probably my favourite piece of 40k art at the moment. So awesome. I really hope that we eventually get some nice new models for the Emperor's Children, but it's been so long since we had a Slaanesh release (let a lone a good Slaaensh release) that I don't know what to think. To be honest I'd expect the World Eaters/Khorne Berzerkers to get a new release before we see new EC/Noise Marines. Link to comment https://bolterandchainsword.com/topic/236305-the-sekhmethh-emperors-children-heresy-eldar-26425/page/111/#findComment-5030160 Share on other sites More sharing options...
hushrong Posted March 12, 2018 Share Posted March 12, 2018 It would be awesome to see your take on that armor. Also, I love the sound of your fluff ideas for the Sons. Nothing is more awesome than raiders who turn around and use some local, disposable muscle. I am trying to build my Black Legion around the idea of raiders as well, trying to gather supplies for the Black Crusade and shed as much blood as possible while doing so. In regards to that picture I would lose my mind if we got Noise Marines like that artwork. I'm going to finish building my EC army and then they go on ice while I concentrate on my new main force...but it would be so tempting to keep the EC going if we get new plastic crack that looked that good. Kizzdougs 1 Back to top Link to comment https://bolterandchainsword.com/topic/236305-the-sekhmethh-emperors-children-heresy-eldar-26425/page/111/#findComment-5030224 Share on other sites More sharing options...
Kizzdougs Posted March 13, 2018 Author Share Posted March 13, 2018 (edited) I've just finished some more bits for my Sons of Horus... I took some step by step pictures of the process, so as soon as I get some time to edit the pictures and write up the process I'll post a tutorial for how I've sculpted the extra detail on these bits And all of the bit together plus some WIP pieces I'm just conscious that if I don't stop soon my Sons of Horus will run the risk of looking a bit too blinged up... but it's just so much fun... Let me know what you guys think. It would be awesome to see your take on that armor. Also, I love the sound of your fluff ideas for the Sons. Nothing is more awesome than raiders who turn around and use some local, disposable muscle. I am trying to build my Black Legion around the idea of raiders as well, trying to gather supplies for the Black Crusade and shed as much blood as possible while doing so. In regards to that picture I would lose my mind if we got Noise Marines like that artwork. I'm going to finish building my EC army and then they go on ice while I concentrate on my new main force...but it would be so tempting to keep the EC going if we get new plastic crack that looked that good. Thanks bro, glad you like the fluff idea for the Sons of Horus. I've been going back over all of the Sons of Horus info that I have to hand, and I think it'll fit nicely. I just listened to The Either for the first time and it has got me even more excited to get some work done on the Sons. Yeah, I'd lose my mind too... fingers crossed that we end up getting something similar to the art Ps. I took your advice with the 'gut plate' eye, hope you like how it turned out. Thanks for looking Edited March 13, 2018 by Kizzdougs frankendoodle65, Ramell, Iron Hands Fanatic and 9 others 12 Back to top Link to comment https://bolterandchainsword.com/topic/236305-the-sekhmethh-emperors-children-heresy-eldar-26425/page/111/#findComment-5031025 Share on other sites More sharing options...
Checkmate Posted March 13, 2018 Share Posted March 13, 2018 Looking very good. I don't know how good your scoring ability is but a few pieces might also be enhanced by adding some Cthonian runes, similar to the marks on Abbadons armour. Pearson73 and Kizzdougs 2 Back to top Link to comment https://bolterandchainsword.com/topic/236305-the-sekhmethh-emperors-children-heresy-eldar-26425/page/111/#findComment-5031033 Share on other sites More sharing options...
Brother Heinrich Posted March 13, 2018 Share Posted March 13, 2018 I like Checkmate’s idea, could be cool to see some runes etched in stuff, unless you’re planning on painting them on. Looks ace regardless. Kizzdougs 1 Back to top Link to comment https://bolterandchainsword.com/topic/236305-the-sekhmethh-emperors-children-heresy-eldar-26425/page/111/#findComment-5031098 Share on other sites More sharing options...
Augustus b'Raass Posted March 13, 2018 Share Posted March 13, 2018 They look great, so... I took some step by step pictures of the process, so as soon as I get some time to edit the pictures and write up the process I'll post a tutorial for how I've sculpted the extra detail on these bits Yes please! Kizzdougs 1 Back to top Link to comment https://bolterandchainsword.com/topic/236305-the-sekhmethh-emperors-children-heresy-eldar-26425/page/111/#findComment-5031193 Share on other sites More sharing options...
malcharion Posted March 13, 2018 Share Posted March 13, 2018 I'm really liking what you are doing with those little sculpt ! A tutorial would be great indeed ! (As a mikhailsavier's art fan too I can only pray for such EC model so that I could have the pleasur to see them painted on this thread ;) ) Malchy Kizzdougs 1 Back to top Link to comment https://bolterandchainsword.com/topic/236305-the-sekhmethh-emperors-children-heresy-eldar-26425/page/111/#findComment-5031209 Share on other sites More sharing options...
frankendoodle65 Posted March 13, 2018 Share Posted March 13, 2018 Sons of horus are looking fantastic, I'm really looking forward to seeing them finished! The tutorial will be great too, these sorts of details can be a right pain to sculpt so it'll be interesting to see your approach. Kizzdougs 1 Back to top Link to comment https://bolterandchainsword.com/topic/236305-the-sekhmethh-emperors-children-heresy-eldar-26425/page/111/#findComment-5031223 Share on other sites More sharing options...
Daemon2027 Posted March 14, 2018 Share Posted March 14, 2018 I’ve seen your progress with the SoH detailing on instagram. Really fantastic work. Kizzdougs 1 Back to top Link to comment https://bolterandchainsword.com/topic/236305-the-sekhmethh-emperors-children-heresy-eldar-26425/page/111/#findComment-5031860 Share on other sites More sharing options...
Joe Posted March 14, 2018 Share Posted March 14, 2018 God damn, dude. Now I want to resurrect the Sons of Horus that I started and never really did anything with for ETL IV. But alas, greenstuff skills elude me. Kizzdougs 1 Back to top Link to comment https://bolterandchainsword.com/topic/236305-the-sekhmethh-emperors-children-heresy-eldar-26425/page/111/#findComment-5031966 Share on other sites More sharing options...
Kizzdougs Posted March 15, 2018 Author Share Posted March 15, 2018 Alright, here is the first set of pictures that I took while adding some greenstuff detail to a MkIV torso for my Sons of Horus project. Unfortunately it's a bit more of a challenge to write up and photograph a greenstuff tutorial than it is with painting. This is the finished piece that we're working towards. I've added some thinned down red paint over the top of the greenstuff so that the detail will show up a bit better in the picture. Once it's painted up and weathered it'll look much better than it does in this 'raw' state. Tools: Greenstuff Hobby knife Sculpting tool (I use an old Citadel sculpting tool) Super glue Sandpaper (the finest grain you can get your hands on) Process: So I started off with a plastic MkIV torso front from the Betrayal at Calth kit. I'd suggest leaving the front of the torso seperate from the back for easy of access, but it's not essential. I'd also suggest cleaning off all of the mould-lines etc before you start adding any of the greenstuff. The same process would perfectly possible with a resin MkIV torso from Forgeworld. The plastic kits are great because the torsos come in two pieces which can make it a bit easier to work on and to get the right angles to remove some of the detail on the front. On the other hand I generally prefer to work with resin when it comes to conversions because in my experience it is easier to get a clean and precise cut with resin. Resin is also easier to sand down for a smooth finish (obviously don't breath in the dust ). 2. The next thing that I did was use the hobby knife to cut away all of the detail marked in red (note: the red on the two lower pipes/tubes extends below the bottom edge of the chest plate). The sharper the knife the better (I've always found blunt hobby knives more dangerous than sharp knives). You can hack away at the detail in any way that you like as long as you don't damage the 'base layer' of the armour underneath. Personally I prefer to start with the blade up near the should and then slice down towards the centre of the chest. If you knife is sharp and your hand steady enough you'll be able to remove the individual pipes/tubes relatively intact. I reused these pipes on a MkIV Thousand Sons torso to add some more detail and further disguise its origins (I'm going to use some 1k Sons bits on my SoH, but I don't want their origin to be immediately obvious). Once the front detail has been removed you'll need to smooth it all down a bit. You can use sandpaper for this step or you could drag a sharp hobby knife across the surface to flatten out the area. 3. Once the chest piece has been flattened out and smoothed with some sandpaper it's time to cut out the lower part of the chest plate. I've painted the whole area that I cut away in red for the benefit of this tutorial, but I'd suggest at least marking out the line to cut along with either a pencil or pen. As you can see in the picture I've also cut out the lower pipes so that they're below the level of the chest piece. 4. Next I started working on the trim around the edge of the armour. I rolled out some greenstuff and laid it in roughly the shape that I wanted. Note: when working with greenstuff keep some water close to hand that you can use on your tools and fingers. If you try to work greenstuf with dry fingers and tools it will just stick to your implements and you'll never be able to get the nice, smooth effect that we're after. Make sure that whatever you're using to work the greenstuff is lubricated in some way! 5. Once the greenstuff was in position I used my Citadel sculpting tool to flatten it out (with some water on the tool). At this stage the greenstuff doesn't need to be too neat or exact. What matters is that all of the area that will end up with greenstuff has green stuff and that it's nice and smooth. I've always found it easier to remove/cut away greenstuff then to add it, at least in this process. 6. I then used my hobby knife to cut away the excess greenstuff to create the shape that I wanted (again, the knife was wet with some water to stop it sticking to the greenstuff). I then left the greenstuff to cure for 12 hours. You could keep working on the piece and try to get everything done in one go, but I prefer to allow the greenstuff to cure once I've completed a piece of detail because it is so easy to touch and ruin one piece of uncured greenstuff while working on another piece. To make this process more time efficient I like to work on several different bits at the same time, in a similar way to batch painting miniatures. 7. So once the greenstuff had cured I came back and started working on the next piece of detail. I used the same process as before: add a rough lump of greenstuff, flattening it out with the sculpting tool, and cut out the final shape with the hobby knife. I also added the indents for where I would add the rivets/studs once the greenstuff had cured. Note: I also used greenstuff to smoothed out the pipes below the chest plate to create the illusion that they were properly attached to the armour. 8. Time for the Eye of Horus. The eye was worked on at the same time as the rest of the detail on the torso, but I've decided to show it separately for the sake of brevity. I used the hobby knife to cut out a circular disc of plastic-card to use as a template for the 'eye'. It's a good idea to use a pen to mark out the circle before you cut it out. Remember that too big is better than too small. If you need to cut it down and make it small that's really easy, if you start by making it too small... well you'll need to start again with another piece... 9. I then used some greenstuff to create a semi-sphere on top of the plastic-card template. I used a wet finger to create the shape that I wanted and to smooth it out. This was probably the easiest greenstuff work on the whole piece. 10. Once the 'eye' had cured I used the hobby knife to seperate it from the plastic-card template. I then rolled out some greenstuff into a thin string and wrapped it around the 'eye' to create a border. I also added the rivets at this stage (just really small pieces of rolled up greenstuff) using some super-glue. When everything had cured I used the super-glue to attach the 'eye' to the recess in the torso. So that's how I did it. It's pretty difficult to properly explain it all via text and image, but hopefully it's of some use to someone out there :) Looking very good. I don't know how good your scoring ability is but a few pieces might also be enhanced by adding some Cthonian runes, similar to the marks on Abbadons armour. Thanks bro! Yeah, I had a quick try at some carved Cthonian runes, but it's pretty difficult to get them to look good. Resin is definitely easier to work with than plastic. I'll probably give it another go, but I might end up relying on decals and free hand. I'll have to see how they look. I like Checkmate’s idea, could be cool to see some runes etched in stuff, unless you’re planning on painting them on. Looks ace regardless. Yeah, it might be possible on the resin bits, but it's a bit more difficult to get clean cuts on the plastic pieces. They look great, so... I took some step by step pictures of the process, so as soon as I get some time to edit the pictures and write up the process I'll post a tutorial for how I've sculpted the extra detail on these bits Yes please! Thanks a lot bro! I'm really liking what you are doing with those little sculpt ! A tutorial would be great indeed ! (As a mikhailsavier's art fan too I can only pray for such EC model so that I could have the pleasur to see them painted on this thread ) Malchy Thanks bro! Hahaha, it would make he very happy if GW/Fw released some Emperor's Children like mikhailsavier's art. Sons of horus are looking fantastic, I'm really looking forward to seeing them finished! The tutorial will be great too, these sorts of details can be a right pain to sculpt so it'll be interesting to see your approach. Thanks a lot bro! Glad you like how they're looking. I’ve seen your progress with the SoH detailing on instagram. Really fantastic work. Thanks for the support bro! God damn, dude. Now I want to resurrect the Sons of Horus that I started and never really did anything with for ETL IV. But alas, greenstuff skills elude me. Glad you like them! One of the reasons that I chose the Sons of Horus was that I'd be able to add plenty of detail to them and make them look a bit different to a 'regular' Legion force. Thanks for looking ;) hushrong, Subtle Discord, Grim Dog Studios and 11 others 14 Back to top Link to comment https://bolterandchainsword.com/topic/236305-the-sekhmethh-emperors-children-heresy-eldar-26425/page/111/#findComment-5032354 Share on other sites More sharing options...
Pearson73 Posted March 15, 2018 Share Posted March 15, 2018 Really helpful tutorial, I'll certainly be trying it at some point. Kizzdougs 1 Back to top Link to comment https://bolterandchainsword.com/topic/236305-the-sekhmethh-emperors-children-heresy-eldar-26425/page/111/#findComment-5032390 Share on other sites More sharing options...
hushrong Posted March 15, 2018 Share Posted March 15, 2018 Oh man! You’ve really knocked it out of the park! And I must say seeing the eye-gut armor go from 2D to 3D is awesome and I’m happy to have a tutorial for it. Just some trophies and mirror coins and then we will start seeing these marines put together? Link to comment https://bolterandchainsword.com/topic/236305-the-sekhmethh-emperors-children-heresy-eldar-26425/page/111/#findComment-5032510 Share on other sites More sharing options...
Augustus b'Raass Posted March 15, 2018 Share Posted March 15, 2018 Great tut for sure!Alternatively, you could put in Glass Microbeads instead of little ball sof GreenStuff for the rivets :) Link to comment https://bolterandchainsword.com/topic/236305-the-sekhmethh-emperors-children-heresy-eldar-26425/page/111/#findComment-5032529 Share on other sites More sharing options...
Kizzdougs Posted March 16, 2018 Author Share Posted March 16, 2018 Thanks for the feedback, everyone :tu: Really helpful tutorial, I'll certainly be trying it at some point. Glad to hear that bro! :) Oh man! You’ve really knocked it out of the park! And I must say seeing the eye-gut armor go from 2D to 3D is awesome and I’m happy to have a tutorial for it. Just some trophies and mirror coins and then we will start seeing these marines put together? Thanks a lot bro! Glad to hear you liked it. I've already got the trophies and mirror coins ready, I'm just waiting for some chains to arrive in the post so that I can attach them to the armour. I probably won't start painting for a while, but I'll probably start assembling some of the minis. My Troops choices are going to be Assault Marines so I need get my hands on some jump-packs before they can be fully assembled. Great tut for sure!Alternatively, you could put in Glass Microbeads instead of little ball sof GreenStuff for the rivets Thanks a lot bro! Yeah, micro-beads are an option, but super bad for the environment... so I wont be using any. Thanks for looking ;) Link to comment https://bolterandchainsword.com/topic/236305-the-sekhmethh-emperors-children-heresy-eldar-26425/page/111/#findComment-5033418 Share on other sites More sharing options...
hushrong Posted March 16, 2018 Share Posted March 16, 2018 Looking forward to seeing these bits made into marines! Really interested in seeing how you do the mirror coins as I would like a few for some of my marines. Also, will you be making any casts of these? Kizzdougs 1 Back to top Link to comment https://bolterandchainsword.com/topic/236305-the-sekhmethh-emperors-children-heresy-eldar-26425/page/111/#findComment-5033528 Share on other sites More sharing options...
Kizzdougs Posted March 18, 2018 Author Share Posted March 18, 2018 A couple of people asked me when I was going to start assembling some of the bits that I've been working on. Unfortunately I'm still waiting for a lot of new bits to arrive in the post and I also don't have access to my bits box at the moment so I probably won't start assembling the Sons of Horus for at least a couple of weeks, so I've used some blu-tack to stick together some bits just to give you an idea of how they might look once they're properly assembled. Some more torsos and power-fist that I've been working on. Some detail that I've added to some legs. All of the helmets together. I hope you like them :) Looking forward to seeing these bits made into marines! Really interested in seeing how you do the mirror coins as I would like a few for some of my marines. Also, will you be making any casts of these? Thanks bro, I'm still waiting for a few bits to arrive in the post before I start fully assembling the minis. For the mirror coins I'm planing to keep it pretty simple. I'm going to use some plastic rod and just slice off the 'coins' with a sharp hobby knife before attaching them to the minis with some chains. I don't really have the skills or equipment to make good casts of my work, so I'm not planning to make any at this stage :) Thanks for looking ;) hushrong, Ramell, Grim Dog Studios and 10 others 13 Back to top Link to comment https://bolterandchainsword.com/topic/236305-the-sekhmethh-emperors-children-heresy-eldar-26425/page/111/#findComment-5034514 Share on other sites More sharing options...
hushrong Posted March 18, 2018 Share Posted March 18, 2018 By the Talon of Horus!!! The blu-tacked marine looks awesome already. Everything about him just fits! Thanks for that teaser before you get everything to assemble your army. Something about that helm with its smooth lines just looks great against the more brutish look of the armor mash up. I need to learn how to really sculpt so I can copy your work for the Sons of Horus! Kizzdougs 1 Back to top Link to comment https://bolterandchainsword.com/topic/236305-the-sekhmethh-emperors-children-heresy-eldar-26425/page/111/#findComment-5034611 Share on other sites More sharing options...
Chickenleg Posted March 18, 2018 Share Posted March 18, 2018 Looking good! Love the Anvilus Pattern backpack for the SOH. Kizzdougs 1 Back to top Link to comment https://bolterandchainsword.com/topic/236305-the-sekhmethh-emperors-children-heresy-eldar-26425/page/111/#findComment-5034619 Share on other sites More sharing options...
KrautScientist Posted March 18, 2018 Share Posted March 18, 2018 This just keeps getting better and better! Fantastic work! And a really cool tutorial to boot -- cheers, for that! :) Kizzdougs 1 Back to top Link to comment https://bolterandchainsword.com/topic/236305-the-sekhmethh-emperors-children-heresy-eldar-26425/page/111/#findComment-5034630 Share on other sites More sharing options...
Charlo Posted March 19, 2018 Share Posted March 19, 2018 Another frater who I have followed on IG via random means but now found on BnC. You're going all out on these guys and I love it. Kizzdougs 1 Back to top Link to comment https://bolterandchainsword.com/topic/236305-the-sekhmethh-emperors-children-heresy-eldar-26425/page/111/#findComment-5035276 Share on other sites More sharing options...
Biohazard Posted March 19, 2018 Share Posted March 19, 2018 Your Sons are looking very impressive and knowing the quality of your Emperors Children this is definitely one to watch. Great work and thanks for the little how to with the Green stuff details. :tu: Kizzdougs 1 Back to top Link to comment https://bolterandchainsword.com/topic/236305-the-sekhmethh-emperors-children-heresy-eldar-26425/page/111/#findComment-5035393 Share on other sites More sharing options...
Recommended Posts
Create an account or sign in to comment
You need to be a member in order to leave a comment
Create an account
Sign up for a new account in our community. It's easy!
Register a new accountSign in
Already have an account? Sign in here.
Sign In Now