NightHunters Posted May 8, 2015 Share Posted May 8, 2015 I am excited. Show me more! Link to comment https://bolterandchainsword.com/topic/248163-mordent-hexs-workshopcurrently-fw-knight-wip-pg11-12/page/10/#findComment-4035481 Share on other sites More sharing options...
MordentHex Posted May 9, 2015 Author Share Posted May 9, 2015 Reworking the leg Pistons and such right now :) I'll post something when its worth the photo, maybe tonight if i get a good session of work in and my idea doesn't belly flops on me. Link to comment https://bolterandchainsword.com/topic/248163-mordent-hexs-workshopcurrently-fw-knight-wip-pg11-12/page/10/#findComment-4035883 Share on other sites More sharing options...
MordentHex Posted May 10, 2015 Author Share Posted May 10, 2015 Update! SHE STANDS on her own! Well maybe its actually a he, but who cares when your a titan? First up is the piston connectors to the foot. you may notice that there are similar circular markings in the four corners of the foot, this is because i was originally going to place them there but it utterly failed and i had to cut them off and redo the whole damned thing from the beginning. So this is as it stands now. Pistons! Hydraulics! shock absorbers! what ever you fancy calling them and their function! I worked on these for the better part of yesterday. With a few bumps and dings experienced as said above. Leg with a hydraulic thingy on each side! Actually these boxes were originally scrapped but i had to add them back to hide the massive screw up that I managed to achieve yesterday. They are now Hydraulic controls for the legs. Also yes that hole i drilled is off center. nothing i can do about it which does piss me off to no end... She is coming back to life! Last picture for today. The right leg has been glued together. I added the pistons on to the leg nice and carefully dry fitting them and all that and then found that the Armor would not fit onto the leg. So i had to remove two of the Pistons and slide the armor sleeve onto the leg, pin it, and then add the two pistons on the leg again under the armor. I'm not going to lie, I was very annoyed. The leg was entirely glued into place after that and then i took out the temporary pins i had put in and drilled and placed larger pins in one at a time both in the front and the back. The hydraulic control boxes came in very hand for mounting so i lucked out it seems. I like these larger Pistons much more than the smaller 2 I had before with the added bonus of being able to get inside the model a little bit easier when it comes time to paint and detail it. The knee joins are being replaced to look better and thats on my list of things to do tomorrow. I have a mold of the CCW elbow ready for use tomorrw to fill in those holes. Then its time to do the left leg the same way. C&C welcome Link to comment https://bolterandchainsword.com/topic/248163-mordent-hexs-workshopcurrently-fw-knight-wip-pg11-12/page/10/#findComment-4037241 Share on other sites More sharing options...
GhostMalone Posted May 10, 2015 Share Posted May 10, 2015 Better paint this bad boy up for etl Link to comment https://bolterandchainsword.com/topic/248163-mordent-hexs-workshopcurrently-fw-knight-wip-pg11-12/page/10/#findComment-4037508 Share on other sites More sharing options...
MordentHex Posted May 11, 2015 Author Share Posted May 11, 2015 scratch built models don't count :) Link to comment https://bolterandchainsword.com/topic/248163-mordent-hexs-workshopcurrently-fw-knight-wip-pg11-12/page/10/#findComment-4038011 Share on other sites More sharing options...
MordentHex Posted May 12, 2015 Author Share Posted May 12, 2015 added the pistons and armor to the right leg. still have not finished the outer knee detailing, will be casting and installing them today. Also i hope to make the Hip pistons and at least get a dry fitting of them on as well sometime today. A friendly neighborhood Horus without a head or arms for scale comparison purpose. As always C&C welcome Radiation 1 Back to top Link to comment https://bolterandchainsword.com/topic/248163-mordent-hexs-workshopcurrently-fw-knight-wip-pg11-12/page/10/#findComment-4039176 Share on other sites More sharing options...
GhostMalone Posted May 12, 2015 Share Posted May 12, 2015 Hell yes you know I love it! Build me one ☺ Link to comment https://bolterandchainsword.com/topic/248163-mordent-hexs-workshopcurrently-fw-knight-wip-pg11-12/page/10/#findComment-4039238 Share on other sites More sharing options...
MordentHex Posted May 12, 2015 Author Share Posted May 12, 2015 Hell yes you know I love it! Build me one ☺ Pay me ;) Link to comment https://bolterandchainsword.com/topic/248163-mordent-hexs-workshopcurrently-fw-knight-wip-pg11-12/page/10/#findComment-4039780 Share on other sites More sharing options...
MordentHex Posted June 11, 2015 Author Share Posted June 11, 2015 Well, ive been busy sense i last posted, I have worked on my Horus Vow a bit, i added a dead broodlord to the base to keep him in theme of my alternative Heresy universe. Sorry, No picture, he was sitting in my bedroom when i started snapping titan selfies. What i have done: Reaver titan Head MKII WIP (MKII because i smashed the hell out of the first one because it was to big.) I know some people like to measure and make their scratch built models to exacting measurements mm by mm. I don't. I dont have the tool to really do that sort of precision. WHat i have is a dremal! WITH A REAL GOOD GRINDER! and i use it with utter ruthlessness! i digress. Here is what i did over the past few days. Front view as it stands now. THe structure is finished, just adding the little details and filling in gaps. Right side: Left Side: still mostly details and extra's missing. Back of the head: Escape hatch! Bottom: with very field rigged and unorthodox extra armor because you can't sit on your helmet on a titan bridge. a snap shot of me holding the head onto the body(perspective makes it look to big, its not) Side view.. i may need to shorten the "neck" a bit OR add a neck protector plate. It just looks awkward. C&C welcome toll next time Cheers! Link to comment https://bolterandchainsword.com/topic/248163-mordent-hexs-workshopcurrently-fw-knight-wip-pg11-12/page/10/#findComment-4082969 Share on other sites More sharing options...
HardCoil Posted June 11, 2015 Share Posted June 11, 2015 Great work. Are you heat-shaping all the rounded armour plates with theat heat gun you showed earlier? It looks really really good! Link to comment https://bolterandchainsword.com/topic/248163-mordent-hexs-workshopcurrently-fw-knight-wip-pg11-12/page/10/#findComment-4083257 Share on other sites More sharing options...
MordentHex Posted June 12, 2015 Author Share Posted June 12, 2015 (edited) Great work. Are you heat-shaping all the rounded armour plates with theat heat gun you showed earlier? It looks really really good! yes my good sir I am when needed. If the plastic card is thin enough I only heat it. Otherwise it warps or melts. this is a lesson i learned the hard way. Edited June 12, 2015 by MordentHex Link to comment https://bolterandchainsword.com/topic/248163-mordent-hexs-workshopcurrently-fw-knight-wip-pg11-12/page/10/#findComment-4083586 Share on other sites More sharing options...
MordentHex Posted June 12, 2015 Author Share Posted June 12, 2015 (edited) I just realized you can change quotes! LOL!!! Hell yes you know I love it!Build me one ☺ Original Hell yes you know I love you!Marry me ☺ Edited LOL!!! Edited June 12, 2015 by MordentHex Link to comment https://bolterandchainsword.com/topic/248163-mordent-hexs-workshopcurrently-fw-knight-wip-pg11-12/page/10/#findComment-4083588 Share on other sites More sharing options...
MordentHex Posted June 24, 2015 Author Share Posted June 24, 2015 The head is finished. I need to add a few more little details like purity seals and green stuff the gaps. It actually turned out looking much like a MK7 space marine helmet which was not intentional. I will permanently attach it after i paint it. I will need to heat and cut down the cabling to make it fit properly. all that is left to do is to add pistons to the hip, mount/attach the shoulder plates, and finish the chainfist. This guy is 90-95% finished. After that, I got to paint it. LOL C&C welcome as always. Cheers. Kobrakei 1 Back to top Link to comment https://bolterandchainsword.com/topic/248163-mordent-hexs-workshopcurrently-fw-knight-wip-pg11-12/page/10/#findComment-4100708 Share on other sites More sharing options...
MordentHex Posted July 2, 2015 Author Share Posted July 2, 2015 Another update. All the pieces are finally starting to fall into place and my four year project is starting to come to an end(building it at least.) I originally started this topic a long long time ago with me jumping off the deep end and building a scratch built Reaver Titan. Well I'm almost done. First up is my converted Reaver Chainfist, No its NOT a giant chainsaw, Its a giant Chainsaw attached to a powerfist! Not in the image is that I managed to goof up one the finger sockets as I guessed i would. I managed to damage the socket a little and had to completely drill out the ball joint on one of the fingers and replace it with a plastic rod. I will have to putty over the ball joint later to make it look like the rest of the fingers. a little putty work to clean up the rough spots along with the dmaage i did and it will be ready to be primed. Next up! I LIED! I totally attached the head to the body! I had to to make sure the cables where long enough and in the correct positions, but deep down in my black heart, I just wanted too. Its a flimsy excuse at best. Lets zoom out a bit! Left is his good side! AND a selfie while we are at it! I mounted the Shoulder pads. this thing is going to get at least 1 can of spray paint on him so I don't think it will impede my painting of the model at all. Last but not least I managed to put most of it all together for this erm..LARGE picture. Somewhere my math failed me I think and im not surprised in the least bit. I'll measure it later when its structurally sound and wont fall if i look at it wrong. I still got some more odds and ends to work on but yeah, its taking shape. Fornow im tired and dirty, shower and bedtime for me... C&C welcome as always. Noserenda, Bernard The slayer, MagicMan and 1 other 4 Back to top Link to comment https://bolterandchainsword.com/topic/248163-mordent-hexs-workshopcurrently-fw-knight-wip-pg11-12/page/10/#findComment-4111002 Share on other sites More sharing options...
MagicMan Posted July 2, 2015 Share Posted July 2, 2015 Damn that is awesome! Link to comment https://bolterandchainsword.com/topic/248163-mordent-hexs-workshopcurrently-fw-knight-wip-pg11-12/page/10/#findComment-4111011 Share on other sites More sharing options...
Brother Sgt. Steine Posted July 2, 2015 Share Posted July 2, 2015 Whoa! Good stuff man. This is workshop madness for sure. Love it. Keep the pics comin' BSS Link to comment https://bolterandchainsword.com/topic/248163-mordent-hexs-workshopcurrently-fw-knight-wip-pg11-12/page/10/#findComment-4111020 Share on other sites More sharing options...
MordentHex Posted July 3, 2015 Author Share Posted July 3, 2015 Damn that is awesome! Thanks :) Whoa! Good stuff man. This is workshop madness for sure. Love it. Keep the pics comin' BSS Thanks to you too! Its felt like madness at times. :) This big guy will be Legio Mortis, a true DeathsHead when i get done with him. I't doesn't look like much at the moment, i'll have to paint on and freehand the other little details in. Lots of skulls, angels and morbidity for sure. Now where is my Meltacannon.... Link to comment https://bolterandchainsword.com/topic/248163-mordent-hexs-workshopcurrently-fw-knight-wip-pg11-12/page/10/#findComment-4111578 Share on other sites More sharing options...
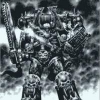
MordentHex Posted July 30, 2015 Author Share Posted July 30, 2015 Update: Horus, Lord of the Sons of Horus/Lunar Wolves I went with Pearl White armor and Gold trim. The Original Horus had two Lightning claws and i stuck with that even though it cost me some to to convert another to fit on him. I liked the green for lighting claws and from inside the suit as it was neutral neither good(blue) nor bad(red) as is the case sometimes with lighting effects. I'm not 100% pleased with the lighting effects on the Lightning claws but I feel it is at least table top quality equal to the rest of my army. Yes I went with Redish blood from the genestealer Broodlord, I changed the consistency and color a tab to reflect its alien blood mixed with human blood(they are hybrid organisms after all.) Does it make any sense what so ever to be bleeding that much from cauterized power weapon wounds? Absolutely not! But it looks cool to me! His armor was dirtied up a bit on the lower legs and the boots, mostly to the front. I dont do a silver highlight on the gold because I thought it would blend to much with the pearl white and to be completely honest I don't like the way it looks or doing it. Most of the boltgun metal is about 2 layers Vallejo Metallic medium over Vallejo primer black. I LOVE this primer, its use is so very versatile. Anyways, model is below. Enjoy. Note: I forgot to drill out the barrels of the "custom" Storm Bolter. OPPS! C&C welcome as always. Now back to my Reaver titan.... Link to comment https://bolterandchainsword.com/topic/248163-mordent-hexs-workshopcurrently-fw-knight-wip-pg11-12/page/10/#findComment-4132250 Share on other sites More sharing options...
MordentHex Posted July 30, 2015 Author Share Posted July 30, 2015 I just measured the height of my Reaver Titan and it comes in at about 42cm tall not including the carapace gun. the scaling of picture below for reference: I'm about right on the money. Sense my Titan is a little larger than normal(not sure how tall the FW Reaver is) It will be a first founding reaver prototype constructed loooong time ago. So it will be something of a cross between a current Warlord titab and a Reaver titan. Fluff monster sated! Link to comment https://bolterandchainsword.com/topic/248163-mordent-hexs-workshopcurrently-fw-knight-wip-pg11-12/page/10/#findComment-4132309 Share on other sites More sharing options...
MordentHex Posted August 6, 2015 Author Share Posted August 6, 2015 (edited) Still plugging away on my Reaver. I did a neck guard because i felt like something was missing between the head and the carapace armor plate. The front chest armor plate will be attached after i paint it and the rest of the chest and will over lap the two side armor plates in the front. I added lots of skulls to it, a Aquila and an eye of Horus just to make him "special" Chainfist in the background getting a bit of primer as well. I'm thinking up a back story on this monster and why on Terra its different. Its also a WIP. Thats all for now. see ya! Edited August 6, 2015 by MordentHex Link to comment https://bolterandchainsword.com/topic/248163-mordent-hexs-workshopcurrently-fw-knight-wip-pg11-12/page/10/#findComment-4139289 Share on other sites More sharing options...
lionofjudah Posted August 6, 2015 Share Posted August 6, 2015 YES!!!!! That's flipping brutally beautiful man.... Love your helm and detailing this far. Looking forward to seeing the other gun arm and that chain fist is rocking!:):) Link to comment https://bolterandchainsword.com/topic/248163-mordent-hexs-workshopcurrently-fw-knight-wip-pg11-12/page/10/#findComment-4139331 Share on other sites More sharing options...
MordentHex Posted August 7, 2015 Author Share Posted August 7, 2015 (edited) YES!!!!! That's flipping brutally beautiful man.... Love your helm and detailing this far. Looking forward to seeing the other gun arm and that chain fist is rocking! Thanks! The other arm is an older style Meltacannon. I think there is a picture or two up of it somewhere back a few pages. I found this on google and it dropped my jaw. guess who's getting a going to be looking similar when i start painting! Edited August 7, 2015 by MordentHex Link to comment https://bolterandchainsword.com/topic/248163-mordent-hexs-workshopcurrently-fw-knight-wip-pg11-12/page/10/#findComment-4139938 Share on other sites More sharing options...
MordentHex Posted August 11, 2015 Author Share Posted August 11, 2015 Update, started painting the past few days and a lot of online flame studying. 6 of the Toes that will slot on the foot. The pictures are not great, sorry, I may add more to the flames to make them pop just a little more. Im going to do another highlight of bright yellow to help it pop. They seem a little too dull for my liking. The skulls and Titan Eagles look metallic but they are not, its a trick of the picture. I started on the Legs as well to a lesser extent. I'm not sure if i should use corroded brass or Steal for the trimming. It wont be parade ground painted but as it has actually been fighting and fighting hard. What do you guys think? NotOneStepBack 1 Back to top Link to comment https://bolterandchainsword.com/topic/248163-mordent-hexs-workshopcurrently-fw-knight-wip-pg11-12/page/10/#findComment-4143523 Share on other sites More sharing options...
MordentHex Posted September 15, 2015 Author Share Posted September 15, 2015 Well there is no rest for the wicked and it seems I've been a very naught man. Time to move again, this time cross country. This means i have to pack up all my stuff and endure the mind numbing terror of it being shipped to a new place and praying that nothing is broken to badly. Its a rather fast and sudden move, me and the wife liked our vacation so much we decided to move there and make it permanent. So everything is on hold until after i get myself situated in my new home. If i manage to get anything up worth a picture before then i'll be sure to post it. Until then wish me luck, i'll try and pop in and lurk all over the B&C as i usually do.... Link to comment https://bolterandchainsword.com/topic/248163-mordent-hexs-workshopcurrently-fw-knight-wip-pg11-12/page/10/#findComment-4172223 Share on other sites More sharing options...
MordentHex Posted December 3, 2015 Author Share Posted December 3, 2015 I've moved but a lot of my stuff got damaged in the move. Also i have not been able to get internet into my house as of yet. To further my own problems my graphics card went out on me this week. So yeah. bad news. Good news is their are a few local guys here that like to play 40k. :D silver lining i guess. So nothing new to put up and i got to piece together my Titan and my Knights from the wreckage that they now resemble. Time to Mechboy up! When i get my stuff up and running again you guys will be the first to know. Till then, im not dead, and the surf is good. ;) Cheers, Hex Link to comment https://bolterandchainsword.com/topic/248163-mordent-hexs-workshopcurrently-fw-knight-wip-pg11-12/page/10/#findComment-4242038 Share on other sites More sharing options...
Recommended Posts
Create an account or sign in to comment
You need to be a member in order to leave a comment
Create an account
Sign up for a new account in our community. It's easy!
Register a new accountSign in
Already have an account? Sign in here.
Sign In Now