AndrewChristlieb Posted November 20, 2016 Share Posted November 20, 2016 (edited) Yeah the models look pretty static. Eventually I'll bite the bullet and grab a box to try and work out some better poses, but I have so much other stuff already to work through :D. Edited November 20, 2016 by AndrewChristlieb Link to comment Share on other sites More sharing options...
tvih Posted November 21, 2016 Author Share Posted November 21, 2016 So do I... apparently doesn't stop me from buying more though Finally done with the first Centurion's pre-painting work other than magnetizing the weapon options. Probably only going to bother with the grav cannons and lascannons. Custodians will be better for the assault centurion role I reckon (not to mention assault centurion drills look utterly terrible), and heavy bolter centurions are sadly kinda piddly. Alas, reposing would be way too much work. Krikey even did a tutorial of it in this BT subforum. I think I'll just make do with the static pose, the dread leg was tricky enough :P Link to comment Share on other sites More sharing options...
tvih Posted November 21, 2016 Author Share Posted November 21, 2016 Oh, one last thing to do in the pre-paint prep - for the first time trying to use a brass etch part. Now, I've had brass etch parts for 1:35 WW2 military models for a long time, but those models have been sitting unbuilt for years and years, so I never actually used a brass etch before. Man, bending this to match the shoulder is a pain, I imagine it'll be even more of a pain on a power armor or terminator shoulder! Link to comment Share on other sites More sharing options...
Ciler Posted November 21, 2016 Share Posted November 21, 2016 If you're working on centurions, keep this rescaling tutorial in mind : http://masteroftheforge.com/centurion-tutorial/ http://masteroftheforge.com/wp-content/uploads/2015/06/centurionscale-1024x283.jpg http://masteroftheforge.com/wp-content/uploads/2015/06/cent2.jpg Victor von Doom 1 Back to top Link to comment Share on other sites More sharing options...
tvih Posted November 21, 2016 Author Share Posted November 21, 2016 (edited) Yeah I remember that from back in the day... but sadly it too goes to the "too much work" category As long as the tassets are ditched the basic proportions are fine as they are I think. The problem I'm facing now is getting the brass properly "flattened" to the pad and more importantly the magnetization, there isn't one flat enough surface to put a 2mm magnet on in the join of the arm and the weapons, as it is a "multisurface" join. Annoying! I'm not sure if I'm gonna even bother with the cabling, as it specific to the weapon loadout and not really needed for the model to look OK. Edited October 13, 2018 by tvih Link to comment Share on other sites More sharing options...
Psykic_scribe Posted November 21, 2016 Share Posted November 21, 2016 Not sure if this is helpful, but after much trial and many errors, I found the best approach for brass etched crosses is to "overbend" them, superglue the middle and squash the centre into place so that it flattens to match the curves. THe biggest pain is preparing the star points to clip off neatly and/or file to the correct angle - still working on that. Link to comment Share on other sites More sharing options...
tvih Posted November 21, 2016 Author Share Posted November 21, 2016 This one's a CF/IF chapter badge on a cross thingamabob. I did the overbending thing, but even so it's hard to accomplish especially as it needs to bend both horizontally and vertically. The round ones are also sure to be a challenge to put into PA/termie pads... ugh! Link to comment Share on other sites More sharing options...
AndrewChristlieb Posted November 22, 2016 Share Posted November 22, 2016 I haven't played with brass, but I would be tempted to take an extra pad and shave the rim off then take a second pad and use a pair of needle nose pliers to crimp the brass between the two pads to give it the proper curve. Link to comment Share on other sites More sharing options...
tvih Posted November 22, 2016 Author Share Posted November 22, 2016 I haven't played with brass, but I would be tempted to take an extra pad and shave the rim off then take a second pad and use a pair of needle nose pliers to crimp the brass between the two pads to give it the proper curve. Hmmm, worth a try I suppose! Link to comment Share on other sites More sharing options...
tvih Posted November 29, 2016 Author Share Posted November 29, 2016 (edited) My first table-ready (as in painted) drop pod! I've been contemplating drop pod lists for a long time, but with the effort it takes to paint these things up as well as the pain the in butt it is to transport them given the space they take up, seems unlikely. Spent all night on the highlights. Edited October 13, 2018 by tvih Victor von Doom, Marshal Mattias, Brother Christopher and 2 others 5 Back to top Link to comment Share on other sites More sharing options...
Ciler Posted November 29, 2016 Share Posted November 29, 2016 Very nice job. In my opinion though, it's not necessary to highlight every panel along every raised line. Link to comment Share on other sites More sharing options...
Link2edition Posted November 29, 2016 Share Posted November 29, 2016 For the pods drybushing in the future could be your friend. If you do a heavy drybrush you could even get some weathering effects from re-entry. Link to comment Share on other sites More sharing options...
tvih Posted November 30, 2016 Author Share Posted November 30, 2016 (edited) I suck at drybrushing, I never get the results I want so I've mostly just given up on it. Plus, changing the way I paint my BT vehicles at this point would be annoying as then the new style would stand out so much Anyways, another night, another model. Highlighted Mk IV Ironclad Brecher for your viewing displeasure: Edited October 13, 2018 by tvih Link to comment Share on other sites More sharing options...
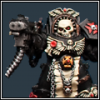
tvih Posted December 2, 2016 Author Share Posted December 2, 2016 (edited) "Acheron" reporting for duty. Even after ten millennia of service, it still yearns for the righteous slaughter of heretics and xenos as much as it did the day it rolled out of the blessed Forge. Edited October 13, 2018 by tvih M@verik115, Honda, Marshal Mattias and 1 other 4 Back to top Link to comment Share on other sites More sharing options...
Brother Christopher Posted December 2, 2016 Share Posted December 2, 2016 The updates keep on rolling. The pace of your progress is astonishing. The Spartan looks top-notch, black suits it really well. May I ask you how wider is the "hull" of a Spartan when compared to a regular Land Raider (and specifically the central part, between the tracks). I would benefit from this info for my current project. I'd assume that it's around 1 cm, but you never know. Link to comment Share on other sites More sharing options...
tvih Posted December 2, 2016 Author Share Posted December 2, 2016 The inner hull seems to be about 6,3 cm wide. Link to comment Share on other sites More sharing options...
Brother Christopher Posted December 2, 2016 Share Posted December 2, 2016 Thanks a lot! Link to comment Share on other sites More sharing options...
tvih Posted December 7, 2016 Author Share Posted December 7, 2016 (edited) Good news is I found my airbrush and basecoated the CF Razorback with it, good results. Maybe because of the thinning medium or whatever, the result is a slightly lighter shade than when brushing. It's actually nice because of the increased detail visibility - downside is that now it's a bit of a bummer that my existing CF infantry isn't done with this this shade (and "upgrading" to it would mean re-painting the details and highlights which is in no way an enticing prospect). It's still much darker than brushed Kantor Blue, the latter being too light for my tastes. But using the brush makes me wonder about trying to do highlights with it rather than the brush. Downside would be that it'll look very different from my existing vehicles even if I manage to do it - and being an airbrush noob that's in no way certain. Could just end up ruining the basecoat Oh, and another good piece of news is that my new matte varnish spray is indeed so matte that it's impossible to even tell if it is on the model or not! Very nice indeed. Edited December 7, 2016 by tvih Link to comment Share on other sites More sharing options...
Marshal Mattias Posted December 7, 2016 Share Posted December 7, 2016 I think slightly differing shades can be a positive thing - I think it makes for a more natural aesthetic. Can I ask what varnish you're using? Link to comment Share on other sites More sharing options...
tvih Posted December 8, 2016 Author Share Posted December 8, 2016 Maston Color Matt Varnish. Probably not available outside Finland. The previous one I had was Maston's as well, but with a crappy nozzle and it was indeed much glossier. Oh... and one other problem with highlighting with the airbrush. My air compressor is kinda noisy, I'd probably get evicted if I used it long enough to highlight anything. Haha. Can't afford a more quiet in the near future. Link to comment Share on other sites More sharing options...
tvih Posted December 11, 2016 Author Share Posted December 11, 2016 Good grief... airbrushing really seems expensive. I'm mostly done with my Imperial Fists Vindicator. And I've spent like 10€ worth of paint+thinner on the damn thing, and the siege shield + Rhino bits (the doors, hull front etc) still aren't even in their final color of Golden Yellow, and I don't think what I have left of it will be enough! Gotta use more water for thinning I guess, even though I already used it alongside the Vallejo Thinner. Yeez. Seems like I won't be painting all that many IF vehicles after all :P Didn't use that much paint to basecoat the CF Rhino I think, but this IF Vindi certainly got rather excessive with two paint pots and one thinner pot expended. Link to comment Share on other sites More sharing options...
Brother Christopher Posted December 11, 2016 Share Posted December 11, 2016 The potential costs and effort is something that puts me off (also, I don't want to mix the techniques for my Templars), but the results seem to be rewarding. I hope that you'll find your work satisfying! Link to comment Share on other sites More sharing options...
tvih Posted December 11, 2016 Author Share Posted December 11, 2016 I was hoping to have the rest of done today, but looks like it was not to be. Airbrush kept clogging up - annoyingly the part behind the nozzle that I can't think of a way to remove for cleaning so it's a pain in the ass - and now I think the threads on the nozzle broke because it won't stay on Technically the model is in playable condition minus the siege shield. Link to comment Share on other sites More sharing options...
tvih Posted December 11, 2016 Author Share Posted December 11, 2016 (edited) Here's the pic minus the stuff I've worked on today: Edited October 13, 2018 by tvih Marshal Mattias and Arthanor 2 Back to top Link to comment Share on other sites More sharing options...
Race Bannon Posted December 12, 2016 Share Posted December 12, 2016 That' a reaaaaallllyy good coat of yellow :tu: Link to comment Share on other sites More sharing options...

Recommended Posts
Create an account or sign in to comment
You need to be a member in order to leave a comment
Create an account
Sign up for a new account in our community. It's easy!
Register a new accountSign in
Already have an account? Sign in here.
Sign In Now