Lamenter Posted September 27, 2012 Share Posted September 27, 2012 I've been Truescaling (or Artscaling as I like to call it) for a few years now and I've been asked many times how I go about making my own conversions. I have a website devoted to these conversions here at masteroftheforge.com where I already have a tutorial for Truescale Power Armour. This is my new tutorial on how to convert Terminators into Truescale. http://masteroftheforge.com/wp-content/uploads/2012/09/53.jpg Components You Will Need These components are everything you will need for a basic Imperial Terminator Space Marine. Artscale Chaos Terminators follow the same approach but will require extra attention in the end stages to add all that ornate detail to top of the plain model. Unlike the Artscale Space Marine in Power Armour the required components here are much simpler. All that is needed is a complete plastic Terminator and 40mm base. The arms aren't altered in anyway at all so something worth noting is that because of the amount of effort required in this conversion it may be a good idea to magnetize the arms to the torso in the end stage to give you multiple weapon options. If so you'll either need to make extra sets of shoulder pads or magnetize those too. You will also need some 1-2mm thick plasticard and optional accessories like Purity Seals. Accessories can be a good way of hiding the mistakes and less than perfect sculpting, just be careful not to over use them. http://masteroftheforge.com/wp-content/uploads/2012/09/01.jpg Tools Required You will need the following materials and tools. Greenstuff and Magic Sculp or another epoxy putty of your preference (details on Putty below). Superglue Scalpel (X-Acto knife or similar surgical style scaplel) – the GW knife, is one of the best I’ve used. The scalpel blade is great for sculpting as well as cutting and it's handle is comfortable and a nice weight in the hand. Replacement Scalpel Blades – cheap enough to get hold of, I bought a few hundred for next to nothing on ebay. Maintaining a sharp clean blade is essential, I usually swap my blades every few days. Needle Files – optional but certainly useful. Come in flat, rounded and circular styles. Pin Vice, drill bits and paperclips for pinning. This is optional in this build. Clippers - optional. Clay Shapers -soft rubber tipped tools in various shapes and sizes. These are not optional unless you are very proficient with modelling tools and putty, in which case why are you reading this? Greenstuff This is my personal preference for Green Stuff and what works best for me (I highly recommend this), if you favour another medium go with that. http://masteroftheforge.com/wp-content/uploads/2012/05/castinggs10.jpg Although I have used plain Green Stuff for a number of years I've recently found a preference for a 50/50 mix of Green Stuff and Magic Sculp (Note: Magic Sculp is very similar to Mulliput, which will work as an alternative). In this example I've used the flesh coloured Magic Sculp. I find it best to first mix the Green Stuff and Magic Sculp separately before combining the two together. http://masteroftheforge.com/wp-content/uploads/2012/05/castinggs11.jpg When fully mixed it will be a pleasing pale green colour. When mixing your putty, make sure you have a clean work surface and clean hands, as any dust, plastic shavings, stray hairs, etc, will affect the quality of the putty. Ideally gloves would be recommended, but I personally never use them, and haven’t had any problems myself (I always wash hands thoroughly after mixing). Before mixing the yellow and blue components of Green Stuff make sure to cut away the putty in the middle of the strip where the yellow and blue meet, otherwise you will get lumps in your mix. I myself used lumpy Greenstuff for years until someone told me I needed to remove the putty that had already slightly cured due to contact. It seems obvious now, but not at the time. The advantage of adding Magic Sculp to Green Stuff is that it softens it but still lets it retain it own elastic qualities. The Magic Sculp also means that after curing if can be effectively filed, carved and scraped, whereas plain Green Stuff is less obliging to these techniques. Note: from this point on I am actually talking about a Green Stuff & Magic Sculp mix whenever I refer to Green Stuff. Sculpting My approach to applying Green Stuff is quite a simple one. In most cases the sculpting is all about creating simple clean shapes. By doing the sculpting in multiple stages you can build up more complex designs by adding simple shapes onto one another one at a time. After each stage of sculpting allow the Green Stuff to fully cure before moving on, otherwise you risk damaging your hard work. My preferred technique is to apply more Green Stuff than I will need to an area, and then to begin shaping it starting with the larger clayshaper. The excess Green Stuff is then trimmed from the edges of the shape with a sharp scalpel. Make sure to keep the tip of the clay shaper wet at all times, to reduce fiction on the Green Stuff and achieve a smooth finish. I find wetting it with saliva works best, but you MUST be careful that the tool is clean, you really don't want any putty getting in your mouth as it is a toxic material. Water or vaseline are effective alternatives, just be careful not to overdo it. Use the clayshapers in the same way you would a paintbrush, using the flat edge to achieve smooth clean finishes. Concentrate on getting the shape (thickness) of the putty right, moving the excess putty to the edges of the shape where you can trim it neatly. Once the basic shape is about right you can focus on trimming away excess putty and getting clean sharp edges with smaller clayshapers. Starting Point http://masteroftheforge.com/wp-content/uploads/2012/09/02.jpg The plastic Terminator legs will effectively become an armature onto which a new pair of legs will be sculpted. Using your scalpel, carefully remove the hip-plates from the legs. Try not to damage the hip-plates as you will be using them later. If you have to cut into the actual legs this is ok as any damage will be covered over later. Next remove the feet completely. You will not need to keep them, they can be clipped off and discarded. http://masteroftheforge.com/wp-content/uploads/2012/09/03.jpg Using the scalpel carefully cut clean through the lower legs, and cut two small pieces of plasticard that will act as spacers to lengthen the legs. http://masteroftheforge.com/wp-content/uploads/2012/09/04.jpg Glue the legs back together with the spacers in place. http://masteroftheforge.com/wp-content/uploads/2012/09/05.jpg You can roughly fill the gaps with Green Stuff if you choose, or make the plasticard spacers wider than the leg and carve it back to the leg width, whatever works best for you. http://masteroftheforge.com/wp-content/uploads/2012/09/06.jpg Begin by filling in the back of the lower legs. Add a large ball of Green Stuff in the centre and using a large clayshaper spread it left to right around the curve of the plastic leg. A lubricated clayshaper is essential to getting a smooth finish. Starting Point http://masteroftheforge.com/wp-content/uploads/2012/09/02.jpg The plastic Terminator legs will effectively become an armature onto which a new pair of legs will be sculpted. Using your scalpel, carefully remove the hip-plates from the legs. Try not to damage the hip-plates as you will be using them later. If you have to cut into the actual legs this is ok as any damage will be covered over later. Next remove the feet completely. You will not need to keep them, they can be clipped off and discarded. http://masteroftheforge.com/wp-content/uploads/2012/09/03.jpg Using the scalpel carefully cut clean through the lower legs, and cut two small pieces of plasticard that will act as spacers to lengthen the legs. http://masteroftheforge.com/wp-content/uploads/2012/09/04.jpg Glue the legs back together with the spacers in place. http://masteroftheforge.com/wp-content/uploads/2012/09/05.jpg You can roughly fill the gaps with Green Stuff if you choose, or make the plasticard spacers wider than the leg and carve it back to the leg width, whatever works best for you. http://masteroftheforge.com/wp-content/uploads/2012/09/06.jpg Begin by filling in the back of the lower legs. Add a large ball of Green Stuff in the centre and using a large clayshaper spread it left to right around the curve of the plastic leg. A lubricated clayshaper is essential to getting a smooth finish. http://masteroftheforge.com/wp-content/uploads/2012/09/07.jpg Note how there is excess Green Stuff on the top bottom and sides of the shape we are making. http://masteroftheforge.com/wp-content/uploads/2012/09/08.jpg Now using a lubricated scalpel blade (otherwise the blade will drag against the putty), trim off the edges of the back of the leg, and clean up with a clayshaper. http://masteroftheforge.com/wp-content/uploads/2012/09/09.jpg http://masteroftheforge.com/wp-content/uploads/2012/09/10.jpg http://masteroftheforge.com/wp-content/uploads/2012/09/12.jpg http://masteroftheforge.com/wp-content/uploads/2012/09/13.jpg Repeat on the other side. Usually best to allow one side to cure first otherwise you risk accidentally damaging the soft putty. http://masteroftheforge.com/wp-content/uploads/2012/09/14.jpg The thighs use the same approach but are more difficult because you have to work all the way around the leg. Start with a sausage of Green Stuff (it always starts with a ball or sausage of Green Stuff :angry:) and wrap it around the thigh. http://masteroftheforge.com/wp-content/uploads/2012/09/16.jpg Smooth out with a clayshaper and trim excess from top and bottom of the thigh. Don't worry too much about getting the edges perfect as you'll be sculpting over them later anyway. http://masteroftheforge.com/wp-content/uploads/2012/09/24.jpg The front of the lower leg is one solid armour plate and is the chunkiest part of the leg. Follow exactly the same approach as with the back of the lower leg, only you need to create a "lip" between the front and back. http://masteroftheforge.com/wp-content/uploads/2012/09/25.jpg If the plastic legs have knee pads you can decide now whether to sculpt over them (making a one piece greave) or leave them uncovered and add the knee pads later. Optionally, you can add knee pads later even if the plastic legs don't have them. Link to comment https://bolterandchainsword.com/topic/261932-truescale-terminator-tutorial/ Share on other sites More sharing options...
Grotsmasha Posted September 27, 2012 Share Posted September 27, 2012 *reply......now get to it :P Cheers, jono Link to comment https://bolterandchainsword.com/topic/261932-truescale-terminator-tutorial/#findComment-3189060 Share on other sites More sharing options...
Lamenter Posted September 27, 2012 Author Share Posted September 27, 2012 http://masteroftheforge.com/wp-content/uploads/2012/09/26.jpg http://masteroftheforge.com/wp-content/uploads/2012/09/27.jpg http://masteroftheforge.com/wp-content/uploads/2012/09/28.jpg http://masteroftheforge.com/wp-content/uploads/2012/09/42.jpg The front of the groin needs to be covered with a thin layer of Green Stuff to pad it out. When that has cured add a thin sausage of Green Stuff around the waist to make the belt. http://masteroftheforge.com/wp-content/uploads/2012/09/43.jpg Flatten and trim. http://masteroftheforge.com/wp-content/uploads/2012/09/44.jpg The "bands" that reinforce the thighs are calves are one of the most tedious parts of the conversion. For each one roll out a thin sausage and press it on the model roughly where you want it. http://masteroftheforge.com/wp-content/uploads/2012/09/45.jpg Trim the ends off then smooth over using a small clayshaper. The are 14 individual parts to these horizontal and vertical bands so it will take a little while to do. Boots The boots need to be entirely scratch built from Green Stuff. Find a piece of plasticard to sculpt onto and measure out two rectangles, each 8mm wide by 12mm deep. These are the confines into which to sculpt the feet. Begin by making two smooth featureless foot shapes, leaving 1mm around the outside edge. This will form the core of the boot. http://masteroftheforge.com/wp-content/uploads/2012/09/17.jpg http://masteroftheforge.com/wp-content/uploads/2012/09/18.jpg http://masteroftheforge.com/wp-content/uploads/2012/09/19.jpg Smooth a lump of Green Stuff over the back end of the foot, trimming away with a scalpel and smoothing it off with a clayshaper. http://masteroftheforge.com/wp-content/uploads/2012/09/20.jpg http://masteroftheforge.com/wp-content/uploads/2012/09/21.jpg Once this has cured roll out a sausage to for the trim on the front of the boot. http://masteroftheforge.com/wp-content/uploads/2012/09/22.jpg Trim and clean up. http://masteroftheforge.com/wp-content/uploads/2012/09/23.jpg If you plan on making more than one Artscale Terminator now is a great time to mold the boots you've just made. I use Blu-Stuff but whatever works for you will be fine. The boots are a very simple shape so very straightforward to cast. http://masteroftheforge.com/wp-content/uploads/2012/09/47.jpg Once you have your legs and cast boots you first need to figure out where to place the boots on the base. When you know where to locate them glue them to the base. http://masteroftheforge.com/wp-content/uploads/2012/09/48.jpg Next add a ball of Green Stuff on top of each boot and press the legs on top of the boots. The Green Stuff allows you to attach the legs and position them how you want without glue or pins. Leave to cure. http://masteroftheforge.com/wp-content/uploads/2012/09/49.jpg Once this join is cured trim and neaten up with fresh Green Stuff. Torso The torso is bulked out on the sides and chest plate. http://masteroftheforge.com/wp-content/uploads/2012/09/29.jpg Start by putting together the two parts of the plastic torso and removing iconography. http://masteroftheforge.com/wp-content/uploads/2012/09/30.jpg Next mix some Green Stuff, and spread it across the side of the torso. As before, the excess Green Stuff is pushed to the edges... http://masteroftheforge.com/wp-content/uploads/2012/09/31.jpg …where it can be easily trimmed with a scalpel, following the existing shape of the torso... http://masteroftheforge.com/wp-content/uploads/2012/09/32.jpg … and then cleaned up with a lubricated clayshaper. The thickness should be just enough so that the plastic where the arm normally joins the body is near the surface. http://masteroftheforge.com/wp-content/uploads/2012/09/39.jpg Repeat on the other side and allow to cure before moving onto the chest plate. One large blob of Green Stuff spread across the chest, smoothed out with a large clayshaper. http://masteroftheforge.com/wp-content/uploads/2012/09/40.jpg Trim the excess from the edges and clean up. http://masteroftheforge.com/wp-content/uploads/2012/09/41.jpg If you wish you can cut away an arch in the bottom of the plate with a scalpel. Link to comment https://bolterandchainsword.com/topic/261932-truescale-terminator-tutorial/#findComment-3189073 Share on other sites More sharing options...
Grotsmasha Posted September 27, 2012 Share Posted September 27, 2012 *reply....again..... :D Cheers, Jono Link to comment https://bolterandchainsword.com/topic/261932-truescale-terminator-tutorial/#findComment-3189094 Share on other sites More sharing options...
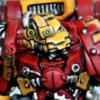
Lamenter Posted September 27, 2012 Author Share Posted September 27, 2012 Shoulder Pads The shoulder pads are pretty straightforward except for the need to hold them. http://masteroftheforge.com/wp-content/uploads/2012/09/33.jpg Start by cutting away the crux terminatus on the right shoulder pad. If doesn't have to be perfect, just get rid of the mass. http://masteroftheforge.com/wp-content/uploads/2012/09/34.jpg So that you can hold on to the pad while applying Green Stuff glue a plasticard rod or tube (or something similar) to the inside of the pad. Once the pads have been sculpted over these improvised handles can be broken off. http://masteroftheforge.com/wp-content/uploads/2012/09/35.jpg http://masteroftheforge.com/wp-content/uploads/2012/09/36.jpg Add a ball of Green Stuff onto the pad and spread it all the way over with a clayshaper. As usual the edges don't matter. http://masteroftheforge.com/wp-content/uploads/2012/09/37.jpg When you have a smooth finish you can trim away the edges, following the outline of the edge of the plastic pad. Finishing Touches Use the same approach that you used to attach the legs to the boots to attach the torso to the legs. This ball of Green Stuff won't be visible, but is just used to add space between the torso and legs. http://masteroftheforge.com/wp-content/uploads/2012/09/50.jpg http://masteroftheforge.com/wp-content/uploads/2012/09/51.jpg http://masteroftheforge.com/wp-content/uploads/2012/09/52.jpg The final touches involve re-attaching the hip-plates, adding knee pads (if applicable), adding the tubing behind the knees, all very straightforward. After that it's just a matter of gluing on the head and choice of arms. Details like a chest aquilla and the crux terminatus can either be molded and cast from existing models or sculpted. At this point you can if you wish add pins in through the underside of the base and into the lower legs to be extra sure the model is secure. http://masteroftheforge.com/wp-content/uploads/2012/09/53.jpg http://masteroftheforge.com/wp-content/uploads/2012/09/54.jpg http://masteroftheforge.com/wp-content/uploads/2012/09/55.jpg http://masteroftheforge.com/wp-content/uploads/2012/09/56.jpg http://masteroftheforge.com/wp-content/uploads/2012/09/57.jpg Link to comment https://bolterandchainsword.com/topic/261932-truescale-terminator-tutorial/#findComment-3189114 Share on other sites More sharing options...
Grotsmasha Posted September 27, 2012 Share Posted September 27, 2012 Now that its finished, some real comments. First up Thankyou!!! Secondly, I'd consider spacing the thigh as well as the shins, annnddd the back of the feet reaaallly look unfinished. Having said that I don't really know what to suggest to fix them, maybe have armour hang a little lower so the boot comes out of it more? Either way its miles better than anything I could achieve. Cheers, Jono Link to comment https://bolterandchainsword.com/topic/261932-truescale-terminator-tutorial/#findComment-3189130 Share on other sites More sharing options...
space wolf Posted September 28, 2012 Share Posted September 28, 2012 great tutorial. You beat me to it, although your GS skill is better than mine. Link to comment https://bolterandchainsword.com/topic/261932-truescale-terminator-tutorial/#findComment-3189628 Share on other sites More sharing options...
Recommended Posts
Archived
This topic is now archived and is closed to further replies.