Father Mapple Posted January 21, 2013 Share Posted January 21, 2013 (edited) I read that the old Flesh Tearers had an inverted scheme for their Death Company, with the shoulders and helmet being red, while the rest of the body was black. My chapter, the Blood Suns, uses Flesh Tearer similar patterns, but they are normally Black shoulders, head, backpack, and leg greaves, like such.http://farm9.staticflickr.com/8082/8399725341_a452956475_b.jpgThe idea is the chapter uses the iconography of a sun/star. They see the Imperium without the Emperor and Sanguinus as being like a red giant star, that has expanded in size and gobbled up it's system, but is at the end of it's life and will soon lose it's heat and collapse on itself, therefore they are named the Blood Suns. Therefore, they see a Marine's life being like a sun that has gone supernova, or turned into a black hole - the Black Rage is a marine's desire to see the end of everything, and destroy it all.So to make it a look like a supernova and a black hole, I'm going for an inverted white and black scheme, but I want some feedback on how this looks, and if it would be striking compared to the above. I'll post some model pictures in the morning when people are awake and I can set some out. But what is everyone's thoughts on this?http://farm9.staticflickr.com/8229/8400814308_0bd0479300_b.jpgWhite color for the supernova imagery, and the black center for a Black supernova. The Red trim and Red chest eagle sort of keeping the basic Blood Sun third color, seen in the original.I love the alternative scheme for Death Company done in the book with the Angels Encarmine having white Sanguinary Guard as well, but I wondered if people think this would work on an actual model.Last consideration: I have a lot of those 3rd edition death company bodies that I'll be using for them models, and I have (with considerable effort) magnetized the backpacks to make sure they're flexible, so this is why I want to make sure I get the colors right. But if not, they'll strip easily being pewter/lead! Edited September 15, 2016 by Father Mapple Jostal and Aothaine 2 Back to top Link to comment Share on other sites More sharing options...
recon0321 Posted January 21, 2013 Share Posted January 21, 2013 How did you change the armor on the game like that? I thought they had set schemes? Link to comment Share on other sites More sharing options...
Snejk Posted January 21, 2013 Share Posted January 21, 2013 I like it! It looks very nice and different from the regular DC. I like it a lot! I like it so much I might even steal it for my own DC. Link to comment Share on other sites More sharing options...
Brother Maikel Posted January 21, 2013 Share Posted January 21, 2013 How did you change the armor on the game like that? I thought they had set schemes? They do have set schemes for particular chapters, with specially embellished pieces of armour. However, you can also take the normal armour and paint it however you want, on a piece-by-piece basis. They even have a decent selection of common chapter symbols to put on the shoulderpad. Its probably the best paint-scheme customizer I've seen... I kind of wish they'd release it as a standalone program, with all of the armour and weapons unlocked (maybe also toss in a terminator option?). Its a pretty good tool for prototyping colour schemes. Link to comment Share on other sites More sharing options...
EgoDraconumNigrorum Posted January 26, 2013 Share Posted January 26, 2013 I read that the old Flesh Tearers had an inverted scheme for their Death Company, with the shoulders and helmet being red, while the rest of the body was black. Really!? I have never heard or read that before. Where did you read that from? - EgoDraconumNigrorum Link to comment Share on other sites More sharing options...
Sokhar Posted January 27, 2013 Share Posted January 27, 2013 It's a pretty striking color scheme, I'd like to see it executed on a model. Link to comment Share on other sites More sharing options...
Nexus25 Posted January 31, 2013 Share Posted January 31, 2013 I love the idea of different color DC. I am doing a diiferent color myself. I don't know how good your painting ability is but leep in mind. White is a pain in the A. Link to comment Share on other sites More sharing options...
Father Mapple Posted February 1, 2013 Author Share Posted February 1, 2013 I'll finish these death company this weekend, and then work on Death Company Dreadnought using the old Furioso metal model for February. Here's the WIP for the Death Company so far. White needs to be washed, red for the chest and shoulder trim needs to be finished, copper gone back over since I needed more white, and then final touch ups. I think I'm doing copper on the sides of the blood drops with a pearlescent white on the drop themselves. I want to keep the red to a minimum on these since it's such a dominant color on the other models.http://farm9.staticflickr.com/8333/8435364039_167d5013a4_b.jpghttp://farm9.staticflickr.com/8353/8435364887_05f246cdff_b.jpghttp://farm9.staticflickr.com/8357/8435367359_5d75c96b8d_b.jpghttp://farm9.staticflickr.com/8193/8435368577_5479af0413_b.jpghttp://farm9.staticflickr.com/8215/8436458458_f698216038_b.jpghttp://farm9.staticflickr.com/8333/8436459442_17330550a2_b.jpghttp://farm9.staticflickr.com/8045/8436460172_bd68b966b8_b.jpgOf course, comments AND criticism is welcome. Aothaine 1 Back to top Link to comment Share on other sites More sharing options...
Father Mapple Posted February 23, 2013 Author Share Posted February 23, 2013 Next to last update on these 5 guys. It's taken me a month longer than I set my goal for. The color scheme works. I'm keeping it to white, red, black, and copper. Brown for some leathers, and steel for some others. But the main uniform colors is working. The burgundy wine color really contrasts nicely and stands out from the black, and the white has enough pop while keeping the recessed dark. I really like how the white has turned out. It's not that it's not even, it's just hard to cover everything. That's more of a painting skill thing - making straight lines and such. I think a lot of it could be saved by my process. I did some of the colors in the wrong order, which I will not be doing again for the other death company in my army. Still have the poor armless guy and another with the cleaning up of the wash with more white. Also, some spots, like every guy has 1 spot I didn't finish of a different color. One guy I didn't finish all the red, another all the black, another the copper, etc. etc. Cleanup is taking a long time to get sorted. The three standing together are done except for drilling out the barrel and painting the eyes. I can't decide red or green eyes here. I have some parchment to do on the jetpacks, the last white on the other 2 guys, and the odd or end. http://farm9.staticflickr.com/8093/8498887575_0a67d1f24a_b.jpg http://farm9.staticflickr.com/8250/8498888181_6dc6025edb_b.jpg[/url] http://farm9.staticflickr.com/8520/8499994770_e23f92d9c2_b.jpg http://farm9.staticflickr.com/8392/8499995408_d8013f617c_b.jpg http://farm9.staticflickr.com/8511/8499996130_720b647edf_b.jpg http://farm9.staticflickr.com/8225/8499996790_a4e97045b2_b.jpg http://farm9.staticflickr.com/8369/8498891499_8c14d88e0a_b.jpg http://farm9.staticflickr.com/8525/8499998390_c0a844827d_b.jpg http://farm9.staticflickr.com/8516/8498892997_80313261f9_b.jpg http://farm9.staticflickr.com/8509/8498893619_167065ce02_b.jpg http://farm9.staticflickr.com/8102/8500000904_57ecd26f32_b.jpg JP Death Co Jan Late WIP Penultimate[/url] by markt1983, on FlickrJP Death Co Jan Late WIP Penultimate[/url] by markt1983, on FlickrOh! And I need to drill out the barrels. Also, i missed all the mold lines? Learning experience, let me tell you. Plastic bits on pewter dudes makes me forget what to look for on which. Comments and criticism welcome! Link to comment Share on other sites More sharing options...
Father Mapple Posted March 10, 2013 Author Share Posted March 10, 2013 Well, the January Commitment is finally done. I have Spring Break next week, so I'm going to try and knock out a Dreadnought using the skills I've acquired painting white the last few months. These guys took SOOOO long. I'll never finish 7 of them in one month, so I might be breaking up the other squad.I know there's mold lines. I know the bolt pistol barrels aren't drilled out. I know there's an eye that needs to be fixed. They're not coated yet, so the matte spray will smooth some of the spots out, as I've found in the past. Also, purity seals need text, but I don't have the microfine pen I keep reading about yet. But I've stared at these guys for so long, I need to be done with them. I only did the Jump Packs, and didn't do the regular backpacks, but for the Independent Characters' hobby challenge I'm doing them for, that's good enough for me. But... I am really loving the color scheme. Like, in an army of Black and Red, these White-hot supernovas coming at you really catch the eye. Here's the Pics! Remember, there's some Jump packs that would go better with specific models, but I magnetized them so these are just assorted as I picked them up.Individual Shots with Jump Packs ON:http://farm9.staticflickr.com/8376/8544284719_52fb447335_b.jpghttp://farm9.staticflickr.com/8241/8544286393_61e608a548_b.jpghttp://farm9.staticflickr.com/8373/8545391492_5090d672a4_b.jpghttp://farm9.staticflickr.com/8239/8544295777_504f7611f9_b.jpghttp://farm9.staticflickr.com/8528/8544297093_4db0504f7a_b.jpghttp://farm9.staticflickr.com/8239/8544298697_736e97f6bf_b.jpgGroup Shot from Behindhttp://farm9.staticflickr.com/8088/8545390056_dc70751202_b.jpghttp://farm9.staticflickr.com/8106/8545388302_8992f533b7_b.jpgGroup Side Shot with Jump Packs OFF:http://farm9.staticflickr.com/8239/8545386676_64bb424894_b.jpghttp://farm9.staticflickr.com/8365/8544287497_de2dd4ccae_b.jpgAnd that's all! Next is the Dreadnought for Death Company. Spyros 1 Back to top Link to comment Share on other sites More sharing options...
SnorriSnorrison Posted March 10, 2013 Share Posted March 10, 2013 Nice colour scheme, brother! I notice some chalkyness in the white areas of the minis. White's a pain the arse to paint, but there are a few tricks(which aren't tricks at all) to make it an easier task. :) 1. You can start over a white primer, shade, and highlight. The fastest method, but not always the best because even a white primer can look a bit chalky. 2. Go from black to white by layering 20.000 thin, very thin, layers of white. But... http://www.everydaygoodmusic.com/wp-content/uploads/2013/01/ain-t-nobody-got-time-fo-dat-edgm-every-day-good-music.jpg 3. You can use the Gee-dub foundation white. It's a base colour, and when applied thinly in 3 to 4 layers, it gets you an even and opaque coat, without chalkyness. I'd certainly give it a try, it has been working very well for me so far, and it actually saves you a lot of time while you're getting a satisfying result. :) Other than that, great work so far. Keep it coming! Snorri Angelus Mortifer 1 Back to top Link to comment Share on other sites More sharing options...
Father Mapple Posted March 10, 2013 Author Share Posted March 10, 2013 I am wondering if the fact that it's all pewter might have something to do with it. Old 3rd Ed sculpts. I might not be priming it the best method either, using brush on. Because the paint I was using was so thin. I am definitely going to be trying some of that new Citadel ceramic white, I've heard a lot of good about it. When I bought the paints I had, it was before the paint line revamp. Either way, thanks for the encouragement and tips, @snorri. I will be doing the Death Co Dreadnought with the same white just for consistency's sake, but the two drop pods and 7 more bolter marines it I'll figure something else out. I'm still in that stage of painting where I notice improvement each set of miniatures, so a change in the white color should be understandable. Link to comment Share on other sites More sharing options...
Iceyeeye Posted March 12, 2013 Share Posted March 12, 2013 I am wondering if the fact that it's all pewter might have something to do with it. Old 3rd Ed sculpts. I might not be priming it the best method either, using brush on. Because the paint I was using was so thin. I am definitely going to be trying some of that new Citadel ceramic white, I've heard a lot of good about it. When I bought the paints I had, it was before the paint line revamp. Either way, thanks for the encouragement and tips, @snorri. I will be doing the Death Co Dreadnought with the same white just for consistency's sake, but the two drop pods and 7 more bolter marines it I'll figure something else out. I'm still in that stage of painting where I notice improvement each set of miniatures, so a change in the white color should be understandable. I have used the Citadels whites in detailing, and I am a novice painter so keep that in mind. In my experience White Scar's (layer) white is better than Ceramite White (base). White Scars tends to stick better to plastic miniatures, and the Ceramite was runny and would slide right off. Link to comment Share on other sites More sharing options...
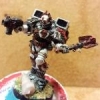
Father Mapple Posted May 5, 2013 Author Share Posted May 5, 2013 Here's the work in progress shots of my Death Company Dreadnought. I stumbled across my camera and 15 minutes.He needs some more red saltires, and some more wash on the front panel. I will add new plastic smoke launchers in the middle on top, because the old metal ones are an eyesore. That's that rough bit on top. Almost done!http://farm9.staticflickr.com/8412/8709474252_5e6a8f79cc_b.jpghttp://farm9.staticflickr.com/8554/8709475098_5819057cf6_b.jpghttp://farm9.staticflickr.com/8552/8708353435_cdbfa81ea2_b.jpghttp://farm9.staticflickr.com/8395/8708354771_72a416f9c7_b.jpghttp://farm9.staticflickr.com/8256/8709478384_f54b4aeb2b_b.jpghttp://farm9.staticflickr.com/8261/8708356551_2d0626d84d_b.jpgComments and criticism welcome! Link to comment Share on other sites More sharing options...
Father Mapple Posted August 7, 2013 Author Share Posted August 7, 2013 OK... I don't know if any of you noticed, but I didn't post for a while. But now, I'm an almost-lawyer with a lot more free time since the Bar exam is over. As a graduation present of sorts, I got a Badger 360 airbrush (gravity AND siphon feed capabilities) as well as a sweet Badger air compressor with a tank, regulator, and moisture trap. Test sprays on some of the 4th Edition ruin pieces went well for undercoating (thats like my 3rd set of those ruins to get in Ebay lots), so expect an uptick in the progress soon. And since it's all acrylic craft paint, it cleans real well with just warm water being sprayed through and a bit of brushing in the paint cup. So, my intent for August is to finish the dreadnought details, and two drop pods fully done. They're assembled, and undercoated, with the white and black basecoat already done on the Death Company pod. I'll post some more pictures soon. Link to comment Share on other sites More sharing options...
Taranis Posted August 7, 2013 Share Posted August 7, 2013 (edited) Congratulations on the almost lawyer and new hardware. :) looking forward to witnessing your skill :yes: Edited August 7, 2013 by Taranis Link to comment Share on other sites More sharing options...
Dolchiate Remembrancer Posted August 11, 2013 Share Posted August 11, 2013 These are really sweet! I did the same thing(sort of) with my own Successor BA Chapter. As the color scheme is Red Gore with Bone White on the shoulder pads, I simply inverse it for the DC. And with the paler armor color(i.e. Bone White) I am also able to just add some dried blood or splatter on them for flavor. Link to comment Share on other sites More sharing options...
Father Mapple Posted August 14, 2013 Author Share Posted August 14, 2013 Thanks for the congrats and the praise. Blood spatter sounds like a good idea! Here's a little WIP shot of my airbrush test results with color. The only color besides primer I'm doing so far is the red. That's the "base" color red. I will be applying a wine-burgandy color that goes over that dark "barn" red. Craft paint names for the win! The Door I did with the airbrush. I also laid down the black undercoat with it. http://farm6.staticflickr.com/5496/9507610594_bf6a4b065e_b.jpg[/url] The bright red was a spray painted one I got from Ebay. I resprayed the insides and interior black with the airbrush. The white and black one I did with a friend's airbrush before Alamo, but I'm working on it. On 2 of them, I did some gunmetal on the insides with a foam brush (like drybrushing) http://farm4.staticflickr.com/3824/9504817985_e19c7b67ea_b.jpg[/url] Here's a better shots of the gunmetal. I like the foam brush because you have to smash it to get the paint off the brush, but it won't fill the crevices with paint and it goes faster than dry brushing with a bristle brush. http://farm8.staticflickr.com/7327/9504820443_eaac1dfe6a_b.jpg[/url] http://farm4.staticflickr.com/3704/9504824857_715aa1e5e5_b.jpg[/url]0 Here's a better picture of the interior POST clean up. http://farm8.staticflickr.com/7320/9504822835_cdf72cbf03_b.jpg[/url] More to come as I lay down more coverage and get these things done. I'm having to plan in advance more (you can see the rude drawing schematic I made behind them) since I only have 3 jars to use with the airbrush, and switching out colors takes time. So we'll see if I can get more red done next time. I will probably finish what's in the pot with the red I have, then TRY spraying on the burgundy straight on to some black on one of the fins to see if there's an appreciable difference. Link to comment Share on other sites More sharing options...
Father Mapple Posted August 25, 2013 Author Share Posted August 25, 2013 Drop Pods WIP 2! It's official, I'm being ambitious. I'm trying to finish the drop pods by September 1st. First up, here's what I got of the Death Company Drop pod. http://farm4.staticflickr.com/3718/9590907856_e0d17a65c7_b.jpg Done with the gunmetal coatings, the shiny metallic black, and I need another coat of the duller white. Washes will go on next - got a new pot of Nuln Oil, so going to try out new washes. Here's the exterior: http://farm8.staticflickr.com/7415/9588126987_a7e835615a_b.jpg The glossy black shows up in the light, but it's harder to see against the matte black. But I don't want the whole thing glossy, so I'll be streaking/damaging the matte black a bit to pick up the roughness of it. The Furioso Drop pod is next. This is the exterior. It's ALL airbrush. I love it. http://farm6.staticflickr.com/5528/9588124815_6058c12726_b.jpg This isn't the final red. But that's the matte black and the gunmetal. Will be adding Copper accents, as I have done with any leadership or veterans in my army. Here's the interior: http://farm3.staticflickr.com/2860/9588122717_13c2772d7b_b.jpg This drop pod would be able to fit a dreadnought in about as believable a fashion as it would fit 10 guys. But that's ok, it's 40k! Anywyas, metal and basecoating done. Need to do gloss black and washes as well. Last one: Dudes drop pod. Exterior. http://farm8.staticflickr.com/7419/9590912902_e0406a1cba_b.jpg I got this one from Ebay, so the insignia are sloppily covered over. BUT look at that smooth paint finish... oooooh. Also, there's not as much overspray on this one as I'm literally seeing improvement on each time I fire up the airbrush. Working on the gunmetal still on this one. http://farm8.staticflickr.com/7425/9588117179_8b868b14d0_b.jpg Almost done with the metal on the interior. Drybrushing is time intensive. And no one will be looking at these as closely as I am, but... oh well. Progress! 1 more week! Link to comment Share on other sites More sharing options...
Office temp Posted August 25, 2013 Share Posted August 25, 2013 Don't you love how much smoother the airbrush is, especially on large surfaces such as vehicles? No brush strokes everywhere, just a clean painted surface. Link to comment Share on other sites More sharing options...
Father Mapple Posted September 3, 2013 Author Share Posted September 3, 2013 @office temp - Yeah, the airbrush is great for smooth finishes. Still learning to get the mix right because some of these paints run in varying levels of thickness. My burgundy color is watery and needs no thinning to spray, but the white is tough to mix right, so I turned the pooling into scratches with some gunmetal and shadow stippling over it to look like paint stripping on the Death Company pod. So, here's the more or less final update on these pods. I'm going to spend 10 minutes washing the metal and ridges with some Nuln Oil and metallic-black wash I made out of metallic black paint, and then consider them done after some matte finish. TO THE PICTURES, BROTHERS! First up is the Furioso Drop Pod. I am putting copper on the upper inset fins to show the veteran status of the occupants. http://farm6.staticflickr.com/5348/9653393571_9996cd0366_b.jpg Same, zoomed out a bit. http://farm8.staticflickr.com/7294/9653389995_fde6f3bac2_b.jpg The inside of it. There's ALMOST enough room without all the seats. This is at least more believable than 10 guys fitting in there! http://farm8.staticflickr.com/7419/9656621872_f54b4a4344_b.jpg Next up is the Death Company Drop Pod. I have completely repainted it since WIP 2, since I did the black and white out of order. Now I know how to use this airbrush a lot better and shouldn't be masking off for longer than I'm actually brushing. I left the seats in this one since I deploy most Death Company in pods right now. I have 5 CCW ones with their jump packs, and am working on 7 Bolter Death Company - 6 plain ones and 1 with a power fist. http://farm8.staticflickr.com/7396/9653382629_9f78eebca7_b.jpg Zoomed in on the doors to show the glossby and matte black layers. Also, the copper/pearlescent white icons look good. http://farm3.staticflickr.com/2862/9656614872_ce643a2868_b.jpg Inside and copper storm bolter. http://farm8.staticflickr.com/7439/9653375627_3d82704f5c_b.jpg More of a tabletop distance. It's sitting on the red seat cushion. Just imagine the red sands of Baal... http://farm8.staticflickr.com/7401/9656602616_5085895380_b.jpg Third, and lastly, is the "normal" drop pod for any other kinds of units. It has the seats in. The red top inset fins will show it to be the "normal" colors. I got it 2nd hand, so the places where icons go on 4 doors is badly patched over, and the inside has a deathwind launcher! For shame! Who uses those?http://farm3.staticflickr.com/2884/9653364189_55b4b95d72_b.jpg I mean, it looks close enough to a stormbolter no one is going to care, right? RIGHT, GUYS!? http://farm4.staticflickr.com/3832/9653360837_74a927ccce_b.jpg ESPECIALLY from tabletop height. http://farm8.staticflickr.com/7454/9653358545_8ed4ce0e8e_b.jpg Oh well, maybe I'll just do this all the time. http://farm4.staticflickr.com/3810/9653396981_aa0cee3728_b.jpg Anyways, NEXT UP: Painting Astorath, Lemartes, and a Reclusiarch/Elite Chaplain when I only have time to use my portable paint station. When I have time to airbrush, I'm painting the White and Black Stormraven. This should look good! Projected completion time is 1 month for both. Spyros 1 Back to top Link to comment Share on other sites More sharing options...
Taranis Posted September 3, 2013 Share Posted September 3, 2013 Thanks for the showing and explanations. I have 3 pods I've been circling for a couple of years. They are currently base coated black with gold symbols. Seeing your take on your pods is a great inspiration. :) What is your red recipe? Link to comment Share on other sites More sharing options...
Father Mapple Posted September 4, 2013 Author Share Posted September 4, 2013 Having 3 pods is great! Already used them in a straight up tie with some Dark Eldar yesterday. They got my Furioso, Death Company Dreadnought, and 8 Death Company right where I needed them, though. Painted models roll "HIT" on scatter dice apparently!As far as the red, I use Apple Barrel craft acrylic paint. This stuff is so thin, it rubs off with just one coat but spreads real evenly. I use black spray primer. The "Barn Red" is the first solid coat of red, which is much darker. Then I use the "Burgundy" color which, to be honest, is pretty light compared to most burgundy recipes from other paint lines. But it gives this awesome medium red wine color. Spray matte finish. Nuln oil wash. Matte again. Done.The red in these drop pod pictures look more crimson than burgundy. Scroll up to the Death Co and see their saltires and chest eagles - that's much more representative since the pictures were done with daylight bulbs. The pods were taken under a yellow light. Link to comment Share on other sites More sharing options...
Father Mapple Posted September 9, 2013 Author Share Posted September 9, 2013 Well, here's the pictures of the Death Company Dreadnought final I promised previously before shaming myself by moving on to other things and never fulfilling my promises of pictures. So, now for real! Just 4 months later! I added the blood drops, the saltires, picked out more of the copper, and touched some areas up with silver on top of the gunmetal colors. First - Dready got BACK powerplant. http://farm8.staticflickr.com/7430/9710941903_3aaeb94d37_b.jpg Left side. It's a good side. http://farm8.staticflickr.com/7295/9710943183_42ec8ace5c_b.jpg Semi-frontal. I don't know what to write on the scroll. Mortis/Morte seems too easy. http://farm3.staticflickr.com/2812/9710947149_d27c7fb6bd_b.jpg A combination of the angle and the lighting is making the copper look greenish. It's more brown and shiny than this. And that white blood drop on the leg - I fixed the drop to be much straighter after seeing it in this picture. http://farm6.staticflickr.com/5485/9714183754_1acea72743_b.jpg More than halfway around it now! http://farm8.staticflickr.com/7444/9714185588_da43c3c7a8_b.jpg As if you couldn't tell, those blood drops and saltires are all free hand. NOT transfers. I know. I wouldn't have been confused either. http://farm3.staticflickr.com/2841/9714187210_f24fef5b8c_b.jpg Comments and criticism welcome, as always. Drop pods really are finished. I sprayed all the black on the Stormraven now (I had just foam brushed it the first time). It's nice and even. The white will be airbrushed on next with some masking tape, then the glossy black since glossy black over a matte black won't show the brush marks like a matte color does over a matte. I sprayed the black first, with the idea it would be easier to touch up the black paint if the tape pulls any off or it bleeds under the tape, rather than touching up the white paint if black gets on top of it. Might mean a thicker layer of white to cover the original overspray of the black, but that's why I got an airbrush! We'll see if that's a sound theory later this week. Link to comment Share on other sites More sharing options...
Father Mapple Posted September 15, 2013 Author Share Posted September 15, 2013 OK! Took some pictures of works in progress. Doing the 3 chaplains and the Stormraven, or trying to, this month. Stormraven for when I have alone time to airbrush, and chaplains when I can sit with paint station in lap and talk/chat with wife/child. First up, I took the chaplains and primed them black. Then I took this steel/stone gray, and brushed them very quickly because I found, even with great daylight lamps, I was having a hard time picking out detail (especially on Lemartes. You almost can't see his normal armor color there's so much bling). So the parts that are gray are going to be white or silver or copper anyways, so it should be easy to cover up. It's a "guide coat," as I read about someone doing something similar to white primed models with a quick black wash, but I've inverted it with a brushing of the elevated detail grayish. Astorath the Grim. In the background, you can see the objective marker I made out of the central column of the drop pod. It looks like some homing archaeotech. Good enough for me! http://farm8.staticflickr.com/7431/9764056014_cb2e66bb7a_b.jpg Lemartes, Guardian of the Lost http://farm4.staticflickr.com/3807/9764123433_ce7f2318b7_b.jpg Reclusiarch Nestor, or my footslogging elites chaplain. He has the least detail molded on him (which is still a lot) so I'm doing a basecoating on him first of all the colors to see if it looks right. All wings, which would be white on normal models, will be the wine/red color instead since the armor will be white. Not totally washed, highlighted, etc., but I want to make sure I'm not making a horrible mistake with white chaplains that have glossy black trim, and copper accents. http://farm3.staticflickr.com/2829/9764062525_f489b1b9db_b.jpg He is probably my favorite chaplain sculpt. Lemartes is awesome, but this guy has fangs. And his Crozius is amazing. See! http://farm4.staticflickr.com/3715/9764074584_fba979d06c_b.jpg Next up is the Death company colors Stormraven. I primed it black, then did the white. It'll be easier to fix white overspray, despite meticulous masking using 10mm tamiya model tape, by painting black over it than painting white over black by hand. This is the general scheme. I need to find the hurricane bolters sponsons and do those real quickly since I've left them off until now. http://farm8.staticflickr.com/7357/9764076705_f93dab5d92_b.jpg Maybe this one is a better picture? Also, the gunmetal was originally white, on other parts, then painted gunmetal. Makes it shinier. Washes will fix it and give a good contrast. I need the good shades of gray on guns, engines, etc., to make an otherwise black and white model have depth. http://farm6.staticflickr.com/5335/9764082265_9b53c3087d_b.jpg Don't know what to do about the engine intake on top. I think it looks horrible. But I need to have it since it stops the turret moving for LOS purposes. Maybe some chapter symbols to break it up? http://farm8.staticflickr.com/7426/9764085116_47288aa0f1_b.jpg Haven't come up with a name for the Dreadnought yet, but have had some good suggestions! Link to comment Share on other sites More sharing options...

Recommended Posts
Create an account or sign in to comment
You need to be a member in order to leave a comment
Create an account
Sign up for a new account in our community. It's easy!
Register a new accountSign in
Already have an account? Sign in here.
Sign In Now