BKZer0 Posted March 2, 2013 Share Posted March 2, 2013 (edited) First allow me to introduce myself. My name is Bob. I have been a member of this forum for a few years. However, I have always been more of a lurker than anything. I used to be an avid poster on TauOnline, and SecondSphere. This project log started on those forums, but I figured you guys might appreciate it.Sorry in advance for the picture vomit. I thought you might want to see everything from the start. I will attempt to explain all the picture sets as I post them.Before I began painting, I read "How to Paint Space Marines", "Codex: Space Marines", and "Insignium Astartes". I really got into Space Marine Iconography, and army organization. As a result, I used to army painter tool along with my own designs to produce concept art for my army. Concept Art: http://www.40k.zombiecrisis.org/Command.jpg http://www.40k.zombiecrisis.org/Veteran.jpg http://www.40k.zombiecrisis.org/Terminators.jpg http://www.40k.zombiecrisis.org/Tactical.jpg http://www.40k.zombiecrisis.org/Assault.jpg http://www.40k.zombiecrisis.org/Devastator.jpg http://www.40k.zombiecrisis.org/Banners.jpg http://www.40k.zombiecrisis.org/Shoulders.jpg http://www.40k.zombiecrisis.org/Termicons.jpg **Edit: Imperial Knight added http://40k.zombiecrisis.org/knight.jpg Some of you may recognize some of the images found here. Because I posted this about 3 years ago on a public forum, a lot of the images I created have poped up all over the net. I am kind of honored that people like them. On a side note, the Blood Ravens 5th Battle Company banner is of my own design. I based it on one of the Ultra Marines banners found in "Insignium Astartes". It is a full size illustrator file, about 2-1/2 x 6 feet. I had a really fun time creating it, and if anyone would like me to try and create a battle standard for them. I have all the elements saved so I would be more than happy to create something. Prepwork: Before Forgeworld decided to make a Blood Ravens transfer sheet, I decided that I wanted to use decals for my marines shoulders. There were several decal lists posted on this forum, but I wanted good vector based images to have nice crisp decals. So I decided to make my own deals. I followed a guide that was posted on BoLs. I purchased Microset, and Microsol. along with krylon crystal clear to set the decals. http://www.40k.zombiecrisis.org/decalprep.jpg Here are two sheets of the finished decals. I printed them at 600dpi on a laserjet. http://www.40k.zombiecrisis.org/decals2.jpg Here is a .jpg preview of the decal sheet. http://www.40k.zombiecrisis.org/Blood%20Ravens%20Icons.jpg And lastly, if you would like to use these for yourself. Here is a link to the print ready .pdf [Link] The next think I did was actually purchase models. The hobby shop in my area recently moved to a smaller location. As a result they had a lot of sales going on. I purchased a big box titles "Space Marine Megaforce". It came with 2 Tactical Squads, 1 Assault Squad, 1 Scout Squad, 1 Dreadnaught, 1 Predator, and 1 Rhino. Additionally, I purchased another Assault Squad, a Terminator Squad, 2 more Rhinos, a Captain, a Command Squad, and a Landraider. The grand unboxing. http://www.40k.zombiecrisis.org/marines.jpg That is everything that would fit on the table. My next post will be the first painting pictures. Edited February 11, 2015 by BKZer0 Brother Tyler, Lachdannan, TIGRYLbKA and 3 others 6 Back to top Link to comment Share on other sites More sharing options...
NovemberIX Posted March 2, 2013 Share Posted March 2, 2013 Very nice! You look like you have a detailed plan, and I for one can't wait to see how it all comes together. Link to comment Share on other sites More sharing options...
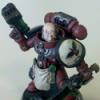
BKZer0 Posted March 2, 2013 Author Share Posted March 2, 2013 (edited) The next thing I did was set at trying to figure out how to best paint Blood Ravens. A gentleman on Youtube by the name of "Shiznaft1" had a nice How to video series up. I decided to take his advice, and kind of edit it to my own style. Here are the results. Painting the Assault Squad: Initially all the models were painted using Reaper Clotted Red. It dries VERY flat. The models were then washed in a coat of GW Devlan Mud. This makes all the models almost maroon. Next they are drybrused with the Clotted Red to tone that back a bit, and Lastly they are Drybrushed with Reaper Carnage Red. Carnage Red is essentiall the Blood Raven color. It is like a deep fire engine red. I drybrushed this all all the edges, and places where you would see highlights. Something you may notice about my army is there are no greaves style legs. I really liked the black knee cap so I purchased a bunch of spare knee cap style legs from battlewagon bits. http://www.40k.zombiecrisis.org/torsos.jpg The next thing I did was work on the shoulders. They are painted using GW Bleached Bone, then washed in Devlan Mud. They look really messy at this point. Next I lightly drybrush them with GW Kommando Khaki. This is more or less their final color. Lastly I highlight the shoulders using a light drybrushing of Bleached Bone. http://www.40k.zombiecrisis.org/shoulders2.jpg The next thing I paited was heads, backpacks, and arms. http://www.40k.zombiecrisis.org/headssmall.jpg http://www.40k.zombiecrisis.org/heasclose.jpg The assembly process. http://www.40k.zombiecrisis.org/arms.jpg http://www.40k.zombiecrisis.org/allarms.jpg http://www.40k.zombiecrisis.org/front.jpg http://www.40k.zombiecrisis.org/ravens_75.jpg Some detail work. http://www.40k.zombiecrisis.org/flamethrower.jpg After taking all these pictures, I could see a lot of poor mistakes. I went back and touched up all the models a little. The finished products: http://www.40k.zombiecrisis.org/details.jpg http://www.40k.zombiecrisis.org/details2.jpg The next thing I had to do was give the a Sergeant. This was my first time ever painting "flesh". http://www.40k.zombiecrisis.org/head.jpg http://www.40k.zombiecrisis.org/sarg1.jpg http://www.40k.zombiecrisis.org/sarg2.jpg Next, I had to base the models. I chose to do a ash style waste land. Bases: http://www.40k.zombiecrisis.org/bases1.jpg http://www.40k.zombiecrisis.org/bases2.jpg Lastly, my girlfriend (fiancée now) is a professional photographer. She set up some lighting in our apartment, and took these pictures. I will hopefully post pictures like this for each squad as they are completed. Pro Pictures: http://www.40k.zombiecrisis.org/ravens-entry1.jpeg http://www.40k.zombiecrisis.org/ravens-entry2.jpeg Edited March 2, 2013 by BKZer0 TIGRYLbKA, Tenebris, Phalanx Warder and 2 others 5 Back to top Link to comment Share on other sites More sharing options...
deathspectersgt7 Posted March 3, 2013 Share Posted March 3, 2013 Well thought out . will keep an eye out for this. WELL DONE!!!! Link to comment Share on other sites More sharing options...
War Angel Posted March 3, 2013 Share Posted March 3, 2013 (edited) That is an awesome looking squad, I love the color, and the shoulder pads look amazing. Is it supposed to be a white color that you've made "dark and grimy" or is it ment to be a bone color? Edited March 3, 2013 by War Angel Link to comment Share on other sites More sharing options...
BKZer0 Posted March 3, 2013 Author Share Posted March 3, 2013 The next thing I set out to do is paint my first rhino. This squad pictured about is the IV Tactical Squad. So I went ahead and started painting their rhino. Prepwork: http://www.40k.zombiecrisis.org/rhino.jpg The rhino was VERY daunting. I had never painted large flat surfaces, and all the silly drybrushing tricks I used on the troops would not work. I picked up a copy of "How to Paint Citadel Tanks" for guidance. Also you will notice the strange piece of pastic in the top left of the picture. It is just a plastic cap. I was a little nervous about painting the entire tank with the Reaper paints that I used on the troops. I didn't want brush strokes, and adequately watering the paint down would require 5-10 coats. I thought that might hurt coat consistency. Everyone told me to use foundation paints. The closest being GW Mechrite Red. It was far too red. so what I did was mix my own. it was about a 2:1 ratio of Mechrite Red, and GW Scab Red. I painted 1/2 that pastic cap with the Reaper Base Color, then mixed until I replicated it with foundation paint. I should have enough for the project. Rhino: Here is is base coated. http://www.40k.zombiecrisis.org/20130111_003423.jpg Detail work. http://www.40k.zombiecrisis.org/20130113_163253.jpg This picture shows my greatest disappointment. This was my first attemt at a super large decal. The edges are VERY obvious to me... No one else sees it... But I know it is there. http://www.40k.zombiecrisis.org/20130115_004018.jpg Finer Details. http://www.40k.zombiecrisis.org/20130115_004106.jpg Finished tank. with the troops. http://www.40k.zombiecrisis.org/20130115_003741.jpg That is an awesome looking squad, I love the color, and the shoulder pads look amazing. Is it supposed to be a white color that you've made "dark and grimy" or is it ment to be a bone color? It is supposed to be bleached bone, so kind of like a cream color. I made left them slightly weathered to look dirty. Ironclad001, TIGRYLbKA and Dosjetka 3 Back to top Link to comment Share on other sites More sharing options...
The_Chaplain Posted March 3, 2013 Share Posted March 3, 2013 Off to a fantastic start brother, it looks like you've got a good plan laid out for tracking things out and updating. Looking forward to more from you! Link to comment Share on other sites More sharing options...
War Angel Posted March 3, 2013 Share Posted March 3, 2013 Oh ok, that's really Cool. That rhino is pimp. I have to ask, how did you achieve the bases? Link to comment Share on other sites More sharing options...
Grimdarkness Posted March 3, 2013 Share Posted March 3, 2013 Looks good well done. Link to comment Share on other sites More sharing options...
BKZer0 Posted March 3, 2013 Author Share Posted March 3, 2013 Oh ok, that's really Cool. That rhino is pimp. I have to ask, how did you achieve the bases? I can put a tutorial up for it. Link to comment Share on other sites More sharing options...
War Angel Posted March 3, 2013 Share Posted March 3, 2013 Thanks, tht would be awesome!!! Link to comment Share on other sites More sharing options...
Adeptus-Alaska Posted March 3, 2013 Share Posted March 3, 2013 wow, these are mad cool! deep respect to your dedication to the hobby! Link to comment Share on other sites More sharing options...
BKZer0 Posted March 3, 2013 Author Share Posted March 3, 2013 Thanks, tht would be awesome!!! I added a tutorial for making my bases. It can be found here: http://www.bolterandchainsword.com/topic/272185-making-simple-desert-bases/ The color scheme in these pictures can be found at the bottom of the tutorial. TIGRYLbKA 1 Back to top Link to comment Share on other sites More sharing options...
AKA_Tattoo Posted March 3, 2013 Share Posted March 3, 2013 Very nice lookin stuff! Link to comment Share on other sites More sharing options...
DarkVen Posted March 3, 2013 Share Posted March 3, 2013 What a solid start! Impressive! Your BRs remind me of good ol' "DoW: Dark Crusade", which is my favorite War40k-game so far. Keep it up! Ironclad001 1 Back to top Link to comment Share on other sites More sharing options...
incarnus Posted March 4, 2013 Share Posted March 4, 2013 If the Rhino hasn't been sealed yet, repeated applications of Micro Sol may help to soften that decal edge. Fantastic work overall. Link to comment Share on other sites More sharing options...
Dosjetka Posted March 4, 2013 Share Posted March 4, 2013 Loving the work you've done here. Very decent stuff Good luck with the rest of your painting adventures! Link to comment Share on other sites More sharing options...
BKZer0 Posted March 4, 2013 Author Share Posted March 4, 2013 If the Rhino hasn't been sealed yet, repeated applications of Micro Sol may help to soften that decal edge. Fantastic work overall.Thanks for the advice. Unfortunately, it is already sealed. I tried drenching the decal in Micro Sol both rubbing it in, and a letting it just dry. It got rid of all the silvering, and I was fairly happy with the way everything looked in the end. I thought it might have just looked bad because the decal was still glossy, compaired to the rest of the tank was matte. When I applied the clearcoat the decal itself blended in, but that is when the edge became more visible. I think on the next one, I am just going to try and cut the decal closer to the graphic. Ironclad001 1 Back to top Link to comment Share on other sites More sharing options...
BKZer0 Posted March 5, 2013 Author Share Posted March 5, 2013 In the interest of keeping consistency I decided to paint the remainder of my troops at the same time. They way there is no variation in quality/color/technique/etc... The finally tally is 10 Tactical Marines, 10 Assault Marines, 5 Terminators, 5 Command Squad, and 1 Captain for a total of 31 models. It is daunting, especially when I think things like "62 arms", but it should be fun. The first thing I did was assemble the troops. http://www.40k.zombiecrisis.org/20130120_155636.jpg Primed http://www.40k.zombiecrisis.org/20130120_182129.jpg I finished basecoating all the models red. You may notice the one white pair of legs. That is for my apothecary. I completely forgot about him, and I accidentally painted his legs red. It was a nightmare painting him white. I watered down the paint so it was little more than milk, then I added about 40+ layers. I think it came out ok. http://www.40k.zombiecrisis.org/20130124_185108.jpg Closer View. It is actually cleaned up in the picture above. http://www.40k.zombiecrisis.org/20130123_040410.jpg Last but not least. I decided to work on the Command Squad first as they are the most detailed. I was also most excoted to paint them. Here is the apothecary torso. http://www.40k.zombiecrisis.org/20130125_012459.jpg That's all for now. TIGRYLbKA 1 Back to top Link to comment Share on other sites More sharing options...
red_knight23 Posted March 5, 2013 Share Posted March 5, 2013 really cool looking, Realy look forward to seeing more of this force Link to comment Share on other sites More sharing options...
War Angel Posted March 5, 2013 Share Posted March 5, 2013 Nice, 31 models at one time, I wish I was doing 30 at a time. What's you're teqnique for pre baseing them? I noticed you have these little squares that you put them on. What kind of glue do you use to bond it and how well does it come off? Link to comment Share on other sites More sharing options...
The Yncarne Posted March 5, 2013 Share Posted March 5, 2013 Great work brother. I understand the difficulties in getting a consistent color. Link to comment Share on other sites More sharing options...
BKZer0 Posted March 5, 2013 Author Share Posted March 5, 2013 Nice, 31 models at one time, I wish I was doing 30 at a time. What's you're teqnique for pre baseing them? I noticed you have these little squares that you put them on. What kind of glue do you use to bond it and how well does it come off? They are glued to pieces of CD case that I can to 1"x1" squares, and 1"x1.5" rectangles. To bond them I use a drop, the worlds smallest drop of superglue. It holds them in place just fine while I am painting. It is not permanent though. If I drop a model, often to base goes flying off. Sometimes if I hold them wrong, they pop off. Every once in a while, they just fall on their own. However, I have had them really get stuck before. I just slide my hobby knife under a toe, and pop them off with leverage. I also only glue 1 foot. Link to comment Share on other sites More sharing options...
retrovertigo Posted March 5, 2013 Share Posted March 5, 2013 They are looking really good, and man after my own heart with the mass production line painting. So satisfying when you can crank out a whole squad in one go. Oh and the bases are brilliantly simple - I'm going to use that for my own. Link to comment Share on other sites More sharing options...
batu Posted March 5, 2013 Share Posted March 5, 2013 Cool project brother ! Keep it up ! Link to comment Share on other sites More sharing options...

Recommended Posts
Create an account or sign in to comment
You need to be a member in order to leave a comment
Create an account
Sign up for a new account in our community. It's easy!
Register a new accountSign in
Already have an account? Sign in here.
Sign In Now