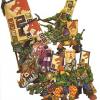
Kierdale Posted March 21, 2013 Share Posted March 21, 2013 After buying an enclosed Medusa last year I was left with (in addition to a very cool piece of mobile artillery) several of those huge chunks of FW resin that come attached to kit components, and thought that they'd make nice barriers/barricades. Hence this tutorial. The end result: I initially just had a play around with the pieces (after thoroughly washing them and cleaning up their surfaces a little: not too much as I wanted them to look like rough, made-in-an-emergency cheaply barricades) and tried carving some damage into them. Some had `boards` seemingly protruding from them and I decided these parts would look perfect painted up as wood sticking up from the concrete blocks. These sections had some lines scored into them to give the impression of wood grain. Damage For example, a particularly wide crater: push the point of a modelling knife into the block at an angle and the rotate it, carving out the resin in a spiral. Here is that `crater` afterwards. I then cut a line outwards from the center of the crater, and then angled my blade ever so slightly and cut again to take out a thin sliver of resin. Repeating that, but making sure not to have the cracks uniform (i.e. cut at different lengths and angles), have several shooting out from the center. You could make the damage seem as if it came from a certain angle by concentrating the cracks on one side, or having them longer to one side and shorter on the other. I then added some cracks joining up these radial ones, as if the concrete further from the center had been cracked by the blast. In addition to using a modelling knife I also experimented with a drill: two holes here from simply drilling directly into the resin, and the one on the right was drilled directly in and then, while still rotating the drill (and bear in mind I only use a GW pin vice) I angled it slightly. The resin is relatively soft but be careful not to break your drill bit or gouge too deeply. Again, the bare holes are enhanced by radial cracks done with a modelling knife. Those on the left do look a little plain but after painting look better. Bases I measured the longest block I had and, judging by the number of blocks of different sizes I had, figured I could get six 3"x1.5" pieces. I cut some thick cardboard, and after a couple of dry-runs deciding what would go where: ...painted the bases with PVA glue and covered them with sand. I was initially going to glue the resin blocks to the baseboards first but then realised that putting them on afterwards would help to make them look like non-permanent features. I then used a hot glue gun to glue the resin blocks to the bases once they had dried. You'll also noticed some GW sprue sections in there too: simply a few lengths cut to size, their ends mangled with some plyers (a bit of chewing here and there too) with short sections of bent paper clip fitted into drilled holes at the ends. While the resin blocks are going to be painted up as concrete barricades, these pieces of sprue will be scavenged lengths of steel-reinforced concrete used to shore-up the barricades (and painted a different tone to reflect this). Next up: Painting. To be completed this weekend. Link to comment Share on other sites More sharing options...
Chaeron Posted March 21, 2013 Share Posted March 21, 2013 Fantastic - I had a similar idea, but you've executed it to perfection (I also do not have anywhere near as much resin residue to do this with!). Can't wait to see them painted. Link to comment Share on other sites More sharing options...
Shiodome Posted March 22, 2013 Share Posted March 22, 2013 keep meaning to do this, i have a carrier bag FULL of these resin chunks (not just from me, i make the group donate them as well :P) Link to comment Share on other sites More sharing options...
Kierdale Posted March 23, 2013 Author Share Posted March 23, 2013 Thanks, Chaeron and Shiodome (named after the Tokyo location?). I'm sure everyone who buys from FW has the idea. I hope this thread inspires some to actually get it done! Painting I sprayed all the pieces with black acrylic spray (cheap stuff from the hundred-yen store. Gloss, but that didn't matter) to basecoat them and help seal the sand on. It also gets in all the cracks so if you miss anything later you can call it shadow. I then painted the ground areas with a dark grey (I mix my own greys, but looking at a colour chart I think the colour is similar to Mechanicus Standard Grey). I painted the sprues with the same colour, though they were later given different washes so the final colours were different. The FW blocks were painted a lighter grey (akin to Dawnstone in the new range). The above photo shows the first, thin coat on one of the blocks. And there with the second coat on. And above: the top piece had it's third coat of light grey, then all (ground, sprues and FW blocks) were given a heavy drybrushing with Longbeard Grey (which shows up a little on the two pieces of cork concrete debris on the lower piece). The top piece has also been given a wash with Nuln Oil shade. Two pieces with the grey areas finished. The sprue-pieces were given a Drakenhof Nightshade wash rather than a black wash, as I like the tone it gives them (thanks to a tutorial I found here on the B&C by -if I remember correctly- Pingo). I intend to do the same for my buildings. The protruding steel from the sprues was painted Mithril Silver (on reflection a darker tone might be better) and then washed heavily twice with Gryphonne Sepia (not yet done in the above image). The wood sections were then painted a dark brown, drybrushed with a lighter one and then washed with Agrax Earthshade. Decorating/Detailing Some posters which can be downloaded at: http://www.warseer.com/forums/showthread.php?138549-Imperial-Propaganda-Posters-and-Signs Outstanding stuff that just begs you to make some terrain to use them on (after being scrunched up and cut a bit). As you can see in the above image, everything's still rather clean. This is where weathering powders come in. My favourite being: I gave the ground areas a light brushing of Light Sand after going over everything with Mud. That dirtied the posters up nicely. And a side-on shot of the right hand piece: Added a small Khorne icon drawn in blood (Tamiya Clear Red mixed with Nuln Oil). And that's it. Link to comment Share on other sites More sharing options...
elmo Posted March 23, 2013 Share Posted March 23, 2013 Consider this stolen Link to comment Share on other sites More sharing options...
Kierdale Posted March 24, 2013 Author Share Posted March 24, 2013 Good! Be sure to post photos when you do ;) Link to comment Share on other sites More sharing options...
Aridene Posted October 7, 2013 Share Posted October 7, 2013 Thats awesome. For sure using it Link to comment Share on other sites More sharing options...
reckoning Posted October 29, 2013 Share Posted October 29, 2013 Had always given this a thought. Glad to see someone actually implementing it in a very effective way. Kudos! Link to comment Share on other sites More sharing options...
Kierdale Posted October 30, 2013 Author Share Posted October 30, 2013 Thank you! If anyone has made barriers like these from FW resin, please post your photos here . I'd love to see them. Link to comment Share on other sites More sharing options...
Ratboy1664 Posted January 15, 2014 Share Posted January 15, 2014 I gave this a go and here are my results. Link to comment Share on other sites More sharing options...
Kierdale Posted January 15, 2014 Author Share Posted January 15, 2014 Very nice work, Ratboy. I like the black scoring around the damage. That's something I missed. Link to comment Share on other sites More sharing options...
Ace Debonair Posted January 16, 2014 Share Posted January 16, 2014 You know when you see an idea that's so obvious and awesome that you just can't believe you didn't think of it yourself? Well, that just happened to me. This is an ingenious, simple and fantastically executed idea. First-rate stuff! Link to comment Share on other sites More sharing options...
SW1 Posted February 14, 2014 Share Posted February 14, 2014 Lol ... Was looking at some of the blocks and thinking of casting something very similar. Going to try making them interlocking like the ones you see at road works. Link to comment Share on other sites More sharing options...
Kierdale Posted February 14, 2014 Author Share Posted February 14, 2014 Sounds good, SW1. Please post some photos here when you do. I'd like to see how they turn out. :) Link to comment Share on other sites More sharing options...
LordOrdGermany Posted February 15, 2014 Share Posted February 15, 2014 That is great my IG comrade! I use the superfluous sprues by FW for exactely the same puropse, too! Gret work. Link to comment Share on other sites More sharing options...
depthcharge12 Posted February 18, 2014 Share Posted February 18, 2014 Fantastic idea! And awesome Thousand sons too ;) I was always hoping that FW would some day accept those sprues back to reconstitute them in exchange for a discount but alas I don't think that's feasible :D Link to comment Share on other sites More sharing options...
Grotsmasha Posted March 7, 2014 Share Posted March 7, 2014 And to think I've just been tossing modelling gold in the bin, d'oh *face palm Cheers, Jono Link to comment Share on other sites More sharing options...
Kierdale Posted December 6, 2015 Author Share Posted December 6, 2015 Elmo recently made some excellent terrain using FW waste so here's a link. :) Well worth a look :tu: Link to comment Share on other sites More sharing options...
CommodusXIII Posted December 15, 2015 Share Posted December 15, 2015 I took the same approach for basing my Imperial Knights! My only problem is that I've run out of flashing. Time to place my next order! Link to comment Share on other sites More sharing options...

Recommended Posts
Archived
This topic is now archived and is closed to further replies.