facmanpob Posted June 24, 2013 Share Posted June 24, 2013 Just found this thread......I knew someone had vowed a Titan for the ETL, and I'm really glad you decided to start a progress log! Some excellent photos and its really interesting to read about the issues you've had with the building process, and how you've overcome them. I love the work you've put into the knees, and the BT iconography works really well. The Techmarine's work station and the cockpit are also very nicely painted....its almost a shame that you can't see them when its fully built! Looking forward to seeing you make more progress with your Titan. By the way, there's still over a month and a half to go in the ETL.....perhaps a Warhound for vow 2? ;) Link to comment Share on other sites More sharing options...
Brother Callius Posted June 26, 2013 Author Share Posted June 26, 2013 Hello again everybody! Thanks for the feedback, it's nice to hear you guys like the bridge/ head/ cockpit stuff. This weeks first update is a minor one as I got the shoulder pads and inner carapace done. I have magnetized the shoulder pads with a 10mm rare earth magnet on each end of the joint so they just ''snap'' into place and can be removed for easy transportation. I kinda like the idea of a Warhound to go with my Reaver as facmanpob jested but I definetly won't be doing it for the ETL as there a many factors against it such as money, time and a three week vacation abroad, but I'm not dropping the idea of adding it later just yet... Dreams aside, on to the photos: Shoulder plates w/ magnet: Inner carapace: That just about covers this small update. This weekend I will have the ultimate challenge as I will take on the main carapace and focus completely on that since it's the first thing you really see on the titan, the titan legion logo have me worried though but i will take it as I go along... By the way does anybody know how to edit the topic headliner as I just can't seem to figure it out? Till next time brothers! Link to comment Share on other sites More sharing options...
Chaeron Posted June 26, 2013 Share Posted June 26, 2013 Pleasure to watch this develop - top work! Link to comment Share on other sites More sharing options...
facmanpob Posted June 26, 2013 Share Posted June 26, 2013 By the way does anybody know how to edit the topic headliner as I just can't seem to figure it out? Till next time brothers! Go to the first post, click edit, then click "Use Full Editor" and it will enable you to amend the topic name and add tags. Nice shoulder purity seals by the way Link to comment Share on other sites More sharing options...
Captain Semper Posted June 26, 2013 Share Posted June 26, 2013 Beutiful shoulder pads - can't wait to see everything assembled! I'm so excited that a Titan is made during the ETL - and of such high quality! :tu: Link to comment Share on other sites More sharing options...
T0MMY Posted June 26, 2013 Share Posted June 26, 2013 Fantastic painting; both on the large areas - especially without using an airbrush (that's right yeh?) - and detail. Amazing. I'd love to do a warhound, but this is something else - great work. Looking forward to seeing the finished beast. Link to comment Share on other sites More sharing options...
Zhoolda Posted June 26, 2013 Share Posted June 26, 2013 Love it! Link to comment Share on other sites More sharing options...
ChaptermasterDemon7 Posted June 26, 2013 Share Posted June 26, 2013 You sir are a master of painting. I love what you have done so far with the titan and I wanting the one I am saving for even more now, even if it is a Mars pattern warhound titan. Link to comment Share on other sites More sharing options...
Brother Callius Posted June 28, 2013 Author Share Posted June 28, 2013 It's time for a little ''preview''! First I must say that I am quite overwhelmed with all this positive feedback i'm getting on this build and I am really glad that you guys are enjoying my humble work. I consider myself an average painter and since there is 30 km (18,6 Mi.) to my nearest GW retailer and I don't have a network of fellow hobbyists it's hard to get other peoples opinion about my work so it's nice to have you guys judge my progress I have made some good progress on the main carapace and I expect that tomorrow evening I will have that done and off my to do list. This picture is just so you can see the progress and my modest work area, you can also see the method I use for my lettering. By the way I finally found a good use for my old dictionary... Here you can see my little slice of GW, or my very own manifactorum if you will. You may notice that the weapons a now in the painting stages and perhaps sunday or next week they will join this thread: I hope you are not to dissapointed with the lack of anything finished but this was just to wet your appetites as the main upload will happen tomorrow evening (I hope) As always thanks for reading! Link to comment Share on other sites More sharing options...
ChaptermasterDemon7 Posted June 28, 2013 Share Posted June 28, 2013 I know the feeling about not having a network of fellow hobbyist. Nice work so far though and now I can go back to working on my tactical squads. Link to comment Share on other sites More sharing options...
Mors Vincit Posted June 28, 2013 Share Posted June 28, 2013 nice NATO member 5.. have one too. Link to comment Share on other sites More sharing options...
Brother Callius Posted June 29, 2013 Author Share Posted June 29, 2013 Hello again everybody! So the time has come for this weeks big update with the main carapace done. I am very satisfied with the finished result, from the servitor on the ceiling (that you will never see) to the scrollwork and the titan legion logo. The freehand was done as I have described earlier but I stumbled onto a problem as I was left with the words a little to narrow and needed something to fill in the gap without looking to out of place. Again I turned to Forge Worlds model masterclass volume two where they used small crosses and it turned out just right. Before I could really start the lettering I had to decide what to write, with the Titan name a sure thing I decided to do two lines so the letters wouldn't end up looking too tall. The upper words read: Dominus Virtuem which means Lord of valor in latin and is quite fitting for a big machine god personified. The lower words is Fides Et Honor and means faith and honour again in latin and it suits the mechanicum and their alligience to the immortal god-emperor. With that sorted I turned to the logo of the Legio Crucius and that was quite the challenge. As I mentioned a few times my freehand skills are quite limited and the prospect of something way more complicated that lettering was daunting to say the least. I am very satisfied with the end result and knowing my limits I ended up ditching the cog around the fist as that would have ended up crooked and off centre, but even without it I am pleased with the result. This is the result I was aiming for: Main carapace: Closeup of the scrollwork: And last but not least the weapons servitor on the ceiling of the carapace: So that is what I have achieved so far and I hope you enjoy it and leave your thoughts on the progress below. Till next time brothers! Link to comment Share on other sites More sharing options...
Kierdale Posted June 29, 2013 Share Posted June 29, 2013 Great work! The scrollwork is particularly nice. How about a bit of weathering on the white shield? A sponge and a dab of grey paint could rough it up a little. Link to comment Share on other sites More sharing options...
Captain Semper Posted June 30, 2013 Share Posted June 30, 2013 Shield with symbol is nice. I was kind of expecting a quartered, more stylised design, so it was a pleasent surprise... :D Link to comment Share on other sites More sharing options...
ChaptermasterDemon7 Posted June 30, 2013 Share Posted June 30, 2013 Very nice. I love the free hand. Link to comment Share on other sites More sharing options...
Stonedog Posted July 1, 2013 Share Posted July 1, 2013 Holy Emperor! This thing is AWESOME! Link to comment Share on other sites More sharing options...
Brother Callius Posted July 4, 2013 Author Share Posted July 4, 2013 Hello again my patient brothers! After some painting days I have now completed the Apocalypse missile launcher and the Gatling blaster and got them connected to the titan. The Apoc. launcher is neither glued nor magnetized as the pin that connects it with the carapace is big and bulky so no other form of fastening is needed. I thought alot about magentizing the Gatling blaster but decided against it as the magnets I've got are too weak (and I am too lazy to order big ones). But most importantly if the blaster was magnetized I couldn't get the cablng that runs from the torso to the weapon to fit as they are connected to the gun itself, and if I am building a model this big and this expensive I would like it to be complete and not have holes where two tubes where suposed to be... Then as I was waiting for the epoxy to secure the Gatling blaster I realised that the only thing left for this beast is the Power fist and I am about to start that later today, so hopefully I will get this bad boy done in the weekend I'm really glad to hear you guys like the freehand as that was the part that worried me the most but I was pleasently surprised with the result. @ Kierdale: I get where you're going and agree but I am afraid to mess up my fist logo as that was a real hurdle to complete but I will experiment with it and maybe it's going to turn out awesome Apocalypse missile launcher: Gatling blaster from the side: And finally the biggest assault cannon ever from the front: That concludes this weapons update and I can now see the light at the end of the tunnel... See you all very soon! Link to comment Share on other sites More sharing options...
Hasdrubal Posted July 4, 2013 Share Posted July 4, 2013 Impressive progress ! I'm afraid I haven't touched my WiP titan for 3 weeks now Link to comment Share on other sites More sharing options...
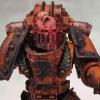
Brother Callius Posted July 6, 2013 Author Share Posted July 6, 2013 Greetings to you all! So the time has come to round this thread up as I have now completed the last step of my Reaver titan and am only missing the final touches My last piece of this giant was the Power fist which I have just completed. It was a real joy to build and I love the freedom you have with it as it can be made just as you want, left or right, opened or closed and anything inbetween. I have magnetized the joint between the fist itself and the arm to ease transportation and also to twist the hand from a more relaxed pose to a more agressive pose. For the job I used two 10mm rare earth magnets wich I sunk into holes I've drilled and filled with power epoxy. As a result the hand can twist all the way around and are not as loose or sloppy as I feared. The magnets I used is good for up to 1,2 kg so there should be enough pull to not drop the hand unintentionally. And now on to the final pics in this thread: Side view of the hand: The inside of the hand: And finally the magnets (this photo was taken before the washes went on so it's quite bright) : I am planning on posting all the pictures of this finished beast in Hall of Honor and will post a link in this thread just in case it gets buried fast... As always comments are welcome and thanks for your precious time Link to comment Share on other sites More sharing options...
Brother Callius Posted July 7, 2013 Author Share Posted July 7, 2013 I am sad to see this thread end as I've gotten a lot of support and ideas from you guys but the titan is done and what a great ride it's been. It was really a joy to work on such an awesome model even though I had my battles with warped resin, epoxy and other fun stuff... All in all I'm glad it turned out as it did and thanks a lot to you all for following my journey and helping where you could This is my hall of honor thread so you can see the finished result without digging through loads of posts: http://www.bolterandchainsword.com/topic/277751-fw-reaver-titan-etl-ii-vow-complete-pic-heavy/ Till next time brothers! Link to comment Share on other sites More sharing options...
Kierdale Posted July 7, 2013 Share Posted July 7, 2013 It's been fun watching! Heading over to the Hall of Honour thread now... Link to comment Share on other sites More sharing options...
ChaptermasterDemon7 Posted July 7, 2013 Share Posted July 7, 2013 Congratz on you finishing it man. It was a honor to watch you paint this wonderful model. Link to comment Share on other sites More sharing options...

Recommended Posts
Archived
This topic is now archived and is closed to further replies.