Storm Hawks Legion Posted October 10, 2013 Share Posted October 10, 2013 so, I've been gone a while, if you don't remember me, don't feel bad I wasn't that memorable, but I'm back now. so, my intent with this thread; something to kick my butt back into gear when I start lagging I created a DIY Marine Chapter, named them the Forge Hawks I intend to collect an entire chapter, eventually, for now, I'm sticking with a company. This is what I have now, pretty close to a full company, except I was quite a bit younger and less skilled, and less patient when I built them I know intend to go back, slowly but surely and rebuild them, along the lines of Leave No Model Unconverted - WORKS IN PROGRESS - The Bolter and Chainsword truescale, with other ideas stolen from around B&C as I go, to date, I got suckered into buying a Dark Vengeance box, not sure how that happened, but, that's what I'm starting with so, way we go. I started with the bikes nothing to fancy, mostly just removed the more obtrusive DA Iconography and painted them up my bike Squadron! the Attack bike I built before going on Haitus... sorry if the photos aren't up to typical B&C Standards, but I use what I have on hand, witch aint too much... recommendations appreciated... now, I like and enjoy Converting and Kit bashing, my GS-fu is very weak, so I try and avoid that much as I can I also am not a big fan of painting... reading peoples articles around B&C now, painting seems to be much more sophisticated and complex than I remember, so, if people would give me some advice/ point out some tutorials I would be appreciative and so, lets see where we go from here... edit: spellcheck only goes so far... Link to comment Share on other sites More sharing options...
Brother Pheidias Posted October 11, 2013 Share Posted October 11, 2013 Looks a little similar to the Howling Griffons, but otherwise a very nice force. For pictures, I recommend daylight, a single-coloured background (a piece of paper can suffice), using the macro-function (flower-icon on most digital cameras), and an online Photo-host like Photobucket. Link to comment Share on other sites More sharing options...
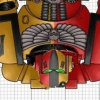
Storm Hawks Legion Posted October 16, 2013 Author Share Posted October 16, 2013 "I'll be back!" Got my Terminators cleaned and assembled before the weekend, didn't get a chance for photos and posting like I wanted too though... so I'm posting them now Converted Sergeant the chest plate is actually a standard Marines chest piece... plus a trimmed down Shoulder guard and MK VI helmet. the older marks of armor are a mark of rank in my chapter, especially the MK VI, so, determining that the original face plate was all but un-usable, I put this together, I did the same with some of the Assault on Black Reach Terminators as well. Still some GSing to do, fill in the top of the armor where the wings should have been, and under the chest... and put a belt back on him the entire Squad haven't done much with anyone but the Sarge yet, still thinking about them want to mod the chainfist, turn it into a large grinder, after all it was designed to breach bulkheads, a grinder or steel saw would make more sense to me than a chainsaw for that purpose, anyone know of any parts that look like a steel saw or a grinder that would work? considered an Ork dread's buzz saw, not sure where to get one or if it's as massive as it looks. Pheidias, I have incorporated two of your suggestions so far, and to much better results, as for the other two, Photobucket keeps telling me I already have an account, but won't send me a password reset e-mail, or any e-mail for that matter... not in my junk folder not in my inbox... but it says the e-mail has already been used for an account, still working on it, might get it up for next update. As for Sunlight, a rather difficult proposition as I'm currently occupying a basement apartment, to get Daylight I'd have to truck everything I want photos of upstairs, then figure out a way of setting it up for pictures, without attracting attention to myself, not the best neighbourhood... see what can be done, these photos were taken on my stove under the kitchen light, the hood light, and my painting light I pulled over, much better, but still a little on the dark side. Link to comment Share on other sites More sharing options...
Storm Hawks Legion Posted October 16, 2013 Author Share Posted October 16, 2013 "I'm proud of what I am; I am a librarian!" got some time today and cranked my librarian out. trimmed some of the DA Iconography, I was actually very proud of how this guy came out, then I saw the photos and he's not nearly as clean as he seemed... little late now, and I'm still proud of how he looks especially the orange robe I really had some doubts as to how it was going to come out, but I think that looks pretty good. now I just gotta figure out how to use him, never had one so I never figured out how to use them, never figured out how to use them so I never got one. now I have one, now I need to figure out psychic powers... Link to comment Share on other sites More sharing options...
Storm Hawks Legion Posted January 7, 2014 Author Share Posted January 7, 2014 well, not going so well, first test miniature... there are parts of it I like I'm actually fairly pleased with the left pauldron aside from that, the purple is either not watered down enough for a wash, or is just the wrong color, I was hoping it would help blend the two halves together, maybe I should be trying to go the other way? still a lot of touch up work to be done, which definitely contributes to the sloppy look, but I don't want to go and do a whole lot more if I just have to strip it down and start again. thoughts or suggestions? Link to comment Share on other sites More sharing options...
Storm Hawks Legion Posted January 9, 2014 Author Share Posted January 9, 2014 Well, since no one seems to care about my painting abilities, I'll go back to what I can do well, Dreadnoughts. "Dread nought but God." Venerable Brother Lenus, from the standard model I have cut off and raised the Sepulcher, that's about it. on another note, where would someone go looking to acquire a set of Sentinel legs? I have a conversion I want to do but, haven't done the leg work yet... Link to comment Share on other sites More sharing options...
lionofjudah Posted January 9, 2014 Share Posted January 9, 2014 eBay or bartertown for sentinel legs. I like the split color scheme you have going on. Bigger pics would help(of course my internet is on my phone;) Link to comment Share on other sites More sharing options...
Storm Hawks Legion Posted January 9, 2014 Author Share Posted January 9, 2014 finally got Photobucket working, now it keeps telling me "that extension is not allowed in this community," what am I missing? Link to comment Share on other sites More sharing options...
Brother-Chaplain Kage Posted January 9, 2014 Share Posted January 9, 2014 What file type did you save the pictures as? Link to comment Share on other sites More sharing options...
Storm Hawks Legion Posted January 9, 2014 Author Share Posted January 9, 2014 on my computer they're .jpg I can upload them to B&Cs gallery and display them that way, but uploading them to Photobucket, I click the image box, it asks me for a URL, I get... http://i1213.photobucket.com/albums/cc470/IroncladDreadnought/Projects/VenerableBrotherLenus.jpg an image, never mind me, I'm just, exhausted, and going crazy... Link to comment Share on other sites More sharing options...
GodEmperorOfMankind Posted January 9, 2014 Share Posted January 9, 2014 Loving the Dread! very cool. What's the purple paint you've been trying out though, maybe I missed something? Link to comment Share on other sites More sharing options...
Storm Hawks Legion Posted January 9, 2014 Author Share Posted January 9, 2014 It's Vellojo violet, I listed the colours on the description in the gallery, should have reiterated here for clarity though...tried again this morning, http://i1213.photobucket.com/albums/cc470/IroncladDreadnought/Projects/a42cf1f7-eb5a-4a6d-bbe3-7c8c1f46462d.jpg I was told be another thread to shade in the contrasting color, hence the yellow shaded with a blue, and the red shaded with a green, course it's not exact but, with my paint selection nothing is... the green is also way to light I think... the blue I think works though http://i1213.photobucket.com/albums/cc470/IroncladDreadnought/Projects/TestMiniature3.jpg try and finish it this afternoon, see what I get Link to comment Share on other sites More sharing options...
GodEmperorOfMankind Posted January 9, 2014 Share Posted January 9, 2014 Thanks for the clarification, I meant why are you using the violet for shading? Personally I don't think it works, what is the end result meant to look like? You said another thread told you to do this, can you show an example? My suggestion would be to do the basic colours as you have (I think you've got them down well enough) then do some basic sading with a wash like nuln oil, then highlight with the basic colours again and a little white. But that's just my 2 cents. Keep it up though mate Link to comment Share on other sites More sharing options...
Storm Hawks Legion Posted April 13, 2014 Author Share Posted April 13, 2014 I rather dislike this whole "responsible adult" thing, I don't have time to do what I enjoy anymore... but that sounds rather whiny and immature doesn't it? sigh... Sorry Angels, I thought I replied to you before now, apparently not. I don't have a link to the thread before, however a member recommended shading with the contrasting color. He also provide a link to a youtube video on color theory. https://www.youtube.com/watch?v=LGuP9PAL2Wk in the video he discusses mixing paints with their contrasting color to darken the shade, I kind of didn't watch the video the whole way and skipped that part, my father would say something to the effect of "can't scratch my ass but tear it all to pieces." but I did go back and try it, I don't have pics, but it didn't turn out pretty either so I finally went out of my way to get some nuln oil, and I don't have photos of that either yet as I didn't get my sergeant done in time for the weekend I do have photos for this post though http://i1213.photobucket.com/albums/cc470/IroncladDreadnought/Projects/Vindicator/VindicatorMarkV14.jpg http://i1213.photobucket.com/albums/cc470/IroncladDreadnought/Projects/Vindicator/VindicatorMarkV12.jpg http://i1213.photobucket.com/albums/cc470/IroncladDreadnought/Projects/Vindicator/VindicatorMarkV5.jpg a prototype Vindicator Mk V fairly simple conversion, could have gone better, I couldn't salvage the interior bogeys so at the front the track is only supported on one side, I also don't have enough track to continue till it's invisible under the hull, and it shows... http://i1213.photobucket.com/albums/cc470/IroncladDreadnought/Projects/Vindicator/VindicatorMarkV6.jpg but it's completely magnetized, goes back and forth to Vindicator and rhino, and anything else I own the parts fpr Link to comment Share on other sites More sharing options...
helterskelter Posted April 13, 2014 Share Posted April 13, 2014 If you look on bits websites, you can pick up extra track to finish where you left off, so no worries there. Kudos on magnetising to make your onmi chassis, and as for the shading, less is more :) Link to comment Share on other sites More sharing options...
Forté Posted April 13, 2014 Share Posted April 13, 2014 Colour theory is a good way to vary how your painting looks. Takes a lot of practice but very rewarding too. Link to comment Share on other sites More sharing options...
Storm Hawks Legion Posted April 16, 2014 Author Share Posted April 16, 2014 "To follow your instincts and to inspire your men, by your example, you have to be with 'em. Where the metal meets the meat." remember that Sergeant I referenced in the last post? I present Sergeant Malcolm Fey First Sergeant Second Company http://i1213.photobucket.com/albums/cc470/IroncladDreadnought/Projects/Painted/1stSergeant2ndCo1.jpg He's the First of the new Marines, tall scale and in proper armor he still needs his extra kit, grenades, fighting knife, etcetera, and his powerpack isn't done yet but he's done enough to post for C&C http://i1213.photobucket.com/albums/cc470/IroncladDreadnought/Projects/Painted/1stSergeant2ndCo6.jpg to show the height difference I'm reasonably proud of the showing, he's the Sergeant from DV, I originally wasn't sure what I'd be able to do with it given the nature of press fits and the difference in styling from the monastic DA to a very straight laced vanilla heraldry, but I think he looks just fine. the conversions should be pretty self evident if people would like fluff I can try and write some up, seems to be what people are doing, I've got a few ideas for him, might write it up and post it this weekend Link to comment Share on other sites More sharing options...
Storm Hawks Legion Posted April 18, 2014 Author Share Posted April 18, 2014 so, ETL III is coming, sounds like a decent excuse to actually move on my army, would be nice to actually get some honors, though I highly doubt I'd manage any of the special commendations. E Tenebrae Lux from darkness, light should be fun Link to comment Share on other sites More sharing options...
Storm Hawks Legion Posted April 23, 2014 Author Share Posted April 23, 2014 "got red on you" http://i1213.photobucket.com/albums/cc470/IroncladDreadnought/Projects/Painted/1stSergeant2ndCo8.jpg I'm pretty happy with him, I think he came out really well, especially as I was aiming for table-worthy maybe a little better since hes the sergeant of the squad. http://i1213.photobucket.com/albums/cc470/IroncladDreadnought/Projects/Painted/1stSergeant2ndCo9.jpg http://i1213.photobucket.com/albums/cc470/IroncladDreadnought/Projects/Painted/1stSergeant2ndCo10.jpg I think the holster and the grenades cover the plasticard at the waist well enough, the, roman esque thing in the front covers the mess of a crotch left from the press fit. so, for ETL I have on my table unpainted, a vindicator, a venerable dreadnought, the rest of Malcolm's squad, which can count as a unit entry on their own, and a 5 man terminator squad. the dreadnought still needs legs, which I'm hoping will arrive with the tracks for the vindicator by the end of the week. I would also like to get the tactical squad and the terminators all re-done for tall scale, but I'm rapidly running out of time and may have to paint them as is. Link to comment Share on other sites More sharing options...
Monstra Sumus Posted April 23, 2014 Share Posted April 23, 2014 He looks very well put together mate, the nuln oil works wonders for the scheme. A slightly thinner layer for the blacks and metallics will see your future models shine. The vindi conversion I like a lot, reminds me of tanks from the Great War. Link to comment Share on other sites More sharing options...
MagicMan Posted April 23, 2014 Share Posted April 23, 2014 That Sarge has come out looking great. :)Nice work on the freehand eagle/bird/hawk, too. Link to comment Share on other sites More sharing options...
Storm Hawks Legion Posted April 24, 2014 Author Share Posted April 24, 2014 thanks guys, it means a lot to have people say that, almost makes me think I'm good enough to share this board with some of the other guys on here. @Tyrax That's what I was going for, I called it a mark V after the British Mark V tank, the elliptical treads have a great trench clearing ability, and allow for easier scaling. I while ago a guy made a life sized Rhino for the release of DoW II https://www.youtube.com/watch?v=6PEU_201IfI on the first hit on the red car he seems to have some trouble scaling it, with the tracks set up this way, there would be no problem scaling the car, which as a vehicle of the emperor's finest, well, you don't get a second chance at first impressions, especially when its the impression your tread leaves on your enemies mode of transport. Link to comment Share on other sites More sharing options...
Moonstalker Posted April 24, 2014 Share Posted April 24, 2014 An entire company is a huge undertaking. You're insane to try to do an entire chapter. But it's the good kind of insane. I didn't watch the video, but the elements of color theory it sounds like they were trying to get into are probably beyond your skills as a painter. For what you're doing, I'd probably focus on getting your reds and yellows down nice and vibrant, with clean dividing lines between them. A white primer underneath them is probably going to make that easiest. Then, a wash! Try something like 25% nuln oil, 25% reikland fleshshade, 25% lahmian medium, and 25% water. If you can get a syringe (for measuring precisely by ml) and an empty paint pot (from the local craft store or online), you can mix up enough of this wash ahead of time that you can get a consistent effect across all your models and not have to mix up more of it all the time. This should give you a dark reddish wash that will help tie the yellow to the red together while picking out the details and adding a bit of shading. The lahmian medium in there will keep the armor looking matte. Then I'd probably thin your yellow and red down with water and carefully paint them onto raised areas/avoiding recesses to bring the color back up/add some highlights. For guns, the joints, etc, just hit it up with a black. The metal you can then paint with a dark metallic (leadbelcher from GW, gunmetal from vallejo). Once the metallic dries, wash it with the nuln oil and (optionally) drybrush it with the metallic color again. You're on a good tack with the eye color. Yellow + red = orange, and orange and blue are good contrasting colors. So using blue as a spot color for the eyes will help make them pop. You could also go green, since it will directly contrast with the red. Have you thought of using decals for the symbols and numbering? You might be able to find something to match in the B&C's decals database. All you have to do is order some transfer sheet paper online and then print the decals onto it with your ink or laserjet printer. Much easier (and much sharper) than trying to freehand all those letters and badges. Link to comment Share on other sites More sharing options...
Storm Hawks Legion Posted April 25, 2014 Author Share Posted April 25, 2014 well Kit, if you think this is insane, I probably should tell you what the original plan was... in other news, I'll definitely have to try your wash recipe, not sure when I'll get back to GW, as for the basecoat, the black stays, at least till this can is done, then I'll probably be halfway through a squad and have to get another black can so... I'd like to do a bit more with the eyes, I found a tutorial on making them look like they glow, but I haven't tried it yet. as for the decals... I have often sat, and thought, "gee, wouldn't it be nice if GW would make decals that would work for this chapter, nah, I'll never find any..." I would love to do my own, which of course opens them up to designing a new chapter symbol, this one I've always done because I could do it free hand, if I'm doing my own decals, I may change it. "and now.... Shebang!" http://i1213.photobucket.com/albums/cc470/IroncladDreadnought/Projects/2nd%20Co%201st%20Tac/2ndCoTac1.jpg 2nd Company 1st Tactical squad, they're a little shorter than Veteran Sergeants are, but their just as fierce everyone of them has had their legs lengthened and re posed, the arms I'm not gonna do much with, mostly because I don't think I can do much with them. I know, three of them are well past basecoat, therefore well past ETL guidelines, well, I'm gonna go get some simple green this morning, toss them in for the weekend, they're the testers I've been posting, or talking about anyway, back left is the mixed paint shade, kind of hard to see in the shadow but, he's there. I've used brake fluid before, haven't used simple green, I'm told there won't be an issue leaving them over the weekend, I know with the brake fluid, well, I fished some models out when I moved I'd dropped in to strip the year before, but, that may have just been because it was pretty well loaded when they went in, not much paint came off. I think that's a decent bit of work for two nights. Link to comment Share on other sites More sharing options...

Recommended Posts
Archived
This topic is now archived and is closed to further replies.