Warsmith Uveron Posted May 25, 2016 Share Posted May 25, 2016 They never look right flying. Dragonlover Its the spikes... they are blunted.. just makes it looks odd. Link to comment Share on other sites More sharing options...
Augustus b'Raass Posted May 25, 2016 Author Share Posted May 25, 2016 (edited) Allright, at the request of Kurama, here's a simple step by step tutorial on how I do my Khorne Daemonkin bases. Note: the pin sticking out of this particular base will slot right into my Bloodthirster's right leg, so it's technically not part of the basing process. Anyway, here goes... Step 1: Put some putty of whatever kind on the base in an irregular form. make sure the edges smoothly transition into the rest of the base. Take a couple jabs at the putty with the back of a brush, or your fingers or whatever, to make it even more irregular. http://i35.photobucket.com/albums/d185/mkruijff/Night%20Lords%20WIP/temporary_zpso9xd5mw6.jpg Step 2: Cut the uncovered parts of the base with a modelling knife: this will give your elmers/PVA glue something to hold on to. Then cover parts of the base with basing paste. You can cover parts of the putty applied before with paste. The colour of course doesn't matter, but for those interested: I used Vallejo Dark Earth paste. Take a piece of miniature razor wire and roll it around a brush, then push it into a thick part of the putty. The with a wet brush, smooth over the gaps left in the putty by the razor wire. http://i35.photobucket.com/albums/d185/mkruijff/Night%20Lords%20WIP/temporary_zpsw1cipuht.jpg Step 3: Cover the parts of the base that are not covered with paste, and some parts that are, especially among the paste, with PVA glue. http://i35.photobucket.com/albums/d185/mkruijff/Night%20Lords%20WIP/temporary_zpsrbulsifr.jpg Step 4: Sprinkle small slate from the Citadel basing kit over parts of the base. http://i35.photobucket.com/albums/d185/mkruijff/Night%20Lords%20WIP/temporary_zpskvrx3dap.jpg Step 5: Apply some puddles of PVA glue and push piles of skulls in those piles. I use 32 mm skulls from Dark World Creations. http://i35.photobucket.com/albums/d185/mkruijff/Night%20Lords%20WIP/temporary_zpsmdyyzhvp.jpg Step 6: Sprinkle basing sand all over the base, then tap it off, leaving only the parts with exposed PVA glue covered with sand. http://i35.photobucket.com/albums/d185/mkruijff/Night%20Lords%20WIP/temporary_zpsr7yzgyph.jpg Step 7: Cut plasticard T or H beams with a very blunt pair of plyers (blunt is good to make the 'metal' look worn and torn. Again apply puddles of PVA glue (as shown in the picture above). Then apply the H or T beams. Then repeat step 6. http://i35.photobucket.com/albums/d185/mkruijff/Night%20Lords%20WIP/temporary_zps4rc1fvwv.jpg Step 7: leave the base for at least 12 hours to give the PVA time to dry. Then cover the entire base minus the plasticard, the skulls, and the razor wire with super thinned down PVA glue, so as to make the basing material rock hard. I hope this helps someone. Replies: @ KrautScientist: Yes, yes, I was a bit sloppy. I admit it. I just really didn't like painting that Dreadclaw. @ codyrstuart: Well, thanks? I don;t mean to do that, just to inspire! I hope there's also a teeny tiny bit of inspiration here, buddy. Wouldn't want to loose you as a visitor... @ Dragonlover: I know right? Super weird. Edited May 25, 2016 by Augustus b'Raass Thousand Eyes, Brother Chaplain Ryld, GhostMalone and 2 others 5 Back to top Link to comment Share on other sites More sharing options...
GhostMalone Posted May 25, 2016 Share Posted May 25, 2016 Dude love it, I'll be trialing this on my next knight! Hope you've got a second etl vow coming after this Augustus b'Raass 1 Back to top Link to comment Share on other sites More sharing options...
Thousand Eyes Posted May 26, 2016 Share Posted May 26, 2016 Wow fair play, that is quite the effort you put in. Does that generally take you long to do? The effect pays for it I am sure though as your bases do look sweet. Link to comment Share on other sites More sharing options...
codyrstuart Posted May 26, 2016 Share Posted May 26, 2016 Oh, I didn't say I was giving up! Look at it more as I need to step my game up. Link to comment Share on other sites More sharing options...
Augustus b'Raass Posted May 26, 2016 Author Share Posted May 26, 2016 @ Kruama± Sure thing, dude. I´m planning on doing a Knight as well. @ Thousand Eyes: It's not a lot of effort and it's actually not quite so time consuming at all. The thing is, there is no drying time in the process, excepts when the base is done and you have to wait 12 hrs to go back with thinned PVA glue. This base took me five minutes or something. You only need the materials, that's all. @ codystuart: You should, buddy! The puppies are a bit behind where they were last year in week two. ;) :p Link to comment Share on other sites More sharing options...
Augustus b'Raass Posted May 26, 2016 Author Share Posted May 26, 2016 Sorry to double post here, but I thought I'd complement the basing tutorial with another, showing how I go about painting the bases. I undercoat the base black. Then, it's a couple simple steps: Step 1: Airbrush or paint all the parts that are supposed to be metal in GW Rhinox Hide. http://i35.photobucket.com/albums/d185/mkruijff/World%20Eaters/temporary_zpsairkvk7p.jpg Step 2: Airbrush or paint all the other parts with GW Steel Legion Drab http://i35.photobucket.com/albums/d185/mkruijff/World%20Eaters/temporary_zpshnormyr9.jpg Step 3: Drybrush everything except the 'metal' parts with GW Karak Stone. http://i35.photobucket.com/albums/d185/mkruijff/World%20Eaters/temporary_zpsyrrmnh7a.jpg Step 4: Cover all the non-metal parts with GW Agrax Earthshade. http://i35.photobucket.com/albums/d185/mkruijff/World%20Eaters/temporary_zps4izq0cxg.jpg Step 5: Retouch the side of the base with GW Steel Legion Drab and the metal parts with GW Rhinox Hide. http://i35.photobucket.com/albums/d185/mkruijff/World%20Eaters/temporary_zpsr9hosj6z.jpg Step 6: Drybrush the skulls with GW Rakarth Flesh. http://i35.photobucket.com/albums/d185/mkruijff/World%20Eaters/temporary_zpsdbmildr5.jpg Step 7: Stiple the metal parts with GW Leadbelcher. http://i35.photobucket.com/albums/d185/mkruijff/World%20Eaters/temporary_zpskqnohtap.jpg Step 8: Stiple the metal parts with some watered down FW Aged Rust weathering powders. http://i35.photobucket.com/albums/d185/mkruijff/World%20Eaters/temporary_zpsp0sbovmj.jpg Step 9: Use some PVA glue to stick some GW Mordheid Turf tuft. http://i35.photobucket.com/albums/d185/mkruijff/World%20Eaters/temporary_zpsgzpdq9pv.jpg Done! :) Teetengee, Daemon2027, JeffTibbetts and 10 others 13 Back to top Link to comment Share on other sites More sharing options...
GrandMagnus Posted May 26, 2016 Share Posted May 26, 2016 Hey Augustus, where are the skulls on the base from? Link to comment Share on other sites More sharing options...
Augustus b'Raass Posted May 26, 2016 Author Share Posted May 26, 2016 I use 32 mm skulls from Dark World Creations ;) GrandMagnus 1 Back to top Link to comment Share on other sites More sharing options...
GhostMalone Posted May 26, 2016 Share Posted May 26, 2016 I may have to steel that recipe for a Mechanicum based force so I can transport them and bring them to yours, I truly can't wait to see the Kytan your planning Teetengee and Alpharaz 2 Back to top Link to comment Share on other sites More sharing options...
Eldrick Shadowblade Posted May 28, 2016 Share Posted May 28, 2016 The dreadclaw is sweet! Maybe just on the bottom add some black / scorch marks or chipping? to show it entering orbit repeatedly? Otherwise it looks really nice. Augustus b'Raass and Doctor Perils 2 Back to top Link to comment Share on other sites More sharing options...
rednekkboss Posted May 28, 2016 Share Posted May 28, 2016 Sweet Fairy Jeebus! There is some beautiful stuff in this thread! I just spent @ 20 minutes looking through it. Great stuff! Augustus b'Raass 1 Back to top Link to comment Share on other sites More sharing options...
Flint13 Posted May 28, 2016 Share Posted May 28, 2016 I may have to steel that recipe for a Mechanicum based force Was that pun intentional? Cause I'm not sure which way is funnier. Augs - Those Slaughterers are looking pretty boss! Augustus b'Raass 1 Back to top Link to comment Share on other sites More sharing options...
GhostMalone Posted May 29, 2016 Share Posted May 29, 2016 Yeah it was intentional Link to comment Share on other sites More sharing options...
BrotherJim Posted May 29, 2016 Share Posted May 29, 2016 Those tutorials are tops buddy, its just nice to watch them come together. Like the old eavy metal step by steps. You should make a tutorial when you do the cytan, for us mere mortals *waves hand Link to comment Share on other sites More sharing options...
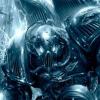
Augustus b'Raass Posted May 30, 2016 Author Share Posted May 30, 2016 (edited) Hey guys, small update on the Bloodthirster I'm working on. As you may have read in the ETL V Chaos Strategium, I'm not enjoying it as much as I expected. It somehow doesn't really resonate with me. It's maybe becuase I love painting vehicles so much that this mostly organic model doesn't jive with me. Oh well. Here he is. All armour arts and his head are bluetaced one. The base is done, as well as the wings. The gold and bone parts need another wash of Agrax and a highlight. The leather need a highlight, wash and final highlight. The metal bits need another wash, and the chains need a basecoat of leadbelcher. They all need another highlight. Oh, and the eyes. I'm thinking blue. Would blue be appropriate? What do you think so far? http://i35.photobucket.com/albums/d185/mkruijff/World%20Eaters/temporary_zpsszydtvcp.jpg Again, I'm having trouble with this mini and any comments or feedback would be most welcome. Cheers! Replies: @ Kurama: work on the Kytan will start as soon as the BT is done! @ Eldrick Shadowblade: Black scorch marks are an excellent idea! Will get to it! @ redneckboss: Thanks buddy! Your threads are a particular source of inspiration for me, even though our painting styles are very different. Your converions and paint jobs just have that je ne sais quo... So I'm very happy to read you liked my work too! @ Flint13: Cheers you! Long time no comment. I was impressed by your fellblade! Was it posted on one of your threads too, as I didn't see it on the ones I know of except for the HH Strategium... @ Kurama: puns for the pun god! @ BrotherJim: Are you my aussie buddy Jacob on FB? I'll do a tut on the Khorne colour scheme with the Kytan, I promise! Edited May 30, 2016 by Augustus b'Raass Kizzdougs and Atia 2 Back to top Link to comment Share on other sites More sharing options...
Quixus Posted May 30, 2016 Share Posted May 30, 2016 (edited) The Bloodthirster looks great so far. I like that the skin isn't red, but it could be a bit lighter. It may be the photo though. The Daemon Prince and Bloodthirster models are some of the best GW has IMHO. *must resist resist the voices telling me to start a chaos army* Edited May 30, 2016 by Quixus Link to comment Share on other sites More sharing options...
Kizzdougs Posted May 30, 2016 Share Posted May 30, 2016 Nice work on the Bloodthirster, dude :tu: Can't wait to see him finished :) Link to comment Share on other sites More sharing options...
codyrstuart Posted May 30, 2016 Share Posted May 30, 2016 I feel you on the BT. It is a great looking model, but doesn't look fun to paint. As for the eyes, I think blue eyes would be a great compliment to the rest of the model. Link to comment Share on other sites More sharing options...
Biohazard Posted May 31, 2016 Share Posted May 31, 2016 Your soulgrinders and blood slaughterers are looking awesome. Nice touch with the rod to hold the slaughterers on the base. I have two of them to paint and base and was looking to do something similar. Thirsters looking good too. I say yes to the blue eyes :tu: Link to comment Share on other sites More sharing options...
Atia Posted May 31, 2016 Share Posted May 31, 2016 (edited) Aww I love that base! Turfs rock! Cool to see a different approach to the Bloodthirster, with red armour and black skin! Although, a shame point for not using that awesome head with the khorne rune shaped horns! You need to do another one now Edit: Or not, as you may not enjoy him as much :/ - what exactly is your problem? The skin is made for a drybrush and glazes (even if it sounds a bit crazy to use a drybrush :P). I really enjoyed my Ang'grath, although I guess the FW one has better details to work with? Edited May 31, 2016 by Atia Augustus b'Raass 1 Back to top Link to comment Share on other sites More sharing options...
rednekkboss Posted June 1, 2016 Share Posted June 1, 2016 Love the red armor black skin. Planning some Khorney deamons myself with obsidian/cooled lava type skin. I know they got the whole "blood for the sausage God" thing going on, but Khorne stuff always screams to me rage on a volcanic scale. Looking forward to watching the progress on this guy. One of these day's I'll have to get that model myself. Link to comment Share on other sites More sharing options...
Augustus b'Raass Posted June 1, 2016 Author Share Posted June 1, 2016 (edited) Hurray! I managed to finish the 'Thirster! In the end, it was just a case of keeping my eyes on the prize and ploughing through it. I'm reasonably happy with how he turned out, and I might even do another one in the future - with red skin, bone armour, and black wings. I made pics of all four sides and of some details. Sorry if they are a bit over-exposed and/or out of focus: the thing is so huge, with such weird dimensions, my hoto botth was just too small and my camera not good enough to focus on it properly... Anyway, without fiurther ado, here are some pics! http://i35.photobucket.com/albums/d185/mkruijff/World%20Eaters/temporary_zpsqeopqvve.jpg http://i35.photobucket.com/albums/d185/mkruijff/World%20Eaters/temporary_zpson2lanzw.jpg http://i35.photobucket.com/albums/d185/mkruijff/World%20Eaters/temporary_zpsqxf1zfhu.jpg http://i35.photobucket.com/albums/d185/mkruijff/World%20Eaters/temporary_zpstajgly5u.jpg And some details: The bloody axe http://i35.photobucket.com/albums/d185/mkruijff/World%20Eaters/temporary_zpsxb2ysk90.jpg Arm and face, which for some reason looks super crappy here but IRL looks fine. http://i35.photobucket.com/albums/d185/mkruijff/World%20Eaters/temporary_zpsvsjgjd3g.jpg And something I'm actually reasonably proud of: the wet-blended fire below his hoove... http://i35.photobucket.com/albums/d185/mkruijff/World%20Eaters/temporary_zpsz19wlr2p.jpg So! Lemme know what you think! C&C is always welcome. I know it's not the best mini I ever painted, so feel free to destroy me. I could use a good whoopin', as I'm only half-way in my vow and it's already almost three weeks into the ETL. Cheers! Replies: @ Quixus: hey buddy! Long time no comment here I hope the skin issue has been solved. If not, lemme know. @ kizzdougs: Thanks, kizz! What do yoy think of the finished product? @ codystuart: Blue it went! Hope you like the end result. @ Biohazard: YAY Biohazard! Yeah the rod really makes the 'slaughterers worthwhile to base - the legs are far too flimsey to hold their weight. @ Atia: Oh the skin was easy: I did drybrush the skin. No glazes though... ANyway, you might have convinced me to buy another one, with that comment. @ rednekkboss: You should. The more I look at him finished, the more I likee that I ploughed through it and actually made an effort to not rush him. It is an awesome kit, just a pain to paint. EDIT: fixed an issue with pictures Edited June 1, 2016 by Augustus b'Raass Checkmate, Quixus, Brother Chaplain Ryld and 3 others 6 Back to top Link to comment Share on other sites More sharing options...
Atia Posted June 1, 2016 Share Posted June 1, 2016 Awesome! Sadly I'm out of likes for today so you will get a *like* here :D Hurray! I managed to finish the 'Thirster! In the end, it was just a case of keeping my eyes on the prize and ploughing through it. I'm reasonably happy with how he turned out, and I might even do another one in the future - with red skin, bone armour, and black wings AND THE COOL KHORNRUNE SHAPED HEAD. ANyway, you might have convinced me to buy another one, with that comment. Mission accomplished Link to comment Share on other sites More sharing options...
KrautScientist Posted June 1, 2016 Share Posted June 1, 2016 Don't worry, buddy: He's looking great! I only have one suggestion, and that would be to give the face some extra attention: The actual face could do with a final layer of "sharper" highlights (check out Duncan Rhodes' Bloodthirster tutorial: He uses completely different colours, but the actual approach will still be enormously helpful to you!). The tongue seems to be missing for some reason, which deprives you of a chance for a tiny spot of contrasting colour. And what about those eyes? Didn't you want to paint them blue...? Link to comment Share on other sites More sharing options...

Recommended Posts
Create an account or sign in to comment
You need to be a member in order to leave a comment
Create an account
Sign up for a new account in our community. It's easy!
Register a new accountSign in
Already have an account? Sign in here.
Sign In Now