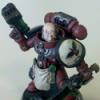
BKZer0 Posted February 21, 2014 Share Posted February 21, 2014 Below I outlined 6 simple steps for painting the coils on plasma weapons. I did not take in-process pictures of the procedure I instead opted for some CG pictures I made. I will take pictures of the steps being performed on an actual model when I paint my next plasma rifle. What you need: - Black Primer - Dark Base Color. (For Green: Snot Green/Warpstone Green For Blue: Ultramarines Blue/Altdorf Guard Blue) - Light Highlight Color: (For Green: Scorpion Green/Moot Green For Blue: Ice Blue/Lothern Blue) - Skull White/White Scar - Badab Black/Nulin Oil Wash Procedure: 1. Prime the part black. http://www.40k.zombiecrisis.org/Plasma/1.jpg 2. Paint the coil section the dark base color. For my example I used green. http://www.40k.zombiecrisis.org/Plasma/2.jpg 3. Heavily wash the coil section with black wash. The wash will naturally fall into the recesses between the raised coils, and against the edges. One thick coat should do fine. Note, this will also darken the green base color. Don't worry about that. http://www.40k.zombiecrisis.org/Plasma/3.jpg 4. Drybrush the coil section with the dark base color. This will brighten the raised coils back to their original color before the wash. If possible, try to only drybrush the top 75% of the coil. This will add a subtle dark to light transition. http://www.40k.zombiecrisis.org/Plasma/4.jpg 5. Lightly drybrush the top 50% of the coil section with the light highlight color. This will brighten the overall look of the coil, and really enhance the dark to light transition. If you want the coil to appear very bright, you may drybrush a little heavier. http://www.40k.zombiecrisis.org/Plasma/5.jpg 6. Last drybrush just the very edge of the coil with white. Try to be very light with this step, or it will quickly overpower the entire look otherwise. Keep it on the edge, and do your best to avoid drybrushing the top and sides of the coil. Keep it on the edge. http://www.40k.zombiecrisis.org/Plasma/6.jpg That's it, you are done. Here is a picture of a finished plasma pistol with this procedure performed. http://www.40k.zombiecrisis.org/Plasma/7.jpg Link to comment Share on other sites More sharing options...

Recommended Posts
Archived
This topic is now archived and is closed to further replies.