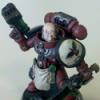
BKZer0 Posted May 27, 2014 Share Posted May 27, 2014 Below I outlined steps for making a custom Space Marine banner using waterslide decals. Things to note: You will not be able to see the edges of the water slide decal in your final product. HOWEVER, you can see them in mine. These is due to a mistake I made when creating the decals. I essentially coated them too think with the sealer after I printed them. This makes the decals thicker than they should be thus showing their edged even after solvent is applied. I proved the instructions for doing this tutorial using a Laser Jet Printer. This is what I recommend. You most certainly CAN use an Ink Jet Printer, just make sure you get the correct Ink Jet Decal Paper. The reason I recommend Laser Jet is that type of printer uses heat melted toner which is a polymer. They essentially print using melted plastic rather than ink. Their prints are waterproof and not susceptible to the deal solvent. You have to be a little more careful when using Ink Jet decals. You can also use pre-made decals. These will likely be Laser Jet. The Krylon Acrylic Crystal Clear is a MUST. There are other clear acrylic top coats that can be used, but Krylon is by far the best. You are not likely to find it in a hardware store. It is an art supply typically used to seal pastel or charcoal work, and finished photographs. What you need: - Image editing software. (I used Adobe Photoshop, and Adobe Illustrator) - A color Ink Jet Printer (400 - 600dpi recommended) - Clear Decal Film Sheets - Laser Jet (I use Experts-Choice Brand) - Micro Sol Decal Solvent - Micro Set Decal Setting Agent (Optional) - Krylon Acrylic Crystal Clear Spray - Testors Dullcote Lacquer (or your top coat preference) - White Paint - Space Marines banner - Water Procedure: 1. First we need to make our decals. Since that is not the main focus of this tutorial I am not going to go too in depth, but I'll provide the basics. We need to figure out the size of our work space. A standard Space Marine banner's surface area is approximately 3.9cm x 2.0cm. The top is actually a little larger (2.1cm to be exact) because of all the cloth folds modeled in, but for simplicities sake, start with a work area of 3.9cm x 2.0cm. Use your printer's maximum dpi settings. For me that was 600dpi which made my work surface 470x920pixels. Example: http://www.40k.zombiecrisis.org/banner.jpg Play around in Photoshop (or what ever image editor you use) Your finished banner will look best if everything is outlined in black. You will need to make 2 decals. one in full color, the other just an outlined version of the finished banner. (you CAN just print 2 color decals if you want, but I found the outlined decal to be easier to work with. Regardless, you will need 2 decals to complete the banner). Here is what I came out with as my finished designs. They are loosely based on the Ultra Marines banners found in the Codex. I will go into why you need 2 decals later in the tutorial. http://www.40k.zombiecrisis.org/banner%20decals.jpg Once your decals are printed on your decal paper, you MUST seal them. They may look OK now. However if you do not seal them, the Micro Sol will actually lift the toner right off the decal paper. This has happened to me once before. to seal them, simply coat your newly printed decals in a VERY LIGHT coating of Krylon Crystal Clear. Make sure your coat them lightly. applying too much clear coat will make finished decal thick. (This is where I went wrong). 2. Next you will need to paint your banner. You are going to need to paint your banner in its entirety. This includes all weathering, shading, highlighting, etc... This is again not part of this tutorial. Here is what my finished banner looked like. I wanted to give it a very old/dirty look. http://www.40k.zombiecrisis.org/20140523_195553.jpg 3. Apply a thin coat of Krylon Crystal Clear to the banner. This will seal in all the work you did on the banner and provide a glossy glass like surface for the decal to adhere to. Decals will adhere to any surface. However, they if you try to place a decal directly on a painted, or matte finish surface you run this risk of decal silvering. Basically the decal doesn't sit flush, and you can spot all those places on the final product. They look like permanent air bubbles. http://www.40k.zombiecrisis.org/20140523_212745.jpg 4. Coat the entire decal work surface of the banner is Micro Sol. The surface tension of the liquid will draw the decal onto it like a suction cup. Carefully place the first decal on to the surface. You have a few seconds to correctly center it. If the decal begins to stick and become difficult to move, just douse it in Micro Sol again. it should loose and become movable again. Micro Sol is a decal solvent. It will soften, and almost melt the decal allowing it to conform to the irregular surface shape of the banner. Once the Micro Sol dries, you will notice the decal will be a little bunched up around the folds of the banner and around the edged of the decal. This is normal. It will take an additional 3 coats of Micro Sol to get the decal to lay flush and become invisible on your surface. With each pass of Micro Sol, use your brush to gently flatten the decal and press it on to the surface. Allow the Micro Sol to mostly dry between each pass. (Optionally some people use Micro Set to get the decal to initially adhere to the surface before softening it with Micro Sol. I have never had an issue with decals adhering so I typically skip this step. but by all means go for it, you wont hurt anything.) http://www.40k.zombiecrisis.org/20140523_222417.jpg 5. This is why you need 2 decals. (Warning it is a little technical) Printer are designed to print on white or light colored paper, and print using a principal called subtractive color. There is no white ink in a standard printer and so the printer just prints everything assuming it is an overlay on white paper. If we were to just place our color decal on the banner now, it wold look something like this: http://www.40k.zombiecrisis.org/badbanner.jpg You essentially just replaced all the white in the decal with your banner base color (in my case red). This is not ideal. to fix this we need to paint everywhere that will be color on the decal with white paint. That is why we place the original decal. It shows us EXACTLY where we need to paint white. In my example, I will need to paint the parchment banner, the laurels, the V, and the halo. I am not going to worry about the Raven since Black Is Black on any color... and My banner is already Red. Painting behind the raven blood drop will serve only to brighten the red which I am not looking to do anyway. You need to be as accurate as possible in this step. Any imperfections will show through to the next steps, but we can fix it later. White paint will work fine. I actually used 70:30 White:Codex Grey because I was going for a darker look. Basically color between the lines. This is the end result: http://www.40k.zombiecrisis.org/20140523_225832.jpg 6. Apply a second thin coat of Krylon Crystal Clear. This will preserve the work thus far, and Provide a nice surface for the next decal. http://www.40k.zombiecrisis.org/20140524_095620.jpg 7. CAREFULLY apply your color decal. perform the same steps as you did with the first decal. You should not have a problem lining it up If you accidentally painted outside of the lines, it will show through now. (You may not a small mistake on the top right serif of the V. We will fix it later). Again, please pardon the thick decals. I promise if you do it right, they will be invisible. http://www.40k.zombiecrisis.org/20140524_104921.jpg 8. After everything has dried touch up your work. any little white spots I hit with black or a little red depending on where the were. Note most model paints are matte, so your touch ups will appear a little ugly at this point because you are painting matte on gloss. Don't worry, this is normal. We will remedy this in a moment. After your are satisfied with the final look, coat the entire banner in Testors Dull Coat. This will bring the banner back to the correct matte finish. and help to hide the decal lines even further. http://www.40k.zombiecrisis.org/20140524_135846.jpg Once you are done. simply attach the banner, and enjoy your work. Here is my completed mini: http://www.40k.zombiecrisis.org/20140524_162536.jpg Link to comment Share on other sites More sharing options...
Dosjetka Posted May 27, 2014 Share Posted May 27, 2014 Excellent tutorial! Thanks for sharing :) Link to comment Share on other sites More sharing options...
Lord Morphail Posted July 5, 2014 Share Posted July 5, 2014 Really nice!! Link to comment Share on other sites More sharing options...
Aqui Posted July 7, 2014 Share Posted July 7, 2014 Cor! Not only does that seem relatively straight forward (I understood it, so it must be ), but it's answered quite a few questions I've always had, but felt like an idiot to ask (the bit about the white parts especially) I'll have to try this out soon! Link to comment Share on other sites More sharing options...
BKZer0 Posted July 8, 2014 Author Share Posted July 8, 2014 Great I would love to see the end result of someone trying this tutorial. Link to comment Share on other sites More sharing options...
Chandrian Posted July 16, 2014 Share Posted July 16, 2014 This is Amazing. !!! I have a banner, its Blood Angels and I've always wanted to clean it off and make a banner from scratch for Chaos but didn't know where to start! Link to comment Share on other sites More sharing options...
Mike Zulu Posted July 16, 2014 Share Posted July 16, 2014 You genius. And I was just about to throw out my decal paper. So much better than using white decal paper. Link to comment Share on other sites More sharing options...
Brother Alanticus Posted May 25, 2015 Share Posted May 25, 2015 This is interesting, I may use it later Link to comment Share on other sites More sharing options...
srpelicano Posted June 4, 2015 Share Posted June 4, 2015 You beautiful bastard, thank you for posting this. Truly amazing banner and simple (in theory to accomplish :) Link to comment Share on other sites More sharing options...
wolfden76 Posted June 4, 2015 Share Posted June 4, 2015 This is excellent mate will be giving it a go for certain. Link to comment Share on other sites More sharing options...
CarbonBased Posted July 28, 2015 Share Posted July 28, 2015 Wonderful! This is so much better than printing white decals and trying to cut them to the design. I can't wait to try this on my models Link to comment Share on other sites More sharing options...
Lemainus Posted August 15, 2015 Share Posted August 15, 2015 ...this is really smart. Gonna have to take a swing at it. Link to comment Share on other sites More sharing options...
Ekfud Posted November 12, 2015 Share Posted November 12, 2015 Excellent overview of the decal approach... and seems to have given a really rich colour on the dark background. Out of general curiosity - what formula are you using to paint the general red on the blood ravens? Looks like it has a hint of white or something else to knock it off the bright red usually seen on blood angels. Very decent looking colour - bit like it has faded a little in the sun or been worn in. Link to comment Share on other sites More sharing options...
Teetengee Posted November 13, 2015 Share Posted November 13, 2015 cool Link to comment Share on other sites More sharing options...

Recommended Posts
Archived
This topic is now archived and is closed to further replies.