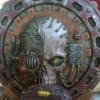
Battybattybats Posted May 20, 2018 Author Share Posted May 20, 2018 Ok here's some detail on my main chipped paint weathering technique. Sorry i haven't got step by step pics, but i've instead got pics of a piece where most of the steps are visible as different parts are at different stages.Firstly you want a nice strong spray undercoat. This is both a real undercoat and also for this technique will look like the undercoat of the scratched paint. For this i use the standard GW black spray.Next you want to paint the exposed pieces of machinery you'll want metallic in leadbelcher. You don't need to be neat, in fact messy is good here so long as you don't do it too thick. Doing this step messy means you'll have nice silver splodges all along the edges where the exposed machinery is which is often where you'll want some.Then, really look at the model from a functional point of view. Ask yourself, where does it move, where might it rub other parts, do parts unscrew or open for maintenance, where will pilots and workers and servitors grab with their hands and put their feet, where will cranes and servo-haulers and servo-arms grab the machine? Those places i hit with what i refer to as a wet-brushing with my leadbelcher. For this i use a drybrush or preferably an old worn out wrecked brush with spread curled bristles. Wipe much of the paint off but far less that you would for drybrushing and give a very quick brushing along the edges, you'll get a nice broken uneven sharp silver on the exposed edges that will rub into things and some nice scratches will start to occur in the directions of your brush-strokes. Then go in and deliberately swipe the brush in directions you can imagine scratches happening in. You want nice patches of less and of more scratches but keep an eye out for something somewhat harmonious looking. You want more of these streaks than you will eventually use because you'll end up going over some intentionally or unintentionally later anyway. You can then go back over this with a nice point brush to add any individual scratches you want in a more controlled manner as well as areas where you want scratches in the depths rather than exposed areas. Areas where paint may have peeled can be shown with some stippling too.The next step is the thin coat. Grab your main colour, in my case it's Khorne Red, get a brush with a good point, make sure the paint is thin but not too flowy, pick a scratch and paint around it. You'll be using your fine-detail painting skills, stabbing forward like stipping sometimes and dragging gently othertimes and whatever feels right as you paint around the scratch (it's easier than that sounds), let the paint go over some silver, keep some black around a lot of scratches. You want this layer very uneven (blotchy is good!) with a fair bit of transparency. You are mainly just painting between the scratches and deciding which ones to keep and which ones not to care about, though you don't need to worry about them still showing through the thin coat. If you want a well-work edge leave what isn't silvered black. As you move around the model it'll get varying consistency and look more natural as you vary consistency of your paint and as the loading of the brush changes, it's about breaking the rule of consistent painting and embracing the inconsistency to create naturalistic tone. Again, it's way easier than that sounds.Next is your second coat, this doesn't have to be so thin. Look for where you want to keep a lot of black showing through and avoid those and look for areas that need to be stronger where there'd be much less wear and paint there. This stage you are showing where most of the paint isn't worn, or where you want the scratches to really look sharp. It ends up a bit like reverse-highlighting in that the paint is more vibrant in the crevices and less so at the scratched edges. Over large patches some very watery splodging stippling can really look great. Sometimes i'll skip the thin coat where i only want to do one pass over a part like a really fine detail or surface area.Next i paint the banding on the armour Balthazar Gold, again though i do some parts a bit thin showing some black through but mainly i keep this paint thick, that way it gets some slightly lumpyness to the texture as i find that works well with gold. I also will sometimes have the gold scratched at the edges like the red parts. Any neatening up needed i9s done at this point.Next step are washes. When i want the red paint to look mostly clean and fresh i'll wash the edges first with Leviathan Purple then Nuln Oil. When i want it to look a little dirty i'll wash where dirt would accumulate with Agrax Earthshade, where i want it to look very old any large area of red gets the Agrax. But mainly the red goes unwashed, the visual distinction that makes helps the brain see that red as 'paint' on metal. For most of my units the metal is well maintained and kept very fresh so it is shaded with Nuln Oil (but not the gloss). Where it's dirty, maintained less frequently or much older it gets Agrax Earthshade over the metal. Gold usually gets Agrax Earthshade, though sometimes i wash it purple too (mainly on non-GW miniatures on a smaller scale). I may also use wash to show where rain or leaks may stain areas.The last step is an if-needed neatening and highlighting stage, clearing up things like excess pooling of wash or areas where the red needs a third thin layer to neaten too much contrast between a thin and thick spot, and if the model needs it a very sparing highlight either in drybrush or carefully layering a bit of unwashed col,our back onto edges, some brighter silver for a newer scratch or where parts have slid against one another recently etc. The trick to make mechanical things look real i find is shade metal heavily and highlight everything minimally, and do both way less on painted surfaces, that way it doesn't 'pop' too much and look cartoonish. That's not a rule i follow with cloth though, which helps when you have red cloth next to red painted metal, the cloth gets more shade (always purple) and much more highlighting (though still mostly in Khorne red and only a teeny bit of Mephiston if at all), that way they appear to have very different textures and refractive charceteristics even if the same colours.Ok so some in-progress steps that show the crucial bits.Ok so here you see my current scratch-brush, you don't need one in this condition but it speeds it all up. The scratches on this have almost all been painted with this brush, with wet-brushing and stippling as well as using it to messily basecoat the exposed machinery. where the bolted ring of the main circular shape is against the housing is the exception where i used the tip of my standard brush instead. You can see between the banding large flat plates with varying thickness of layer on them, with how effective you can weather just with the unevenness of two thin coats of red. The very heavily scratched area at the front you can see where i've stopped partway, and how easy it is to make the red uneven.This image shows how a thicker coat along narrow edges can be really quite effective especially right next to areas that have the two uneven thin coats, especially with a lot of the black still visible between some of the silver and the red as well as through the 1st thin coat.Hopefully that explains and shows things well enough? But please barrage me with questions if not. JeffTibbetts and deathspectersgt7 2 Back to top Link to comment Share on other sites More sharing options...
JeffTibbetts Posted May 22, 2018 Share Posted May 22, 2018 I'll have to process this a bit further when I'm not at work, but yes this is exactly what I'm after. Thanks for taking the time! Battybattybats 1 Back to top Link to comment Share on other sites More sharing options...
Battybattybats Posted June 2, 2018 Author Share Posted June 2, 2018 I want to get most of my existing Knights done (or mostly done) before getting more, but i want to thank whoever it was at GW who put separate yellow cogs of several different sizes on the new Valiant/Castellan decal sheet. That's going to make things much easier for me, especially with the Armigers i have and the ones i'll be getting. So for this release i've ordered the limited edition codex, dice and cards bundle and a couple of the gorgeous Mechanicus measurement tools.I'll wrap up some current underway projects, set aside a few others for now and then get back to work on at least a few of my knights together. At least, that's the plan. Link to comment Share on other sites More sharing options...
Battybattybats Posted June 11, 2018 Author Share Posted June 11, 2018 In this post i'll show the finished 2nd Haemotrope Reactor which should hopefully show off the weathering technique i use to it's fullest. But first, some better pictures of the chainsaw-faced techpriest.As you can see a lot is still blu-tacked as i sort out where it's going, so a lot is still tentative at the moment.There's no right hand at the moment, i'm thinking some spare manipulator claws from the Kataphrons maybe. I may also use some as servo-arms on the back.Now onto some close-ups of my weathering.This reactor is more heavily weathered than the other.With paint this thin i put some lahmian medium on the spots i pick the miniature up by to reduce wearing off paint, many might want to spray-coat the whole model with a seal instead.I don't think i've mentioned how i paint large pieces of bone? Is that of interest?To wrap up this post, some more images from some weathered parts of the Promethium Pipes that go with the reactor. JeffTibbetts, Bjorn Firewalker, deathspectersgt7 and 1 other 4 Back to top Link to comment Share on other sites More sharing options...
Bjorn Firewalker Posted June 11, 2018 Share Posted June 11, 2018 (edited) The paint on the reactor is impressively detailed. Excellent work. Edited June 11, 2018 by Bjorn Firewalker Battybattybats 1 Back to top Link to comment Share on other sites More sharing options...
deathspectersgt7 Posted June 11, 2018 Share Posted June 11, 2018 Great Job on the reactor the chipping and such is ace . Battybattybats 1 Back to top Link to comment Share on other sites More sharing options...
Battybattybats Posted June 14, 2018 Author Share Posted June 14, 2018 Along with the collectors edition of the new Knight Codex, the cool measuring gauge and cards etc i ordered myself something else a bit cool recently that has now arrived. Another addition to my collectors editions:Wrath of the Omnissiah.This limited ed has a nice marbled effect on the page edges.The embossed cogs and gold detailing is really gloriousAnd here's a clearer shot of that writing on the spineI have to admit, the new Black Library collectors editions are a significant bump up from the previous ones i have (Skitarius, Tech Priest and Cybernetica), this is magnificent! JeffTibbetts 1 Back to top Link to comment Share on other sites More sharing options...
Battybattybats Posted June 15, 2018 Author Share Posted June 15, 2018 So Blood Angel Terminator Shoulderpads from Forgeworld are on last chance to buy, and i wanted some to use on the Terminators that came with Deathstorm. And at the same time Secutarii and Termite rules for 8th are out. So looks like i'm making a Forgeworld order in the next few days. I'm not sure i can afford the Termite yet, but should manage the pads and a Hoplite upgrade set which will go with my Forgebane skitarii plastics. Hmm now to sort out the iconography for my Hoplites. Link to comment Share on other sites More sharing options...
Battybattybats Posted June 29, 2018 Author Share Posted June 29, 2018 One of the details in Codex Skitarii that really caught my attention was the War of the Golden Cog. The idea of the Fabricator General of Mars seizing the Culexus Temple Fortress and almost pitching the Imperium into a new major civil war. And at the end of events the Skitarii are left with some mysterious relic called The Golden Cog. So I wonder what it could be.. Something anti-psychic? Or something of dangerous warp energies that you'd want it stored with the Culexus? Well when Malign Sorcery came out for AoS I took one look at the Chronomantic Cogs and knew I must have that, that this might well work for the mysterious Golden Cog artifact. I'm thinking the new fantasy script on one cog will probably get removed but other than that I'm not sure I'll be changing much. The big question is, do I paint it as if it's solidifying out of quicksilver or other molten metal (necrodermis???) or try for some sort of weird coloured smoke as if part of the cogs turn in the warp and part in realspace (reminding me a little of the seemingly impossible geometry of the gears in the Myriad Abominable Intelligence in Cybernetica and Myriad). Suggestions always welcome. In the meantime I'm working on the void shield generator and some other unfinished pieces to clear workspace for my knights. I'll get some pics of progress when possible. Link to comment Share on other sites More sharing options...
Battybattybats Posted July 30, 2018 Author Share Posted July 30, 2018 Finally got some more pics to share.First one of my custom objectives, the gathered group of data storage units.I decided to try the gemstone paints on this model, a bit tricky to use but a good effect, especially where i disregarded the instructions and underpainted highlights though in the main i'll be sticking to my existing techniques for my Mechanicus models. (Though the unlit red glass light was using blood for the blood god, which i use extensively on other models)As i did a really good job i think on the chipped and weathered paint and gilding on this model i'll show a lot of pics of it.So there we go, a gathered group of scavenged data-storage units perfect for use in Kill Team and 40k. I'll post this now and put the next model in the next post imminently to avoid the risk of the currently cantankerous machine spirit of this cogitator i'm using getting belicose and forcing me to re-enter data inefficiently. Bjorn Firewalker and deathspectersgt7 2 Back to top Link to comment Share on other sites More sharing options...
Battybattybats Posted July 30, 2018 Author Share Posted July 30, 2018 And now for the result of a lot of work.And true to form the first pic is bad, lol i didn't expect i'd need to change from macro to get the whole model into focus.Now here's a closer look at some of the detail.I decided i din't like the glow or plasma-ball look most go with on the spherical parts of this model, because it's a void shield generator after all, it needs to be sinister, and what is more sinister than near-pitch blackness behind the glass? The void itself contained?There's very little scratching on the paint of the upper portion, but still a lot of discolouration from time, something suggested by the sculpt with a lot of cracks and chips sculpted in the base half and only a little in the upper portions.The view from above. With my appropriate red nail polish and chair visible.The stone of the cog colour turned out a bit subtle for what i'd wanted, but i didn't want to make it any more orange.So there we go, my void shield generator is pretty much done (i'm tempted to weather some bits of the reliquary bones a little further but probably will do as is). It's been a ton of work, lots more than i expected, this is not an easy model to clean and assemble and paint, so i'm glad i didn't grab three of them as i was tempted to do (if i do get more it'll wait till my to-do pile has shrunk quite a lot!). But on the final assembly of the sub-assemblies and touch-up last night it definitely gave quite the thrill of achievement and of a visually imposing piece of model. Dantay VI, deathspectersgt7, Bjorn Firewalker and 1 other 4 Back to top Link to comment Share on other sites More sharing options...
Bjorn Firewalker Posted July 30, 2018 Share Posted July 30, 2018 Beautiful works. Battybattybats 1 Back to top Link to comment Share on other sites More sharing options...
deathspectersgt7 Posted July 30, 2018 Share Posted July 30, 2018 Great Job Bat !!! . But why no Mech-skulls on your nails ? Battybattybats 1 Back to top Link to comment Share on other sites More sharing options...
Battybattybats Posted July 30, 2018 Author Share Posted July 30, 2018 Thanks everyone! Great Job Bat !!! . But why no Mech-skulls on your nails ? Ah well i hadn't planned to get my nails in the shot, it's just happenstance they are red currently (though it is a colour i wear on my nails often, though less so than black or silver), but i do have some skull nail-art decals i wear sometimes and some small metal glue-on nail skulls in gold, next time i go to that much trouble on my nails i'll post it here! deathspectersgt7 1 Back to top Link to comment Share on other sites More sharing options...
deathspectersgt7 Posted July 30, 2018 Share Posted July 30, 2018 Battybattybats 1 Back to top Link to comment Share on other sites More sharing options...
Battybattybats Posted August 7, 2018 Author Share Posted August 7, 2018 I'm currently finishing the decals on my Kill Team, gone through a lot more microsol than usual, as the limited ed decal sheets are thicker than the standard ones that come in sets. Pics will follow soon once i hit them with enough lahmian medium to drop the shininess down.On the down side my Forgeworld order hasn't shown up yet, and it had some last chance to buy stuff in it (Blood Angel Terminator shoulderpads and a friends Scorpions stuff) so mechadendrites crossed that it's just delayed in customs or similar and will show up soon.On the up side my Kill Team dice arrived. I'll get pics of those when i get some of the Kill Team.I'm also going to try and get the big Adeptus Titanicus box on Saturday. Link to comment Share on other sites More sharing options...
Battybattybats Posted August 9, 2018 Author Share Posted August 9, 2018 Pic time again.To make things easier for myself and my opponent in Kill Team games i wanted to make it even easier identifying who is who, but names on the base didn't feel Mechanicus enough or impersonal enough. So instead the Kill Team is numbered 1 through 10 on the back of their robes.You can also see the screen of the Omnispex and one of the Servoskulls there.So for the unit designation i went with one from the large Mars decal sheet.4 Beta, the B-team ;)And finally some pics with the Mechanicus Kill Team Dice.Something tells me that pic deserves a humorous caption.So that's my Kill Team done for now. Once i get the new game (I'm still playing Shadow War Armageddon currently) i may add an Infiltrator or Ruststalker (and i have a squad of each to get to work on at some point). My Forgeworld order arrived, but there's some breakage of two of the spindly Secutarii Hoplite weapons so hopefully Forgeworld can send replacements for those parts. The Skitarii that came with Forgebane will become my Hoplites. Lots of projects on the go (my Shadow War Armageddon Orks may end up off the sprues as i got the Forgeworld Kommando upgrade set too) and I hope to get Titanicus ordered on Saturday before the grand master edition sells out.I'm very tempted to work on both scales of House Cydonia at the same time and am pondering final decisions on the scheme and insignia of Legio Apex, the Capstone of the Pyramid. (I'm thinking one of the decals of a yellow triangle with the black cog halo at the tip, following the symbology of the sun cresting the tip of a Pyramid, the question i'm pondering is the best backdrop behind the decal to show up both the yellow and black well). Bjorn Firewalker, deathspectersgt7 and JeffTibbetts 3 Back to top Link to comment Share on other sites More sharing options...
Bjorn Firewalker Posted August 9, 2018 Share Posted August 9, 2018 Great-looking Skitarii! Battybattybats 1 Back to top Link to comment Share on other sites More sharing options...
deathspectersgt7 Posted August 9, 2018 Share Posted August 9, 2018 Graet job , like the squad designations . Battybattybats 1 Back to top Link to comment Share on other sites More sharing options...
Battybattybats Posted August 11, 2018 Author Share Posted August 11, 2018 Thanks Bjorn Firewalker and deathspectersgt7! A little bit of quite pleasant news, Forgeworld is sending replacement for the broken Hoplite weapons and I managed to preorder Adeptus Titanicus Grand Master Edition with the coin. So as well as tiny House Cydonia Knights there'll be some Legio Apex in this thread, eventually. Link to comment Share on other sites More sharing options...
Battybattybats Posted August 16, 2018 Author Share Posted August 16, 2018 Here's the other weapon options and gear i magnetised on my Kill Team Leader.Firstly the Galvanic Rifle. With (for Shadow War Armageddon rules) the red-dot laser sight Servo Skull.Next up the radium Carbine and pointing arm.Here's a view from the back of the backpack with attached servo-skull (i used some spare backpacks and magnetised them, swapping between servo-skull and no-servo-skull on the team members who can take red dot laser sights in SWA and with the Alpha as denotes their status a plain servo-skull and a red-dot servo-skull)Arc Pistol and Maul for wrecking xenos machinery and techsorcism of Mechanicus machines.Radium Pistol and Taser GoadA view from the side to show the weathered paint on the goad, not that the camera wanted to get that into focus.Oh and i realised i'd been inconsistent with the shoulder colours, i usually have gold on Vanguard and steel on Rangers but i'd put gold on most of the Killteam Alpha's shoulders so i fixed it up on the Phosphor Pistol and Power Sword.And here's a shot showing the Alpha with all the weapon options and second backpack.Other work for the day has included gluing a second set of Promethium Pipes that a friend spotted in a store in a nearby other city and picked up for me and shortly my latest Forgeworld stuff (Blood Angel Terminator shoulder pads, Ork Kommando upgrade set and of course the Secutarii upgrade set, minus the replacement spear parts still in the mail of course) will be going into the bucket to soak. Bjorn Firewalker, Subtle Discord, Brother Lunkhead and 1 other 4 Back to top Link to comment Share on other sites More sharing options...
Bjorn Firewalker Posted August 16, 2018 Share Posted August 16, 2018 Excellent work. Battybattybats 1 Back to top Link to comment Share on other sites More sharing options...
Battybattybats Posted August 22, 2018 Author Share Posted August 22, 2018 So my Titanicus copy arrived (along with the collectors coin) and it's wonderful but... a few components are a bit of a problem. One warlord base is buckled, one decal sheet was scrunched (but i think micro-set/microsol will sort that out and one warlord titan sprue is quite warped. The latter might or might not be a problem, i've had some less warped sprues still have models go together fine but this one is the worst i've see. So i've let GW customer service know about this by email, though i've asked if they want me to see how the titan sprue parts go together to see if the warping is a problem as that'd be an expensive replacement.Other than this, the Titanicus set is glorious! Subtle Discord 1 Back to top Link to comment Share on other sites More sharing options...
deathspectersgt7 Posted August 22, 2018 Share Posted August 22, 2018 Ouch . i have not seen a plastic sprue warp since the 1970's . Battybattybats 1 Back to top Link to comment Share on other sites More sharing options...
Battybattybats Posted August 22, 2018 Author Share Posted August 22, 2018 From what I heard its caused by removing the sprues from the mold before they've sufficiently cooled. My Mighty Empires set has several mountains hexes that are a bit warped and don't sit right. I've started assembling the warped-sprue warlord to see if its a problem, so far the warping seems to be the frames rather than the parts, at least as far as the legs go. The back pieces that the void shields attach to are the biggest concern due to how warped the frame is, but they might be ok. Building the warlord so far is a unique experience, it goes together delightfully though I'm having to be extra careful with glue. Link to comment Share on other sites More sharing options...

Recommended Posts
Create an account or sign in to comment
You need to be a member in order to leave a comment
Create an account
Sign up for a new account in our community. It's easy!
Register a new accountSign in
Already have an account? Sign in here.
Sign In Now