Psy-Crow Posted August 1, 2014 Share Posted August 1, 2014 http://i92.photobucket.com/albums/l40/Scuberu/010814_DSC_0023_zps2810705a.jpghttp://i92.photobucket.com/albums/l40/Scuberu/010814_DSC_0025_zps31e3bdd0.jpg Link to comment Share on other sites More sharing options...
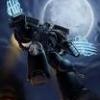
Psy-Crow Posted August 1, 2014 Author Share Posted August 1, 2014 About 80% done. Black needs toning down, decal needs edge blended in, sword needs bring up to pure white, and base needs finishing. Link to comment Share on other sites More sharing options...
Grotsmasha Posted August 1, 2014 Share Posted August 1, 2014 Veeeerrrryyyy cool :tu: Link to comment Share on other sites More sharing options...
Psy-Crow Posted August 2, 2014 Author Share Posted August 2, 2014 Thanks Grotsmasha, I'm 95% there now, just the basing left to do. Should have some pics up in HoH either tomorrow or early next week. Thanks for the kind words Help needed, originally the helmet on the ground was supposed to be a random chaos one which I painted blue as I thought it would tie in with everything else, however the more I looked at it, it was starting to look like his helmet which has been damaged. My question is this, does the helmet look too much like chaos? IMO I think it looks ok but it could be wishful thinking. I can't change the helmet but I can re paint it to look more chaos, maybe black and pink. ATM it's navy blue and orangey yellow, which I thought would be Blood Angel colours? Link to comment Share on other sites More sharing options...
Voxxel Posted August 2, 2014 Share Posted August 2, 2014 Nice! Very simple yet very well executed color scheme! Care to share your red and gold recipes? Link to comment Share on other sites More sharing options...
Psy-Crow Posted August 2, 2014 Author Share Posted August 2, 2014 Thanks voxxel, I feel honoured as your thread was one of the threads I used for inspiration when looking at different styles of Blood Angels. The red is a variation of Vadskaers (Spl? sry), I have a mix of old and really old paints, and I have no idea what they are called now. White Primer Scorched brown Base Red Gore leaving shading Two thin layers 1/1 Red Gore / Mecharite Red Two thin layers 1/1 Red Gore / Blood Red Two thin layers 1/1 Red Gore / Blood Angel Orange Then highlights worked up from Blood Angel orange to another really old colour Orc brown (vomit brown is the closest i've seen) I used to play back in 2nd edition, so for me a true Blood Angel should be orange. This fella was painted to reflect that. I was aiming for a mix between Vadskaers red and old school eavy metal. Link to comment Share on other sites More sharing options...
Psy-Crow Posted August 2, 2014 Author Share Posted August 2, 2014 Oh, and at the end i use a couple of very thin glazes of 1/1 blood red and chestnut ink. For the gold its exactly Vadskaers recipe. Link to comment Share on other sites More sharing options...
Voxxel Posted August 2, 2014 Share Posted August 2, 2014 Thanks! I checked his recipe, and it's quite similar to the way I do gold. Interesting to see you use red gore into most of your mixes, but it works really well! As you said, it really captures the old 'eavy metal blood angels look, which I love as well. You could have gone even more orange for that :P Can't say I'm a big fan of their modern approach to painting blood angels.. Link to comment Share on other sites More sharing options...
Psy-Crow Posted August 2, 2014 Author Share Posted August 2, 2014 My thinking was the Red Gore would tie everything together. The thing is at the moment i'm still experimenting, I haven't found my own style yet, which i'm fine with. I'm reading as many tutorials as I can and copying other peoples style to teach me how to paint. I'm also saving my pennies to visit golem studio for a days tuition. I really need some lessons in the basics. This is my 42nd figure, so far i'm up to 10 Tac squad in Random purple (don't ask) 10 Tac Raven Guard 10 Scout Raven Guard 5 Term Raven Guard 1 Telion, 1 ultramarine, 1 Dread, 1 Greyseer, 1 Ork, 1 Dark Angel and this chap Link to comment Share on other sites More sharing options...
Aqui Posted August 3, 2014 Share Posted August 3, 2014 Fantastic stuff Perhaps making the blue helmet darker alá Night Lords or similar might make a difference? Link to comment Share on other sites More sharing options...
Midnightmare Posted August 3, 2014 Share Posted August 3, 2014 Your painting is so crisp, very nice work. Link to comment Share on other sites More sharing options...
Voxxel Posted August 3, 2014 Share Posted August 3, 2014 My thinking was the Red Gore would tie everything together. The thing is at the moment i'm still experimenting, I haven't found my own style yet, which i'm fine with. I'm reading as many tutorials as I can and copying other peoples style to teach me how to paint. I'm also saving my pennies to visit golem studio for a days tuition. I really need some lessons in the basics. This is my 42nd figure, so far i'm up to 10 Tac squad in Random purple (don't ask) 10 Tac Raven Guard 10 Scout Raven Guard 5 Term Raven Guard 1 Telion, 1 ultramarine, 1 Dread, 1 Greyseer, 1 Ork, 1 Dark Angel and this chap That's a great way to find your style! Just reading/watching stuff and trying things for yourself. Before I started my blood angels I watched tons of youtube tutorials (awesomepaintjob, girlpainting, spusemaroon, etc) and also started with painting a couple of different sm chapters. Btw, you don't need anyone to give you tuition on the basics ;) You're way past that point, but it's always nice to learn something from experienced painters! Link to comment Share on other sites More sharing options...
Psy-Crow Posted August 3, 2014 Author Share Posted August 3, 2014 @Aquilanus, I wish i'd read your comment before i'd finished him. I went with the blue with a yellow stripe. I'll hopefully have pics by midweek when I get hold of a good camera. If the general thinking is too chaos looking i'll probably repaint it. Thanks for the idea @MidnightRunner..Thanks, it really helps getting feedback on here. @Voxxel.. Oh yes, watched the heck out those guys. The tutorial that gave the "ahh thats how you do it" moment was on here, from SCC. His Raven Guard tutorial was great for because it shows how to paint black in simple yet effective way, and shows multiple angles of every step, the exact spots on a marine that need highlighting, something I was struggling with. My main problems atm are consistency, in regards to paint thickness and techniques used on a figure. This guy is the 2nd guy i've done that i'm relatively happy with. (The other is a Skaven Greyseer. Can't post here but Skaven are my 2nd love.) Link to comment Share on other sites More sharing options...
Vadskær Posted August 4, 2014 Share Posted August 4, 2014 A really cool sculpt and beautiful paint job Psy-Crow :-) Thanks for trying out my recipes and good job of modifying and making them your own!A few comments or suggestions, which is really a matter of individual taste: - I think the gold could do with more highlighting, 1:1 Shining Gold & Mithril Silver with perhaps a few pure Mithril Silver points - The black tabard and cloak could also in my book do with a gradual build up of some lighter gray highlights. - also, maybe it's just the picture, but his left hand holding the cloak seems not to have been given the same fine highlights as the rest of the model? /vadskær Link to comment Share on other sites More sharing options...
LutherMax Posted August 4, 2014 Share Posted August 4, 2014 Niiiice! Is this a kitbash? The blue helmet does look slightly out of place - again maybe it needs more damage / blending with the environment ? Link to comment Share on other sites More sharing options...
Forté Posted August 4, 2014 Share Posted August 4, 2014 Can I recommend decal mediums for blending decals into miniatures. That and varnish to take the gloss look away from them. Otherwise, fantastic. Great base too. Link to comment Share on other sites More sharing options...
Psy-Crow Posted August 4, 2014 Author Share Posted August 4, 2014 http://i92.photobucket.com/albums/l40/Scuberu/0408_DSC_0042_zps88864cf8.jpg Link to comment Share on other sites More sharing options...
Psy-Crow Posted August 4, 2014 Author Share Posted August 4, 2014 The Finished shot, here are some shots of my vanguard WIPs and a top secret projecthttp://i92.photobucket.com/albums/l40/Scuberu/0408_DSC_0047_zps69b368c1.jpghttp://i92.photobucket.com/albums/l40/Scuberu/0408_DSC_0048_zps20bc3f74.jpghttp://i92.photobucket.com/albums/l40/Scuberu/0408_DSC_0049_zps949bba49.jpg Link to comment Share on other sites More sharing options...
disease Posted August 4, 2014 Share Posted August 4, 2014 It's a very impressive mini. When you apply your two thin layers before the highlights, do they completely cover the previous, or do you leave a little of the previous shade at the edges? Link to comment Share on other sites More sharing options...
Psy-Crow Posted August 5, 2014 Author Share Posted August 5, 2014 Wow, some very heavy hitters in here @Vadskaer, you're right on every point. The black was a first attempt at a new technique. I need to use much thinner paint and bring it up to lighter. For some reason the photo makes his sword arm look more gloss than the body, in RL it doesnt look that way but the camera never lies. I've already planned to start taking more WIP shots to combat this. Thanks for the pointers, its very helpfull. @Disease, Leave a little but this is my first time doing it that way and i dont think I pulled it off. your stuff is awesome btw. @LutherMax, Thanks, your Blood angels are fantastic. yes it is, its a chapter master body, death company sword, and the head is old tactical box I think, not 100%. @Forte, I fixed the decal with a layer of FFwax then took off the shine with matte medium. I'm deliberately not getting any decal solution to force me to pactice freehand, i just keep chickening out at the last minute Link to comment Share on other sites More sharing options...
Psy-Crow Posted August 6, 2014 Author Share Posted August 6, 2014 http://i92.photobucket.com/albums/l40/Scuberu/010814_DSC_0041_zps0d4a0f1a.jpg Here is a pic of a droppod painted just before I painted my dreadnaught. I had planned to add some of the excellent forgeworld decals I have to it but just after I finished paint, I decided the highlights were to bright and toned them down with some nuln oil. This stuff is garbage, it dried in crusty white streaks. The pod was the first vehicle I've ever done and after the pain in the backside it was to build, let alone paint, when the wash dried and I saw the finish it left, it pushed me over the edge. I stopped painting for a month (as this is the proper amount of time a man needs to sulk) and now it glares at me, taunting me. My plan to fix it is to apply decals then weather it in order to hide my shame, but as i'm saving my pennies to visit Tommie Souile (spl?) in his studio some time soon, I'm probably going to wait, take it with me and learn weathering techniques from him. As always, critics and comments much appreciated. PsyCrow Link to comment Share on other sites More sharing options...
Voxxel Posted August 7, 2014 Share Posted August 7, 2014 @Forte, I fixed the decal with a layer of FFwax then took off the shine with matte medium. I'm deliberately not getting any decal solution to force me to pactice freehand, i just keep chickening out at the last minute Just do it! The freehand on my captain was litterally the first freehand I ever tried, because I was also too scared to do it. But you know what, it's not that hard! The trick is to start with a color close to the color you're painting on so you can make easy corrections. Try it! I had planned to add some of the excellent forgeworld decals I have to it but just after I finished paint, I decided the highlights were to bright and toned them down with some nuln oil. This stuff is garbage, it dried in crusty white streaks. You probably let it pool to much then.. It's sucks when it happens, but when used correctly the wash is great! If you want to tone down the highlights you can also just use a watered down version of nuln oil. But btw, I think the drop pod looks great! Edit: Oh and shake the pot really well before you use it :) Link to comment Share on other sites More sharing options...
Psy-Crow Posted August 7, 2014 Author Share Posted August 7, 2014 @Voxxel. Thanks for the tips, i've heard similar advice from others, but i didn't slop it on, I used a thin layer. Its one of the issues i'll be saving for golem studio. Until then i'm more than happy to make my own washes. You are correct about the freehand. After venting in my post last night I started to practice freehanding Raven Guard emblems for the drop pod, the forgeworld ones are extremely nice but there isn't one which fits exactly, this is the third attempt. Its not right proportionally but I think I should be good to go after a few more. http://i92.photobucket.com/albums/l40/Scuberu/IMG_4139_zps34cfa139.jpg Link to comment Share on other sites More sharing options...
Psy-Crow Posted August 10, 2014 Author Share Posted August 10, 2014 Here are some shots of a diorama i'm working on little by little in between painting. Still very early, flash still there and bluetak holding things together. I'm probably going to change the position of the arms, and the base is just getting a rough idea of positioning, i've still got a few ideas brewing for it. At the moment the title in my head is 'Clever Girl' from Jurassic Park, he's concentrating on one nid and the other attacks from the side. Let me know what you think. http://i92.photobucket.com/albums/l40/Scuberu/100814_DSC_0051_zps3497bd08.jpghttp://i92.photobucket.com/albums/l40/Scuberu/100814_DSC_0050_zps0fbc14e2.jpghttp://i92.photobucket.com/albums/l40/Scuberu/100814_DSC_0052_zps46ef99e5.jpghttp://i92.photobucket.com/albums/l40/Scuberu/100814_DSC_0053_zps13ec8bcc.jpg Link to comment Share on other sites More sharing options...
deathspectersgt7 Posted August 10, 2014 Share Posted August 10, 2014 Nice free hand of the Raven. Great looking CM. Link to comment Share on other sites More sharing options...

Recommended Posts
Archived
This topic is now archived and is closed to further replies.