ChaosRising Posted November 2, 2014 Share Posted November 2, 2014 What follows are my photo-notes (as well as some actual ones) for the units that were pledged to CoC VII. Both units began here. They then looked a bit like this. I realize that everyone has probably seen a CSM box and its bitz, but I decided to show them anyway, as proof that I really did buy the pieces. NURGLE MARINE PROGRESS: Bitz in the planning stage. After the picture I realized I'd forgotten arms...and shoulder guards...and something for my specialist. Oh well...more grey plastic that we can all skip looking at. The red bolters were left overs from when I was building my original World Eaters and Word Bearers (I primed entire sprues red). I liked the idea of the red contrasting with the Nurgle scheme and connecting the Nurgle marines with the Word Bearers. Bitz - now black. All the stuff that I forgot in the first picture is now shown. The red bolters disappeared since I wanted them red. Secret Weapon #1 Now the painting can begin. Backpack Comparison - the one on the left is 100% black primer; the one on the right is Catachan Green over black primer. Just thought I'd give a rough idea of how Catachan looks when placed on top of black. Main Bitz are now all coated with Catachan Green. Secret Weapon #2 Torso Comparison - the one on the left is Catachan Green over black primer; the one on the right is Camo Green over Catachan Green, over black primer. Main Bitz are now all Camo Green over Catachan Green over black primer. Secret Weapon #3 - and yes, it does say Rotting Flesh (I know it's not real clear in the picture) Torso Comparison - the one on the left is Camo Green over Catachan Green over black primer; the one on the right is Rotting Flesh over Camo Green over Catachan Green over black primer Main Bitz are now all Rotting Flesh over Camo Green over Catachan Green over black primer After this point I stopped taking WiP pictures of the Nurgle Marines because I was getting distracted by taking pictures and making sure that everything looked ok. Everything else - mostly bolters and accessories (and an icon bearer) - had to be done on the fly to some degree or other and didn't really lend itself well to step-by-step pictures. However, pictures of the finished product should be coming soon. This shot is mostly for the bases and icon - sorry...my creative side wasn't really kicking in for Nurgle bases, so I may revisit them later, but it's better than the black plastic they would have normally received. For those interested about the bases....the slime trails were done with a Kabalite Green squiggle directly over the black plastic. Over the Kabalite Green I put Moot Green so that it nearly filled the Kabalite (but not quite). After this was done, I put in a thin trail of Camo Green (roughly 1/3 - 1/4 the width of the original Kabalite). To change the look from muddy to toxic, I added tiny streaks of Flash Gitz Yellow. Once that was done, I put a layer of 'Ardcoat over the whole thing, and then painted the remaining black plastic with Mechanicus Standard Grey. Side shot of the shoulder guards Group photo Group photo (better quality) Shoulder guards (better quality) The Bigger Picture - just for kicks. Thought it would be fun to show the completed squad as an expansion for an existing squad. The old squad (5 marines + a champion) has formed a circle around the new squad. Coming soon to a sector near you... WORD BEARERS I apologize in advance for the overall lack of Word Bearer photos. Once I started working on the W.B. squad I didn't want to deal with taking photos, lest I lose my focus and have my project come to a halt. As a result, the Word Bearers were not subjected to the same amount of picture taking as the Nurgle marines. As with the Nurgle marines, the Word Bearers began here. They then looked like this. Next step. Any place that's black on the model was later painted silver. This particular model was started as a generic Khorne marine shortly after the photo was taken. Now....due to the lack of photos between when I started and finished, here's a quick overview of what was used where. Eyes: Warpstone Glow Silver areas - Runefang Steel over black Brass(ish) areas - Brass Scorpion Horns: Abaddon Black basecoat in all cases; Screaming Skull over Balor Brown (or) Ulthuan Gray over Adeptus Mechanicus Standard Chainsword furs: Adeptus Mechanicus Standard drybrushed with Ulthuan Gray Finished squad (front) Finished squad (shoulder guards) Link to comment https://bolterandchainsword.com/topic/298763-lorgars-tribute-to-nurgle-call-of-chaos-vii-wip/ Share on other sites More sharing options...
Forté Posted November 2, 2014 Share Posted November 2, 2014 That was a little tough on a mobile browser. Nothing wrong with posting the actual pics ;) Liking how the colour is coming out in the final pic though. I still don't understand how some people paint with all the parts separate though but if it works keep at it :tu: Link to comment https://bolterandchainsword.com/topic/298763-lorgars-tribute-to-nurgle-call-of-chaos-vii-wip/#findComment-3850808 Share on other sites More sharing options...
ChaosRising Posted November 2, 2014 Author Share Posted November 2, 2014 Thanks, forte. I, for one, will never understand how some people can make a model look good if the thing is fully built from the start (excluding models that come as a single piece of course)... Link to comment https://bolterandchainsword.com/topic/298763-lorgars-tribute-to-nurgle-call-of-chaos-vii-wip/#findComment-3851466 Share on other sites More sharing options...
Augustus b'Raass Posted January 6, 2015 Share Posted January 6, 2015 Ugh... Sorry mate, but I'm not going to click every single image to look at it, especially when my ipad asks me to install an app to look at them every time. Why not just post the images in the post? I'd love to follow your progress but not if doing so is a grueling experience... If you need help figuring out how to you can drop me a pm. I'm happy to help out!! :tu: Link to comment https://bolterandchainsword.com/topic/298763-lorgars-tribute-to-nurgle-call-of-chaos-vii-wip/#findComment-3911067 Share on other sites More sharing options...
Forté Posted January 6, 2015 Share Posted January 6, 2015 I'll second b'Raass here. Add the images in your post. Especially if it's a WIP topic. Link to comment https://bolterandchainsword.com/topic/298763-lorgars-tribute-to-nurgle-call-of-chaos-vii-wip/#findComment-3911096 Share on other sites More sharing options...
Lucio Posted January 6, 2015 Share Posted January 6, 2015 Thanks, forte. I, for one, will never understand how some people can make a model look good if the thing is fully built from the start (excluding models that come as a single piece of course)... The trick is figuring out which surfaces matter to the finished model and whether assembly preventd easy access to those surfaces. For example boltguns obscure the chest, so leaving them off makes sense as it'll still be visible afterwards. Shoulder pads on the other hand, fit firmly over the shoulder so putting them on first makes sense, to save painting parts of the arms which then cause an adhesion problen for the glue. Link to comment https://bolterandchainsword.com/topic/298763-lorgars-tribute-to-nurgle-call-of-chaos-vii-wip/#findComment-3911103 Share on other sites More sharing options...
Forté Posted January 6, 2015 Share Posted January 6, 2015 Little blob of blu tac added before priming on the areas where you'll glue the finished model really helps having a strong bond. Link to comment https://bolterandchainsword.com/topic/298763-lorgars-tribute-to-nurgle-call-of-chaos-vii-wip/#findComment-3911105 Share on other sites More sharing options...
Slave to Darkness Posted September 14, 2015 Share Posted September 14, 2015 I build but leave the bolters off, though recently I have started leaving the backpacks off as well, less stress at the end of the day, and its actually quicker because your not wasting time trynna get the brush in between the pad and the pack Link to comment https://bolterandchainsword.com/topic/298763-lorgars-tribute-to-nurgle-call-of-chaos-vii-wip/#findComment-4171671 Share on other sites More sharing options...
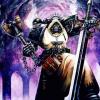
Akylas Posted September 15, 2015 Share Posted September 15, 2015 I leave the bolters and backpacks off. It started with my Salamanders. I left their backpacks off because they were a different color. Eventually I noticed it just made things easier for my Black Legion as well. Those Bearers of the Word and Nurgle Marines are looking good. Link to comment https://bolterandchainsword.com/topic/298763-lorgars-tribute-to-nurgle-call-of-chaos-vii-wip/#findComment-4172323 Share on other sites More sharing options...
Stormborn Posted September 15, 2015 Share Posted September 15, 2015 Really nice looking models, colour scheme is great. I've tried both methods of painting and find unassembled is easier to apply paint (although I still suck at painting), but I find it easier to visualise a paint scheme on an assembled model. Link to comment https://bolterandchainsword.com/topic/298763-lorgars-tribute-to-nurgle-call-of-chaos-vii-wip/#findComment-4172485 Share on other sites More sharing options...
ChaosRising Posted September 20, 2015 Author Share Posted September 20, 2015 Thanks Akylas and Stormborn. Overall I tend to agree with Stormborn about painting before assembling. Recently, however, I have started to make an exception when it comes to vehicles (mostly tanks) as I find that pre-building the hull and dry-fitting the smaller pieces on for priming helps to reduce waste and means less time spent waiting for parts to dry before flipping them over. Link to comment https://bolterandchainsword.com/topic/298763-lorgars-tribute-to-nurgle-call-of-chaos-vii-wip/#findComment-4176229 Share on other sites More sharing options...
Recommended Posts
Archived
This topic is now archived and is closed to further replies.