Doctor Perils Posted August 21, 2016 Share Posted August 21, 2016 Absolutely love your grey grey knights!!! And the Deathwatch models are really cool, any plans for enlarging the Kill-Team? And look forward to seeing your knight, I was only just saved from myself by the FLGS not having any left ^^ Link to comment Share on other sites More sharing options...
Stercus Posted August 21, 2016 Author Share Posted August 21, 2016 I've got the overkill box, so a few of those will eventually end up painted. The knight was very much an impulse buy. I'd been playing the freeblade game quite a bit on my iPad and I thought to myself "I wonder how much they go for on eBay". As it turned out, not that much with a bit of sharp bidding. Should arrive this week, and once the kids are back at school in a couple of weeks, Gardinel shall walk. Link to comment Share on other sites More sharing options...
Stercus Posted September 3, 2016 Author Share Posted September 3, 2016 So.... Turns out the top hatch on a knight doesn't open on its little hinge. We'll see about that so we will. Nothing like taking a saw and a sharp knife to a ninety quid model to while away a couple of hours. Will stick up a few WIP shots when I persuade the camera on my new phone to cooperate. Link to comment Share on other sites More sharing options...
Stercus Posted September 17, 2016 Author Share Posted September 17, 2016 Apologies to anyone diligently following this thread, vainly hoping for updates or progress. You poor fools. :-) While not fully up to speed again yet, rest assured I have been ticking over the last few weeks. here's a wee picture to whet the appetite: Gardinel shall walk. And to prove it, he has a leg. There will be some truly enormous picture dumps over the next few days, as i document the process leading me to having this single photo to show, but I hope it will be worth it. Before I begin, I'd like to make it plain that anything you see on this thread regarding construction of a knight or in any way making it look cooler than the standard model is entirely stolen from the endeavor of other more accomplished modellers. (mainly JeffTibbetts' Queen Bee if I'm honest). Hopefully you'll enjoy it. Cheers all. Link to comment Share on other sites More sharing options...
Stercus Posted September 22, 2016 Author Share Posted September 22, 2016 Picture dump incoming. First, some ramblings from me. Well, I purchased a Knight. I decided to make it look as much as possible like the one I use in the iOs game "Freeblade", so spent a week or two just looking over the sprues and working out what to do. Having settled on a pose, I then had to do some brainstorming as to how best to bring it about. Firstly, i wanted this beasty to not appear static, and also to not share the stock model's "left foot forward, right foot back, firmly planted walking forward" stance. The knights in the game are much more dynamic, so I decided to make Gardinel in a more aggressive posture. To whit, he's going to be standing tall with his left leg in a straight vertical, while stamping on some xenos critter with his outstretched right foot. this is going to require a near total rebuild of the right leg, and some minor repositioning and strengthening of the left leg, as it will need to support the full weight of the model. Here's where I got up to: Firstly, before sticking the two halves of leg together, I cut the right leg at the knee around the line of the joint with a coping saw. I then glued the two halves of the lower and upper legs together, jamming offcuts of sprue inside to provide extra strength for gluing and pinning. I also cut away the ball and socket joint at the ankle using a craft knife, as this would need to be replaced to achieve the pose I wanted. Not shown in the pictures above is that I also removed the bolt on the hip joint. In the finished model, the new angle of the hip would have made it look weird. I took a mould of it first using Insta-mold so I can cast a new one and replace it later. Next, using 1.5mm brass rod to pin the joints, I attached the upper and lower leg at the desired angle: That's about as much of a bend at the knee as you can achieve without getting the gubbins at the back of the thigh all snarled up, but it provides plenty of dynamism for my purposes. You can also see where i repaired the hole left by removing the big bolt using milliput. It still needs a little smoothing out, but that will wait til after the main construction phase. to attach the foot, we need a new ball and socket joint, and for that we need an 11mm half-sphere. Haberdashery shops are your friend (or anyone with a well-stocked sewing kit). These were 50 pence or so at my local market, and following a little trimming and roughening up with sandpaper, fit very well. After rebuilding the pistons with brass rod and a little more pinning and gluing later, we get to this stage: So far, so good. Its a little rough and ready right now, but I'm in no hurry. Next job is a foot. To get it good and stompy we need to adjust the position of the toes. they are fairly straightforward to remove with a sharp knife (or a razor saw if you have one). I used a slightly angled cut to preserve as much detail as I could, mainly because I'm not overly confident of my ability to resculpt anything I chop off by mistake. Once the desired toes are removed, I filled the cavities in the sole of the foot and bottom of the toes with milliput to make drilling holes for pinning easier, and then used brass rod to re-attach the toes at a less flat angle. The gap where the soft bendy part of the toe used to be will be rebuilt with milliput and greenstuff later. So, thats one leg. The left leg is a more simple conversion as it doesn't need the knee angle to be changed. It will however need to be considerably strengthened to support the full weight of the model. To that end, I used a length of 2.5mm thick brass rod to run from the foot to the hip in a single straight line. this should provide the necessary rigidity to hold Gardinel up. I'm also filling all the hollow parts of this leg with milliput to add extra weight and solidity. You can see from these pictures how the rod works. The internal surfaces of the main leg needed a little shaving to get the rod in smoothly, and as in the right leg previously, I removed and replaced the ball joint at the ankle. I'm going to double pin the hip joint for this leg to prevent any rotation: The last thing I want is the load bearing leg to remain static while the rest of the machine slowly does a face-plant into the table after all. Well, thats the first few steps on what is likely to be a long build. Hopefully I'll make a good job of it, because this really is a very nice kit with real character. Hopefully it will entertain a few of you as I grapple with a build ever so slightly out of my comfort zone! Link to comment Share on other sites More sharing options...
Stercus Posted September 18, 2017 Author Share Posted September 18, 2017 Well, it's certainly been a while since I put anything up on this thread. Unfortunately I was cut off mid-build by my pc deciding to throw the mother of all tantrums, leaving me unable to add pictures. I have actually done plenty more stuff since I last posted, and should have a few more pictures to share before this weekend, so this post is just a little bit of relief that the thread still exists. Link to comment Share on other sites More sharing options...
Stercus Posted September 21, 2017 Author Share Posted September 21, 2017 So here's a small update. Having got my hands on the Shadow Wars: Armageddon rulebook, it looked like a great opportunity to diversify my model collection a bit, so I've been building and painting all sorts of stuff, with various killteams and terrain pieces getting sorted. One of my current favourites is this guy: The base model came free on a white dwarf some time ago, but he's repurposed here as an Ogryn special operative for an Imperial guard team. On a personal level, I'm not a huge fan of GW's take on the ogryns; they always look cartoonishly massive and bulky, but this guy has the additional stature and muscle mass to fit the part. I had to scratch build a ripper gun, as nothing in my bits box was suitable: There's pieces from literally a dozen kits in that gun, as well as plenty of plasticard. I had to dremel off an awful lot of chaos-y detail, but broadly speaking, I'm pretty happy with how he's turned out, although I'll have a clearer idea if any more work is needed once I've put some primer on (If the rain here ever stops). For reference, here's a comparison with a regular guardsman. He really does tower over his littler colleague. More to come in a couple of days, with yet another homebrew astartes chapter making an entrance, and also the addition of (gasp!) xenos. Thanks for looking, if indeed you still are. Link to comment Share on other sites More sharing options...
Bjorn Firewalker Posted September 21, 2017 Share Posted September 21, 2017 The Ogrin and his scratchbuilt ripper gun are well done. Link to comment Share on other sites More sharing options...
Stercus Posted September 21, 2017 Author Share Posted September 21, 2017 The Ogrin and his scratchbuilt ripper gun are well done. Thanks. It was a fun build. Weirdly, both the hands are different sizes, but I figure ogryns are supposed to be stable mutants so perhaps it's just how this guy rolls. Link to comment Share on other sites More sharing options...
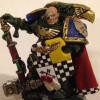
Stercus Posted September 22, 2017 Author Share Posted September 22, 2017 Here's a couple of additions: Firstly, some nasty gribbly beasties. These are mostly straight from the box, aside from a few tweaks to the front one's leg position. still need to add a little greenstuff to his (it's?)knee. To follow, an officer from yet another homebrew chapter, the Jade Cobras. This lot in fluff have taken an absolute kicking from a Tyranid incursion and have resorted to guerilla actions to try and resupply their fleet. Obviously this guy is a way off being finished yet, in fact his head is currently somewhere in the uk postal system. his right shoulder pad will be replaced, as most likely will his bolt pistol. the left hand is a custom built lightning claw as while I ilke the idea of them as a weapon, the GW representation of them always struck me as lumpen, clumsy things. Should have another post in a day or two, with more Xenos for your entertainment. Link to comment Share on other sites More sharing options...
Bjorn Firewalker Posted September 22, 2017 Share Posted September 22, 2017 The backpack-mounted cobra looks great. Where'd you get it? Link to comment Share on other sites More sharing options...
Stercus Posted September 22, 2017 Author Share Posted September 22, 2017 It was from the imperial wizard kit. Not sure if it's still available since everything got sigmarised. Link to comment Share on other sites More sharing options...
Stercus Posted May 15, 2018 Author Share Posted May 15, 2018 I should probably post some more stuff here now the sunny weather has arrived and I can finally spray models again... Link to comment Share on other sites More sharing options...


Recommended Posts
Archived
This topic is now archived and is closed to further replies.