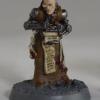
Psykic_scribe Posted December 26, 2014 Share Posted December 26, 2014 ObjectiveOh decisions, decisions! I need some firepower in my SM army and the Predator is an ideal base, but with Lascannon or Autocannon? I want to be able to swap the main weapon, but my usual magnet solutions are placed between parts instead of using glue. In this case, I want the barrel movement to remain for both weapons, so this took some planning on my part. Hence this photo record of my modifications. Hope these are useful to someone ...... Tools and materials1. The usual files, craft knives and a heavy bladed craft knife.2. Three Neodymium 3x1 mm disc magnets3. Plastic rod, 2.0 or 2.5 mm diam, 40 to 50mm length.4. Superglue and Green Stuff (GS) Step 1 – separate the “drum” that sits in the turret mounts:Taking the bottom half of the Autocannon (leave the Lascannons alone for now in case of any irredeemable errors ), and a strong craft (Stanley) knife, partly cut under the lower armour shield and cut especially at the lower corners. Then with the same strong blade, make cuts down through the three supports close to the flat surface of the drum. (Mind your fingers and do not snap the blade. For such thick plastic, I would usually use a hacksaw but that would remove material that we need.) Tidy up the drum with a file; we will need only one. Step 2 – Mount the Autocannon barrelThe Step 2 photo shows the barrel and armour upside down, but the drum right way up. Drill two small holes on the drum face, one for the magnet and the other aligned with the gun barrel to take the plastic rod. I have packed out the back in the drum to support the magnet. Fix the plastic rod to protrude in both directions from the drum – approx. 1.5mm towards the barrel and the same into the turret. Glue the Autocannon barrel halves together. When dry, clamp and carefully drill out the rear of the barrel, just enough to take the plastic rod in a dry snug fit. Step 3 – Fit a magnet into the AutocannonPack out the left side of the Autocannon with GS and while still soft, place a magnet on it’s partner in the drum, push-fit drum to Autocannon and make an impression in the GS. Pull apart, remove the magnet and superglue into the GS. Step 4 – Trial fit the drum with AutocannonWhen the superglue is dry, push-fit the drum into the Autocannon and place into the two turret halves – do not glue the turret yet. Check that the barrel elevation is sufficient, or trim the rear of the plastic rod to fix. Step 5 – Prepare the Twin-Linked LascannonNow we can “risk” the Lascannons, repeating steps 1 to 3. In this case, the drum on the Lascannons is cut away and is not needed. Carefully drill out the inside of the right hand barrel for a short distance to take the plastic rod from the previous drum. The photo shows an alternative of plasticard packing for mounting the magnet in the Lascannons. Step 6 – Complete the TurretTrial fit both weapons into the turret, then the turret halves are glued together. No glue on the drum or weapons, so that the drum moves and the weapons can be swopped. Objective achieved. Link to comment Share on other sites More sharing options...

Recommended Posts
Archived
This topic is now archived and is closed to further replies.