UltraRich Posted January 3, 2018 Author Share Posted January 3, 2018 I've got a good technique for the bullet holes drill a pilot with a pin vice then stick the end of a knife in and spin it changing the angle to the hole so it makes an irregular hole iceman2160 and duz_ 2 Back to top Link to comment Share on other sites More sharing options...
duz_ Posted January 3, 2018 Share Posted January 3, 2018 I've got a good technique for the bullet holes drill a pilot with a pin vice then stick the end of a knife in and spin it changing the angle to the hole so it makes an irregular hole /yoink! UltraRich 1 Back to top Link to comment Share on other sites More sharing options...
WarriorFish Posted January 4, 2018 Share Posted January 4, 2018 That feels suspiciously like how I drill holes for magnets - which one of us should be worried? :lol: UltraRich, MrZakalwe, Res Ipsa Loquitur and 2 others 5 Back to top Link to comment Share on other sites More sharing options...
Ahistorian Posted January 8, 2018 Share Posted January 8, 2018 This is all fantastic stuff, one of my favourite project threads! UltraRich 1 Back to top Link to comment Share on other sites More sharing options...
UltraRich Posted January 9, 2018 Author Share Posted January 9, 2018 Thanks. I've filled out the base of the bastion and started to texture it so should have a good update this weekend duz_ 1 Back to top Link to comment Share on other sites More sharing options...
UltraRich Posted January 23, 2018 Author Share Posted January 23, 2018 (edited) Im still cracking on with the troops as theres no point building a AOP bastion if theres no one to put on it! Ive got five about done except for some extreme highlights and some aquila shading Ive even done some SM powersword work on one of the sergeants We have a new captain with a chin straight out of family guy Ive also had a go at camo on one of my snipers. This has just had its first wash and is still wet Im going to paint the highlights and shade rather than rely on the wash. I'll use the wash as a guide for where to put the paint Also anyone who saw the "today in IG" thread will know I accidentally won 4 auctions on Ebay when I expected to win one or two (damn you drunk bidding!!) Ive gone through them and fixed some of the broken ones and put the least likely to make it into the army back on ebay (25 in total) Im now left with this at my current rate I reckon 2020 looks good..... Edited March 25, 2020 by UltraRich The Ergonomic Enginseer, Bjorn Firewalker, robofish7591 and 5 others 8 Back to top Link to comment Share on other sites More sharing options...
Major_Gilbear Posted January 23, 2018 Share Posted January 23, 2018 Looks like a proper IG company that does! I also have to say, I do like those old Cadian metal figures - they'll look great when you've got them all done up. UltraRich 1 Back to top Link to comment Share on other sites More sharing options...
Bjorn Firewalker Posted January 24, 2018 Share Posted January 24, 2018 Good job. I especially like the lightning effects on the power sword. UltraRich 1 Back to top Link to comment Share on other sites More sharing options...
UltraRich Posted January 24, 2018 Author Share Posted January 24, 2018 (edited) Thanks guys Ive been working on the metal sniper tonight as I found it in a box at the weekend Its an old one where the head was damaged so I switched it out for a scout one. It was actually a simple paint job and actually fun to do Ive tried to paint him with one eye shut and one open edit: just noticed the bad highlight on the gun butt..... will fix later. Edited March 25, 2020 by UltraRich The Ergonomic Enginseer, Major_Gilbear, our_baz and 5 others 8 Back to top Link to comment Share on other sites More sharing options...
Major_Gilbear Posted January 25, 2018 Share Posted January 25, 2018 Looks good - and your sniper has a much straighter rifle than mine do! :( Link to comment Share on other sites More sharing options...
UltraRich Posted January 25, 2018 Author Share Posted January 25, 2018 Looks good - and your sniper has a much straighter rifle than mine do! :( They are a nightmare. It looks straight but it's not 100%. Ive got to tackle the metal sword on the metal command squad captain at some point. That has a wave in it! I miss painting metal minis :) duz_ 1 Back to top Link to comment Share on other sites More sharing options...
Bjorn Firewalker Posted January 25, 2018 Share Posted January 25, 2018 Good job on the sniper. The camouflage pattern on his cloak is a good touch. UltraRich 1 Back to top Link to comment Share on other sites More sharing options...
Ranulf Posted January 25, 2018 Share Posted January 25, 2018 That sniper is awesome UltraRich, nice touch with the kill markings. Paint job is crisp and clean with nice highlights and great camo. Well done. UltraRich 1 Back to top Link to comment Share on other sites More sharing options...
Inso Posted January 25, 2018 Share Posted January 25, 2018 (edited) Nice work on all the troops and the conversion work on the sniper is pretty seemless. Great stuff Edited January 25, 2018 by Inso UltraRich 1 Back to top Link to comment Share on other sites More sharing options...
WarriorFish Posted January 25, 2018 Share Posted January 25, 2018 Good use of the Scout head for some variety, and the classic camo cloak job is excellent :tu: UltraRich 1 Back to top Link to comment Share on other sites More sharing options...
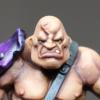
UltraRich Posted January 27, 2018 Author Share Posted January 27, 2018 (edited) We can do better than an ork..... "Nid, Dont Push me" Edited March 25, 2020 by UltraRich The Ergonomic Enginseer, walter h, duz_ and 4 others 7 Back to top Link to comment Share on other sites More sharing options...
WarriorFish Posted January 27, 2018 Share Posted January 27, 2018 Nice, can't wait to see him finished :tu: UltraRich 1 Back to top Link to comment Share on other sites More sharing options...
duz_ Posted January 27, 2018 Share Posted January 27, 2018 That would make a perfect vow for the trooping the colour! :D Great conversion! UltraRich and walter h 2 Back to top Link to comment Share on other sites More sharing options...
Colonel Cross Posted January 27, 2018 Share Posted January 27, 2018 everything is so fantastic! That Valkyrie is a masterpiece! UltraRich 1 Back to top Link to comment Share on other sites More sharing options...
UltraRich Posted January 27, 2018 Author Share Posted January 27, 2018 That would make a perfect vow for the trooping the colour! Great conversion! Thanks, I'll add it later tonight WarriorFish and duz_ 2 Back to top Link to comment Share on other sites More sharing options...
Bjorn Firewalker Posted January 27, 2018 Share Posted January 27, 2018 (edited) "Nid, Dont Push me" http://i51.photobucket.com/albums/f372/rbrewster101/IMG_7716_zpsyau8jfxv.jpg Me: "Guardsman Marbo? What are you doing in a Cadian army?" Marbo: "Catachans being who we are, we killed every damn bug within reach, so I have to go for a walk to find worthy prey." Me: "But the nearest Catachan Regiment is light-years away!" Marbo: "What, are you another one of those pansies who need to hide behind a Gellar field to cross the void? The denizens of the Warp don't deserve your fear, they deserve a sharp blade through the backs of their necks." Edited February 3, 2018 by Bjorn Firewalker UltraRich, duz_, Furio Reyka and 1 other 4 Back to top Link to comment Share on other sites More sharing options...
UltraRich Posted February 10, 2018 Author Share Posted February 10, 2018 (edited) Ive not updated for a bit so I thought Id share progress I decided the bastion looked too plain with a straight square base so kicked it out using plasticard and some spare corner brackets to match the level above. Im much happier with the result (even though getting the angles was a pain) Ive spread some filler on it which will be sanded to give it the same surface as the plastic level above I also bought some Halfords textured spray which has a fine sand in it and that looks like it will work really well to Tie the whole model together Im also experimenting with how I paint faces. Ive a load of helmetless minis so I thought Id work on my technique Normally I focus on the flesh then do the eyes but this method works from the eye outwards. The first one came out ok but the 2nd one is a bit Jack Sparrow Note only the faces are done on these minis... Edited March 25, 2020 by UltraRich The Ergonomic Enginseer, Tallarn Commander, duz_ and 3 others 6 Back to top Link to comment Share on other sites More sharing options...
Bjorn Firewalker Posted February 10, 2018 Share Posted February 10, 2018 The bastion looks promising. Will you mount antiaircraft guns on that tower? Link to comment Share on other sites More sharing options...
UltraRich Posted February 11, 2018 Author Share Posted February 11, 2018 (edited) The bastion looks promising. Will you mount antiaircraft guns on that tower? Thanks, Yes there will be two turrets above the door, bolters in all the windows and a laser on the roof So today this has had an undercoat then black from below, white from above then grey on all the surfaces. Ive now started to weather it.... this is going to be a loooooooooong process! Im using oil paints and the dot process with white, black, brown and a tiny bit of green I'll post a pic when I do the next panel Ive done the door and the level immediately above it. Its hard to photo at the moment as its still wet. It will look better post a purity seal Edited March 25, 2020 by UltraRich walter h, Tallarn Commander, Reviler and 3 others 6 Back to top Link to comment Share on other sites More sharing options...
WarriorFish Posted February 12, 2018 Share Posted February 12, 2018 Really popping now, speedy progress too so looking forward to seeing it in all its glory when complete :) Link to comment Share on other sites More sharing options...

Recommended Posts
Create an account or sign in to comment
You need to be a member in order to leave a comment
Create an account
Sign up for a new account in our community. It's easy!
Register a new accountSign in
Already have an account? Sign in here.
Sign In Now