HardCoil Posted April 26, 2015 Share Posted April 26, 2015 Hello B&C I'm an old veteran from the 1st to 3rd edition days, who promised himself that taking up kill-team would never lead to a 40K army, yet here we are. I started messing around with models a few years ago, but this is my first army project in quite some years. I've always been good at planning and really bad at actually doing stuff, so hopefully this thread will keep me motivated till I hit 1500 points or above of Grey Knights I've been looking at all the truescale stuff here and other places, and after reading the Heresy novels, I think it's the only way to model marines.Here are my first two attpemts, based the ideas from Doghouse's old theads and from http://masteroftheforge.com/ : http://i.imgur.com/OtZc5.jpg http://i.imgur.com/Rs91eiH.png I was pretty happy with these apart from two things: They take a long time to build, and in-game space marine rules don't really do them (or the novels) justice - they don't look like they will allow a lasgun shot thrugh 1/3 of the time :-/ So now the plan is to use these to represent terminators. Terminators aren't as tough as novel/fluff marines, but they are a lot closer than normal game marines. I chose GK because they have lots of terminators, and aren't restricted too powerfists as CC weapons. So.. here's the plan: Grey Knight Terminators This will be the backbone of the army. Here is my first WIP test model: http://i.imgur.com/902KUM9.jpg To make production as fast as possible I've come up with the following recipe: Backpack and storm bolter: Each piece is 3D printed at Shapeways. Casting isn't time or cost efficient (click for bigger) http://i.imgur.com/wzOBbwlm.jpg http://i.imgur.com/7qBYI3Km.jpg http://i.imgur.com/hG16yqWm.jpg Torso: Cast torso rear that just plugs in to the GKT kit chest plate at and alternative angle: http://i.imgur.com/fBa3f4f.jpg Legs: Bulked out with greenstuff as everybody else does. Thigh gap reduced. Arms and head: Adapted and posed. Left hand built from scratch. Force Weapon: Goes on a servo arm on the backpack. Status right now is that I'm tweaking the 3D models which need a little bit exaggeration of the details, and a bigger Aegis on the backpack. I also need to build a little Auxillary Grenade Launcher to fit on the left arm, where the place for the original storm bolter is. And I need to design a psycannon Close combat specialists (hammer guys) will get a wrist mounted bolter with ammo feeds an each arm (kinda like Marneus Calgar). DreadKnights Based on Dreamforge 15mm Leviathans, as they are the exact right size. Switched the stupidly large gun for a FW gatling gun to represent heavy psycannon. Also building a new head: http://i.imgur.com/svwAUsAm.jpg StormRaven Currently at the mental planning stage. Will probably be extended and I'll mess around with cockpit placement. DreadNought Yes, I want a dread Thinking of building it from at Centurion with a bigger upper torso, in style with the original RT dreads. Power armoured GKs (purifiers) What to do here? I'm thinking of a less completely sealed version of the armour (like in Edge of Tomorow). Widen the torso, armoured boots, and then clothing for arms and legs, like these chaos dudes (click for big): http://i.imgur.com/u6X0ogPl.jpg So there it is, the big plan. I'll do my best to keep this updated as things progress. Any comments and suggestions will be very much appreciated. Link to comment Share on other sites More sharing options...
BrotherCaptainArkhan Posted April 26, 2015 Share Posted April 26, 2015 Hard to say whether this is more ambitious or unique. Either way I'm definitely keeping my eye on this one. I must question why you're doing Marines with unsealed armour, but they look awesome nonetheless. Very eager to see where this goes. Link to comment Share on other sites More sharing options...
HardCoil Posted April 26, 2015 Author Share Posted April 26, 2015 Thanks Maybe unsealed is not the right word, as the suit could still be environmentally sealed. Just not armourplates all over, to make sense of the in-game 3+ save and to differentiate them from the "count as terminators". Link to comment Share on other sites More sharing options...
Arebennian Posted April 26, 2015 Share Posted April 26, 2015 Nice job so far. Where do the legs from those Purifier counts as Marines come from? Link to comment Share on other sites More sharing options...
HardCoil Posted April 26, 2015 Author Share Posted April 26, 2015 Thanks, they are from: http://evilcraft.eu/products/ Definetely not purifiers though, as seen from their Alpha Legion insigina ;) Link to comment Share on other sites More sharing options...
HardCoil Posted May 2, 2015 Author Share Posted May 2, 2015 Made a mock up for the Hammer guys: http://i.imgur.com/STvmgKp.jpg The idea is that they fire their wrist mounted bolters alternating, counting as a storm bolter. Harder to use, and expensive to maintain, so only given to CQB specialists. Ammo feed is from Zinge Industries. Seems to fit together as I wanted, so made a model for the wrist mounted bolters: http://i.imgur.com/XriobdM.png Now I "just" need to mod the backpacks and also make a psycannon, and I can send the file to Shapeways for printing Link to comment Share on other sites More sharing options...
suspire Posted May 3, 2015 Share Posted May 3, 2015 Purifier poses are great. Looks close to real world assault rifle handling. My fav is the second from the left. His ammo feed from the backpack is dope. Link to comment Share on other sites More sharing options...
HardCoil Posted May 3, 2015 Author Share Posted May 3, 2015 Thanks, I'm glad you spotted the weapon handling. I'm trying to be as realistic as possible with that. Those are some older Chaos dudes though, but the purifiers will be done similarly... though I can't decide if I want to go with normal storm bolters or the wrist mounted ones, as purifiers are supposed to be CQB specialists. Normal storm bolters would give a little more freedom to model interesting shooting/reloading poses, as those are pretty hard to do with the terminator based models :-/Got some work done on the count as Dreadknight head and torso lettering: http://i.imgur.com/DHF8Oxc.jpg Link to comment Share on other sites More sharing options...
Brother Sgt. Steine Posted May 4, 2015 Share Posted May 4, 2015 Cool stuff man. I'll be watching this as it develops. BSS Link to comment Share on other sites More sharing options...
HardCoil Posted May 5, 2015 Author Share Posted May 5, 2015 Thanks :) Got most of the work done on the Psycannon: http://i.imgur.com/MPnCANA.png Barrels will be brass, so the barrels in the 3D models will be inverted into holes before printing. I'm glad I got around to making a topic here, it's really motivating! Link to comment Share on other sites More sharing options...
HardCoil Posted June 1, 2015 Author Share Posted June 1, 2015 Got a razorback turret made from scratch after reading Subtle Discord's tutorial. Made a sketch on graph paper, transferred to plasticard and glued it together. Seams were filled as discribed by SD in his thread: http://i.imgur.com/GAzXyp6.jpg http://i.imgur.com/xAeVubX.jpg http://i.imgur.com/eSDWid0.jpg Turns out a tube cutter is really good for making those lascannon coolilng sleeves: http://i.imgur.com/y1dCnQQ.jpg Just don't cut all the way through http://i.imgur.com/pNc7o6x.jpg Yay It's a bit rough in places, but I'm happy with it as my first serious attempt. Also got at bit more 3D modelling done, found out I needed specific backpacks for librarian and CQB specialtst. It's slow going, but I'm getting there. Link to comment Share on other sites More sharing options...
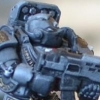
HardCoil Posted June 11, 2015 Author Share Posted June 11, 2015 Gotta get this thing going, made an ETL wow of the Razorback, a dread, a dreadknight, 5 termies and a librarian... and completely forgot I'm away on holydays for the last two weeks of july I got the Razorback painted. It was my first tank done with an airbrush, and it was amazingly fun and fast. I know the tank has a lot of rough spots, but it's an old model I built (apart from the turret) years ago, so I figured it was good to learn on. http://i.imgur.com/q7NpEaA.jpg http://i.imgur.com/AzLzWsV.jpg On the terminator front I FINALLY got the models done, final integrity checks is running at Shapeways now. Here are the highlights: http://i.imgur.com/07ydMP1.jpg I tightened and exaggerated the design on the bolter and mags a bit, got the psycannon done and decided to make a special backpack for the librarian with a bigge psychic array thingie to count as aegis. I also made backpacks and feed interfaces for the beltfed psycannon and storm-bolter setup, but they are not in the render. Now I just need to build a sprue, so the order should go out tomorrow to give me some time to build and paint the things.Edit: Whoops, put the psycannon upside down on the render Link to comment Share on other sites More sharing options...
HardCoil Posted June 13, 2015 Author Share Posted June 13, 2015 Started the Centurion to dreadnought conversion. The plan was to 3D print the upper body, but there are so many interesting shapes in the centurion kit, that I decided to try to build it traditionally. Here's what I got so far. http://i.imgur.com/83WFXr1.jpg Just roughing out the forms at this point, everything is obviously extremely rough. The overall profile is going to be inspired by (and a tribute to) the old RT era dreadnought. The upper body needs a LOT of bulking out, and I need to make a good looking way to attach the upper and lower bodies. I was using a mix of Magicsculp and greenstuff for the toes, but I don't think I used enough magicsculp, as it still came out a bit soft. Time to break out the files tonight. Link to comment Share on other sites More sharing options...
HardCoil Posted June 18, 2015 Author Share Posted June 18, 2015 Progress is slow, but steady. New guns and packpack is in production at Shapeways, got most of the terminator legs finshed and had quite a bit of progress with bulking out the dread. Hard-surface modelling and symmetry are really really tough, so there's a lot of filing and cutting involved after the putty sets. http://i.imgur.com/rvTqkVn.jpg Link to comment Share on other sites More sharing options...
malika666 Posted June 19, 2015 Share Posted June 19, 2015 *mindblown* This stuff is just amazing! I really love that Centurion machine and those guns are just way too cool! By the way, do you have a shop or anything on Shapeways? I'd like to follow your updates there as well if possible. :) Link to comment Share on other sites More sharing options...
HardCoil Posted June 19, 2015 Author Share Posted June 19, 2015 Thanks :) No shop yet, I'm still testing and optimizing the models and layouts. It's getting a bit pricey with the new extreme detail material, 6 bolters, a psycannon and 6 backpacks were like €50 with shipping :-/ Link to comment Share on other sites More sharing options...
malika666 Posted June 19, 2015 Share Posted June 19, 2015 Understandable, especially when printing in FXD things will get expensive! However, don't you have your own designer page on Shapeways where you show your stuff, or do you have everything set as private? Link to comment Share on other sites More sharing options...
Rift Blade Posted June 19, 2015 Share Posted June 19, 2015 Have to agree. Amazing stuff, especially the guns for the razorback. Keep it up. Link to comment Share on other sites More sharing options...
HardCoil Posted June 29, 2015 Author Share Posted June 29, 2015 Update on the dread, now with 500% more skulls: http://i.imgur.com/zOY51DY.jpg Still needs a bunch of details, like GK shields and other paraphenelia + a stable attachment of the upper body. 3D prints in Extreme Deratail arrived from shapeways today, going into the ultrasonic cleaner tomorrow.: http://i.imgur.com/OyI9XS5.jpg Perfect timing, as girlfriend and progeny are offworld to vacation colony for a few days from tomorrow. Forge reactors are warming up for a mad dash to fullfil my ETL oaths :D Link to comment Share on other sites More sharing options...
Hm74 Posted June 29, 2015 Share Posted June 29, 2015 Great stuff Hardcoil!...Following this topic and cannot wait until the painting starts..keep it up ;) Link to comment Share on other sites More sharing options...
malika666 Posted June 30, 2015 Share Posted June 30, 2015 Ultrasonic cleaner? Can you tell me more about that! :D Link to comment Share on other sites More sharing options...
HardCoil Posted June 30, 2015 Author Share Posted June 30, 2015 Yeah it's a kinda bath with ultrasound transducers that cleans things :) Microbubbles form on the surface of the items and breaks gunk away. I bought it to clean my airbrush, but I think it'll be good for removing matrix and residue from the 3d prints also. Link to comment Share on other sites More sharing options...
malika666 Posted June 30, 2015 Share Posted June 30, 2015 Hmm, so basically to remove that grainy texture and print lines? Very curious to see the results. I've been tempted to perhaps use Shapeways' Frosted Ultra Detail or Wax to print some prototypes for casting. So I'm very curious to see how you'll manage to clean up those models. I used Frosted Ultra Detail in the past, but it need extensive cleaning and even then you'll notice something's up with the texture. Whilst you can get away with this for BFG and Epic scaled models, on 28mm scale it becomes just a bit too noticeable. :( Link to comment Share on other sites More sharing options...
HardCoil Posted June 30, 2015 Author Share Posted June 30, 2015 No it's to remove oil and the wax support from the prints. It obscures detail and makes it impossible to print. The printlines you have to deal with or ignore afterwards, they are extremely small with FED Link to comment Share on other sites More sharing options...
malika666 Posted June 30, 2015 Share Posted June 30, 2015 Ah, but wouldn't you be able to do that with an old tooth brush, some warm water, and soap? Link to comment Share on other sites More sharing options...

Recommended Posts
Archived
This topic is now archived and is closed to further replies.