Cactus Posted May 12, 2015 Share Posted May 12, 2015 White Dwarf 229 had two pages on the display. This is the best image of the titans, showing the traitor warlord. http://i1205.photobucket.com/albums/bb440/Cactus-/b79825e2-15a1-47ac-8ff0-85b4ef4f0992_zpsflqnxpaz.png Link to comment https://bolterandchainsword.com/topic/307066-incarnating-the-god-machine-etl-iv-vow-complete/page/2/#findComment-4040070 Share on other sites More sharing options...
Nuclear Fridge Posted May 14, 2015 Share Posted May 14, 2015 That first image just... fried my tiny little mind. The Imperial Knight as "kitten scale" at the feet of the Titan. There's a dull crunch underfoot and the Princeps wants to know what just happened... The Moderati checks his screens and shrugs. "I think that was a Knight Errant we just trod on, my Princeps." Link to comment https://bolterandchainsword.com/topic/307066-incarnating-the-god-machine-etl-iv-vow-complete/page/2/#findComment-4041942 Share on other sites More sharing options...
CommodusXIII Posted May 14, 2015 Author Share Posted May 14, 2015 "Detected on the left leg. No damage registered. Probably just debris, sir." Link to comment https://bolterandchainsword.com/topic/307066-incarnating-the-god-machine-etl-iv-vow-complete/page/2/#findComment-4042034 Share on other sites More sharing options...
CommodusXIII Posted May 16, 2015 Author Share Posted May 16, 2015 Today's excitement at the Warhammer World re-opening is the perfect opportunity for an update. Based on this picture, I can begin adding numbers and details to my model: Left arm: Belicosa-pattern volcano cannon (standard) Right arm: Macro-gatling blaster (free upgrade) Carapace: Two double-barreled turbo laser destructors (free upgrade) Total: 2750 points This will be subject to modification by the ETL staff, but it's good to have something to work with. Also, initial estimates place the Forge World model at around 2 feet in height. Mine is pushing 3 feet, so it won't be as comparable as I'd hoped. I am, however, much happier with the overbearing scale of my model - it dominates my game room, not just the table! Picking up where I left off on the arm shields: http://i.imgur.com/X4Qe9w1l.jpg?1 Step 1 is priming with Army Painter Goblin Green. This picture was taken after Step 2 - initial metalwork. All of my metalwork is done with Vallejo's alcohol-based metallics. The trim is Red Gold and the aquilae are Old Gold. It's a subtle difference. The alcohol-based paints are much thinner, and are thus more susceptible to overpainting and running. I generally put down two light coats, followed by touching up any spots with primer showing through. I then let it dry completely overnight - these paints have real metal in the pigment, and will actually rust if exposed to water-based acrylics too soon. http://i.imgur.com/gPul8eil.jpg?1 Once the metallics fully dry, it's time for Step 3 - acrylics. The arm shields demonstrate the range of my chosen color scheme of green, dark grey and yellow/black hazard stripes. The stripes are not perfect, nor do they match each other! That's alright, though. When assembled, you won't see them both at the same time. I actually enjoy these little imperfections - they add character. After painting the panels, I go back over the parts one more time with Army Painter Goblin Green touch-up paint to take care of any running/overpainting. Any imperfections, scratches or dents get a touch of silver to show battle-damage. Once I'm satisfied, it's on to Step 4! http://i.imgur.com/p4Z5Ypjl.jpg Step 4, the last in the process, is a black wash. I've learned from my first attempt at the turbolasers to thin out the Vallejo Dark Wash - it doesn't behave the same as my beloved Nuln Oil, but a dash of water gets it close. I generally lay the parts on a piece of plexiglass (which they won't stick to while drying) but in the case of the arm shields I opted to use the torso to suspend them. Gravity will draw the streaks down and back, hopefully giving a subtle appearance of the Titan walking forward. I'll let this dry overnight, and tomorrow we'll see how it looks! http://i.imgur.com/YemxhhUl.jpg?1 Here are the finished arm shields. The black wash settles into the cracks and gets rid of the flat, clean look. I prefer my models to have a good deal of grime and oil on them, as they're not walking off the showroom floor - they're in the midst of a grueling campaign. However, the bright metals also show that beneath the grime is a walking monument to the Machine God, a work of art as beautiful as it is deadly. http://i.imgur.com/ZbZmZKbl.jpg?1 The honor banner is more-or-less finished. I hit it with a heavy coat of gloss varnish prior to laying down the transfers. They were taken from a myriad of sources, including the Imperial Knight and Skitarii kits and a very old Imperial Guard tank kit that I had laying around. Once the transfers dried, I gave the entire banner a heavy coat of Lahman Medium to seal it and remove the gloss. I then added the scripting with a fine detail brush and unthinned paint. A final wash of Nuln Oil brought it to my standard of dirt and grime. http://i.imgur.com/tzJYGCwl.jpg The banner secures to the underside of the groin with brass picture-hanging eyelets and magnetic jewelry clasps. It's relatively small in comparison to the Titan, but the Lucius patterns typically downplay ornaments and heraldry. It's not too far off from Forge World's model. It hangs a bit lower, but it's much easier to trim the chain down than to stretch it out... EDIT: Because I finished this within hours of the original update, I'm tacking it on now rather than holding it for next week: http://i.imgur.com/Vyc4n8wl.jpg Here is the completed macro-gatling blaster arm. This was a real bitch to reassemble, though I'm grudgingly glad that I decided to paint it in two pieces. I'm even more glad that I don't have to do it again. I added panels from the Space Marine Drop Pod kit between the barrels - the greeblies give a bit more detail and hide the rather bland joints between the barrels and rotors. http://i.imgur.com/IyCCxWJl.jpg The arm connects with two bolts extending from the arm shield, through the joint, and capped at the end with nuts disguised as vents. You can't see it in the picture, and it's difficult even to see in person, but I have warning decals around the vents for added detail. http://i.imgur.com/qYl8wvwl.jpg The business end of the macro-gatling blaster. I'm really looking forward to putting it to good use one day. What next? Onto the volcano cannon on the left arm. I'm still on track to hit my goal by the end of the month - the carapace weapons, arms and arm shields. I'll probably take a short break at some point to paint some smaller models and relax a bit, before diving into the legs and groin. Link to comment https://bolterandchainsword.com/topic/307066-incarnating-the-god-machine-etl-iv-vow-complete/page/2/#findComment-4044784 Share on other sites More sharing options...
Vel'Cona Posted May 17, 2015 Share Posted May 17, 2015 Now that I've seen all the pics of FW's Warlord, I like yours even better. I guess I just prefer blocky and robotic than all the smooth lines of the FW style titans. Link to comment https://bolterandchainsword.com/topic/307066-incarnating-the-god-machine-etl-iv-vow-complete/page/2/#findComment-4045323 Share on other sites More sharing options...
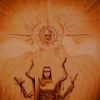
CommodusXIII Posted May 18, 2015 Author Share Posted May 18, 2015 The more I work on it, the more I like it as well. Something's been nagging on my mind since yesterday evening, and I finally figured out what it is. The pictures of Forge World's model shows two TL lascannon turrets on its back, underneath the shoulder armor: I don't have a good place to put similar turrets on the back of mine - due to the way it's detailed, there isn't an open spot that's mirrored on either side. I do, however, have enough room to place turrets on its side. This would be reminiscent of this classic illustration, which I've already referenced earlier: http://i.imgur.com/2oqz9ZM.jpg I'd really only be using this in Apocalypse or other special games, so I'm not terribly worried about remaining consistent with Forge World's model. I had enough bits laying around from other projects to create a single mock-up, which I blue-tacked to the side of the torso for evaluation: http://i.imgur.com/KIzimB5l.jpg I wasn't sure until I tacked the mock-up to the model, but I actually like this quite a bit. It helps to further break up the slab-sidedness while still remaining true to the Lucius-pattern aesthetic. It's a unique feature of an old piece of artwork that, to the best of my knowledge, as never found expression in a model. And it's somewhat supported by Forge World's model. I also like the general feel, as it gives the Warlord the appearance of being a walking battleship. I can imagine it striding through a vast city, raking enemy positions in the buildings with lasfire as it passes. I also get mental images of the helicarriers from Captain America: The Winter Soldier. Yup, I think I'll do it. Link to comment https://bolterandchainsword.com/topic/307066-incarnating-the-god-machine-etl-iv-vow-complete/page/2/#findComment-4046859 Share on other sites More sharing options...
Red Skullz Posted May 18, 2015 Share Posted May 18, 2015 Those add more details to the large surface and that's a good thing - looks good too! Link to comment https://bolterandchainsword.com/topic/307066-incarnating-the-god-machine-etl-iv-vow-complete/page/2/#findComment-4047105 Share on other sites More sharing options...
Radiation Posted May 18, 2015 Share Posted May 18, 2015 Awesome! Link to comment https://bolterandchainsword.com/topic/307066-incarnating-the-god-machine-etl-iv-vow-complete/page/2/#findComment-4047125 Share on other sites More sharing options...
Vel'Cona Posted May 18, 2015 Share Posted May 18, 2015 I dig it. If you have any extra turrets from a LR kit those would work too (or Razorback, Predator, Leman Russ, etc.). Honestly, that artwork is the ONLY way I see a Warlord Titan. I just can't picture the FW model "looming" in the same way. To some extent, I think I prefer the Titans to resemble Battlemechs more than Warjacks (blech). Link to comment https://bolterandchainsword.com/topic/307066-incarnating-the-god-machine-etl-iv-vow-complete/page/2/#findComment-4047460 Share on other sites More sharing options...
CommodusXIII Posted May 18, 2015 Author Share Posted May 18, 2015 I'd thought about using LR or Predator sponsons, but the problem is that they don't have enough vertical range of motion. I was also toying around with using Razorback turrets, which would also fit the turret mount pictured above. I settled on this version after comparing it to the artwork. It's a bit over-designed for a simple lascannon, but it's a Titan - everything is over-designed! I took a few moments to study Chuffy's video of the construction manual to see the detail underneath the armor. He mentions the lascannons, and also the bolt cannons - when I read the weapon entries, I figured that the Warlord had the option to take either. It turns out it has both - the bolt cannons are tucked up underneath the front of the shoulder armor. I went back to the pictures from the re-opening and sure enough, there they are staring me in the face: Can you find them? So what does this net me? Two twin-linked lascannon turrets and two bolt cannon turrets. Tempest incorrectly switches which is twin-linked and which is not, but that's not important. The artwork in my previous post depicts three turrets on each side. My new plan is to build two as single lascannons (firing together for twin-linked) and a single bolt cannon/heavy bolter. Back to the bits store! Link to comment https://bolterandchainsword.com/topic/307066-incarnating-the-god-machine-etl-iv-vow-complete/page/2/#findComment-4047555 Share on other sites More sharing options...
Olis Posted May 18, 2015 Share Posted May 18, 2015 It's good to see you're looking to revising you're own Titan based on what FW has put forth. Placing it on par is a good move. Link to comment https://bolterandchainsword.com/topic/307066-incarnating-the-god-machine-etl-iv-vow-complete/page/2/#findComment-4047567 Share on other sites More sharing options...
CommodusXIII Posted May 18, 2015 Author Share Posted May 18, 2015 I'm something of a stickler for WYSIWYG with my own models. I won't sit down and model every single grenade, but the major weapons and visible wargear, at least, have to be correct. I don't like shooting imaginary guns. Link to comment https://bolterandchainsword.com/topic/307066-incarnating-the-god-machine-etl-iv-vow-complete/page/2/#findComment-4047582 Share on other sites More sharing options...
Vel'Cona Posted May 18, 2015 Share Posted May 18, 2015 Or swinging imaginary swords. Nothing more frustrating than sitting across from an opponent and having him reveal that the Chainsword his Captain is carrying is actually a Relic Blade/Valor's Edge/hairdryer. Link to comment https://bolterandchainsword.com/topic/307066-incarnating-the-god-machine-etl-iv-vow-complete/page/2/#findComment-4048038 Share on other sites More sharing options...
CommodusXIII Posted May 18, 2015 Author Share Posted May 18, 2015 That gets to me too. I'm not a fan of magnetizing models for gameplay purposes, so I tend towards ambiguous conversions. My Skitarii Alphas have ornate power axes for close combat weapons - because the Skitarii can't take axes, they really could be anything. That's why I always give my opponent a copy of my roster and specifically tell them what everything is before the game starts. Invisible weapons? No thank you. Flamers that are actually meltaguns or plasma rifles? Not for me. Link to comment https://bolterandchainsword.com/topic/307066-incarnating-the-god-machine-etl-iv-vow-complete/page/2/#findComment-4048120 Share on other sites More sharing options...
Mithrilforge Posted May 19, 2015 Share Posted May 19, 2015 Good work so far Commodus, the extra detail does make it look much better..but don't let too much detail waylay you from finishing this beauty my machadendrites are crossed for you..several times Mithril Link to comment https://bolterandchainsword.com/topic/307066-incarnating-the-god-machine-etl-iv-vow-complete/page/2/#findComment-4048615 Share on other sites More sharing options...
CommodusXIII Posted May 19, 2015 Author Share Posted May 19, 2015 Oh I'm very aware of that danger. Fortunately, I'm almost through the most intricate parts. These little side-projects will help keep me sane when it comes time to paint to the vast surfaces of the legs and torso. Link to comment https://bolterandchainsword.com/topic/307066-incarnating-the-god-machine-etl-iv-vow-complete/page/2/#findComment-4049094 Share on other sites More sharing options...
Kilofix Posted May 19, 2015 Share Posted May 19, 2015 Just a thought: I noticed the FW version has little arches on the sides of its upper stacks. Have you considered getting GW buildings (Basilica or Sanctum) and attaching their sidewalls? Link to comment https://bolterandchainsword.com/topic/307066-incarnating-the-god-machine-etl-iv-vow-complete/page/2/#findComment-4049390 Share on other sites More sharing options...
CommodusXIII Posted May 19, 2015 Author Share Posted May 19, 2015 I had considered that, but realized that if I went down the path of adding architectural detail to that level I'd end up covering the entire model to keep it consistent. Instead of adding gothic details, like the Mars-pattern model, I'm adding industrial bits. Piping, joint covers, pistons, etc. Also, I'm trying to mimic the Lucius-pattern Warhound more than the Mars-pattern Titans. My Warlord looks a bit bland compared to Forge World's, until you put it next to their Warhound of the same pattern. Then it matches a bit more. I really, really wish that I had picked a couple of these up before they were discontinued - if I knew then what I know now... Link to comment https://bolterandchainsword.com/topic/307066-incarnating-the-god-machine-etl-iv-vow-complete/page/2/#findComment-4049416 Share on other sites More sharing options...
Kilofix Posted May 19, 2015 Share Posted May 19, 2015 Lucius aesthetics - makes sense. Link to comment https://bolterandchainsword.com/topic/307066-incarnating-the-god-machine-etl-iv-vow-complete/page/2/#findComment-4049482 Share on other sites More sharing options...
CommodusXIII Posted May 19, 2015 Author Share Posted May 19, 2015 Yeah, the guys at EnGen did a ridiculously-good job of scaling up the original Epic model. The more I work on it, the more I'm surprised at how faithful it is. I'm tinkering with it mainly because: There's a lot of detail that couldn't make it into the Epic model due to its smaller size, and thus wasn't included in this 40K-scale interpretation. This is where I rely on the artwork and the FW Warhound for cues. I have to tinker with everything. It's my way of making it my model, instead of just a model. This includes little things like banners, antennas and other greebles that simply amuse me. The trick is to add these details in such a way that they don't diverge too far from the ruleset or throw off the aesthetic. So far so good! I found a new batch of bits this week, so the torso will begin to take shape while I'm painting up the last arm and getting started on the legs. I'm starting to pay more attention to the head, as this will be the focus of the model when completed. I'm going through my old copies of Dan Abnett's Titan graphic novel to see if there's any more inspiration to draw from Imperius Dictatio. I also got an update from EnGen - the left leg has been repaired structurally, and they're working to clean up the cosmetic damage from the collapse. I don't mind a bit of battle-damage here and there, so I'm sure it will turn out perfect! They're also helping me replace some of the original resin details that had been lost earlier. Link to comment https://bolterandchainsword.com/topic/307066-incarnating-the-god-machine-etl-iv-vow-complete/page/2/#findComment-4049497 Share on other sites More sharing options...
Vel'Cona Posted May 20, 2015 Share Posted May 20, 2015 So what caused the initial left leg disaster? Errant pet? Shipping mistake? Warp-storms? Link to comment https://bolterandchainsword.com/topic/307066-incarnating-the-god-machine-etl-iv-vow-complete/page/2/#findComment-4050171 Share on other sites More sharing options...
CommodusXIII Posted May 20, 2015 Author Share Posted May 20, 2015 I'm pretty sure it was a stress fracture during shipping. It gave way moments after that first WIP picture was taken. Fortunately, I managed to toss my phone and catch it before it crushed my Knight or bounced off the floor, but the leg was out of commission. There was a lot of swearing. Link to comment https://bolterandchainsword.com/topic/307066-incarnating-the-god-machine-etl-iv-vow-complete/page/2/#findComment-4050206 Share on other sites More sharing options...
SlangWhanger Posted May 20, 2015 Share Posted May 20, 2015 Fortunately, I managed to toss my phone and catch it before it crushed my Knight or bounced off the floor... I like your sense of priorities here, the Omnissiah would be proud! Really nice model here though and I'm loving the green scheme. Good luck for the rest of the build! Link to comment https://bolterandchainsword.com/topic/307066-incarnating-the-god-machine-etl-iv-vow-complete/page/2/#findComment-4050500 Share on other sites More sharing options...
Nuclear Fridge Posted May 20, 2015 Share Posted May 20, 2015 Fortunately, I managed to toss my phone and catch it before it crushed my Knight or bounced off the floor... I like your sense of priorities here, the Omnissiah would be proud! Really nice model here though and I'm loving the green scheme. Good luck for the rest of the build! Phones can be replaced - a Titan can't! Link to comment https://bolterandchainsword.com/topic/307066-incarnating-the-god-machine-etl-iv-vow-complete/page/2/#findComment-4050537 Share on other sites More sharing options...
Vel'Cona Posted May 20, 2015 Share Posted May 20, 2015 Definitely a wise decision. Here's hoping the repaired parts come back strong enough to get some new pics! Link to comment https://bolterandchainsword.com/topic/307066-incarnating-the-god-machine-etl-iv-vow-complete/page/2/#findComment-4050776 Share on other sites More sharing options...
Recommended Posts
Archived
This topic is now archived and is closed to further replies.