Semper Fortis Posted October 11, 2018 Share Posted October 11, 2018 You should be proud as that is exceptionally well done. I've not liked the ogryn charonite sculpts before now, and had no plans to put them in my army. After seeing yours, I'm reconsidering. Hope your surgery wet well. Give that arm time to heal. Audemus 1 Back to top Link to comment Share on other sites More sharing options...
Audemus Posted October 11, 2018 Author Share Posted October 11, 2018 Okay, I put the Stormblade images together! Every sponson is actually magnetized with corresponding blank panels that are magnetized as well (also the lascannons are magnetized because I can't stand wobbly guns! ). I had to learn a bit more about magnets than I realized due to this project because, due to their close proximity to each other, I began running into conflicting magnetic fields and I had to vary the strength of each magnets location so that it would not only fit...but also overpower the conflicting field for a specific location without disrupting the others. What this basically means is, initially, I had some seriously Eldar-like grav panels floating around the tank before getting things back in line! LOL The quad sponson setup is shown in the last two pictures, it is honestly a bit cluttered in that setup but considering I wanted to make sure I added in all options due to the cost of the Stormblade, it was worth going the extra mile to make it possible. It should also be noted that this tank did something amazing and totally unintended, I found the artist Stephen Hickman commenting on my painting and then following me on Instagram after he saw it. This was a surreal moment for me since I have owned books with his artwork on the cover all my life and the last thing I would have expected from painting up a tank was for it to catch the eye of such an amazing artist. The Emperor works in mysterious ways! 1905th Solar Auxilia Cohort, 'Rust Scorpions' - Stormblade Brother Sutek, Semper Fortis, Lord Marshal and 3 others 6 Back to top Link to comment Share on other sites More sharing options...
Audemus Posted October 11, 2018 Author Share Posted October 11, 2018 (edited) You should be proud as that is exceptionally well done. I've not liked the ogryn charonite sculpts before now, and had no plans to put them in my army. After seeing yours, I'm reconsidering. Hope your surgery wet well. Give that arm time to heal. Thank you so much! I've been very hesitant to add them into my army for a while now as well but decided to take the plunge due to the sheer amount of vehicles I have done lately and some of the guys in my gaming group are getting keen on playing Centurion rules. Speaking of Centurion rules, I can upload some pictures of the game we played a few weeks ago as well, I almost forgot! This was 1500 points in Centurion mode (no vehicles, I was allowed 1 medusa due to the artillery note in the rules) and it made me realize just how much I wish Rapiers had not been made OOP by FW. I literally had nothing in terms of direct fire that could kill the Dreadnought and I did my best to capture the sheer terror of this thing as it made it's way down the street toward my cowering Lasrifle section. I tried to shell it with the Medusa with mixed results...that is saying, my first Medusa shell scattered off the Dreadnought and on to the Alpha Legion warlord and blew him clear off the table during Turn 1. I also landed another shell directly on the damn things head but rolled a 1 for the armor roll, many tears were shed, yet in retrospect the poor thing ended up becoming so enmeshed in the 20 lasrifle guys that it could not get free for the last 2 turns so I probably could have won the game if I had just ignored it. I've learned my lesson though! The other highlight was the Rotor Cannons, who were just hurling obscene amounts of lead down the field at the approaching Alpha Legion and shredding them well beyond their point value. Considering it was two Storm Sections on the right side of the table vs. an enormous tactical squad with a captain having the 2+ save and a volkite armed squad of marines as well, I think they did well for themselves. I was averaging 14-17 wounds (it was close to this, it's been a few weeks now) a turn from the rotor cannons on the marines, which felt pretty stupendously large even if the bulk were saved. It definitely ensured my opponent could not ignore them though and thus tied up a large amount of his force on that side of the table; also I really enjoyed seeing them have the opportunity to flex a bit since my last two games against bikes has really put a damper on their usefulness. Edited October 12, 2018 by Audemus Arion, Markus_, Semper Fortis and 5 others 8 Back to top Link to comment Share on other sites More sharing options...
Spiky Norman Posted October 12, 2018 Share Posted October 12, 2018 Just wanted to let you know, that it was a joy to read through this blog, especially as I've bought Solar Auxilia Las rifles, Veletaris Storm and the Ogryns to use as my IG/Tempestus 40k army. I'm sure I'll refer back here for inspiration as I start the project in earnest. Hopefully you'll continue to share your great work! :-) Audemus 1 Back to top Link to comment Share on other sites More sharing options...
Audemus Posted October 12, 2018 Author Share Posted October 12, 2018 Just wanted to let you know, that it was a joy to read through this blog, especially as I've bought Solar Auxilia Las rifles, Veletaris Storm and the Ogryns to use as my IG/Tempestus 40k army. I'm sure I'll refer back here for inspiration as I start the project in earnest. Hopefully you'll continue to share your great work! :-) Thank you very much! I really appreciate the kind words and will definitely be continuing to update things on here as well. Soon as my arm is healed, I will be tackling the rest of the Ogryn (the third ogryn's torso was not in the shipment so I'm waiting for FW to send the replacement too) and then I'm going to work on my Solar Auxilia Kill Team project. That second project is going to provide me a chance to actually paint the command characters for the Solar Auxilia a second time. I like my original ones but they were painted so early in my return to painting that now I look at them and just know I can do so much better, which isn't a big deal when it comes to rank and file infantry, but when they are supposed to be the center piece of your army it begins to chafe after a while that they aren't quite up to par. The plan is to lavish attention on them when they show up next week, assuming my arm is feeling up to it. I've even ordered extremely fine sandpaper to remove mold lines, rather than using the flat of my hobby knife like I normally do, all to ensure that they are in the best state for painting that they can be. Overkill? Perhaps! Yet I really enjoy challenging myself to explore new techniques and really push what I'm able to do. When I finished that Ogryn I was shocked because he looked so good that even I was like, "damn did I do that?!" I want to have that same feeling when I look at the Lord Marshal. Also, because I always think it's interesting how lighting in photo tents changes the way colors show up, here is the Ogryn Charonite just sitting on my paint desk. The picture was just taken with my phone but it always fascinates me how the good lighting in the tent can sometimes wash out colors, always a trade off I guess. DuskRaider, Trokair, MrBear and 4 others 7 Back to top Link to comment Share on other sites More sharing options...
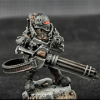
Audemus Posted October 20, 2018 Author Share Posted October 20, 2018 My arm is finally in the clear, it no longer really hurts and the doctors just have me cleaning it regularly for the next week to ensure that there are no issues...which is why I was able to finally pick up my paint brush again! \o/ While I was waiting for my arm to heal up all of my orders that I had planned out started coming in so I have quite a bit on hand to paint now. I've got the rest of the Ogryn Charonite squad, waiting on Torso #3 to be re-shipped to me since it wasn't in the original order, a brand new Solar Auxilia Tactical Command, and my first Carnodon is also here. Quite a bit of resin goodness! For the new Solar Auxilia Tactical Command, I've decided that I'm going to really work each model as much as I can instead of just focusing on the Lord Marshal and Strategos. So with that in mind, here is the first of the Command team! 1905th Solar Auxilia Cohort, 'Rust Scorpions' - Veteran Auxiliary w/ Grenade Launcher MrBear, Semper Fortis, DuskRaider and 4 others 7 Back to top Link to comment Share on other sites More sharing options...
bluntblade Posted October 21, 2018 Share Posted October 21, 2018 You really haven't shied away from how nightmarish the Charonites are. Audemus 1 Back to top Link to comment Share on other sites More sharing options...
Audemus Posted October 21, 2018 Author Share Posted October 21, 2018 You really haven't shied away from how nightmarish the Charonites are. Thank you! They are seriously nightmarish and I definitely wanted to press that idea home. When I was reading through the Black Book: Conquest and got to the whole Port Maw battle when they were released in the hundreds to repel the Sons of Horus boarding the loyalist flagship...it really left a impression on me. How often during the Heresy did human and abhuman defenders push back overwhelming Astartes boarding parties? Not only that but Horus Lupercal had to personally get involved in order to prevent a total defeat. The mental image of hundreds of armored Ogryns, driven insane by combat stims, pouring through the internal corridors of the ship with giant surgically implanted claws capable of cutting through closed bulkheads...well, it's a down right terrifying image. The claws and process of wiring the Ogryn's brains is so messed up the Mechanicum considers it absolute anathema. If the tech can scare them and make them forbid it's use within their ranks, you know it has to be some savagely dark technology. I just wish they were still around because I'm fairly certain unleashing them into a space hulk full of Tyranids would result in a battle of such epic scale that even an Astartes would be left speechless. :) Brother Sutek 1 Back to top Link to comment Share on other sites More sharing options...
Semper Fortis Posted October 22, 2018 Share Posted October 22, 2018 Glad to hear that your arm is on the mend and you're painting again. Really loving that Veteran Auxilliary. He portends an awesome command squad. I have a question, if you've the time to answer. Since it is apparent that you're the master of the drybrush technique, can you explain how you control your brush to keep from spreading onto unintended surfaces? My brush control is decent with other techniques, but i have a great deal of difficulty drybrushing in tight spaces, for instance "surface A" (say the muzzle of the grenade launcher) and keeping it off "surface B" (the gold banding around the muzzle) or vice versa. Thanks in advance. Audemus 1 Back to top Link to comment Share on other sites More sharing options...
Audemus Posted October 22, 2018 Author Share Posted October 22, 2018 (edited) Glad to hear that your arm is on the mend and you're painting again. Really loving that Veteran Auxilliary. He portends an awesome command squad. I have a question, if you've the time to answer. Since it is apparent that you're the master of the drybrush technique, can you explain how you control your brush to keep from spreading onto unintended surfaces? My brush control is decent with other techniques, but i have a great deal of difficulty drybrushing in tight spaces, for instance "surface A" (say the muzzle of the grenade launcher) and keeping it off "surface B" (the gold banding around the muzzle) or vice versa. Thanks in advance. Thank you! I actually just finished magnetizing the head for the Lord Marshal (which is something I wished I had done the first time around but it always made me a bit nervous due to how small the head is lol) so I'll be able to have him without a helmet and all buttoned up depending on whatever mood I'm in at the time. I'm really trying to go all out on each member of the squad, god knows they cost enough to justify it, and it's a really fun process looking for ways to spruce them up even more than their already amazing initial sculpts are. So this kind of ties into your question so I'll start with this so that I can reference things I have done to improve dry brushing based on what I was doing about 3 years ago. Below is the same Vet Auxiliary from my initial Tactical Command squad and the new one next to it. Strangely, at least to me, a lot of people have commented on me going after more details as the first thing that stands out above and they would be right...for a long time I was nervous about trying to do details that could be easily caught by a bad brush stroke and painted over leading to a tug of war as I tried to correct the error and caused more issues. For me though, when I look at the above for improvements, I see how much smoother the paint is on the newer model and how much better control I have when dry brushing now. It is especially apparent on the armor as it almost looks like a different color even though the paints put on there are identical and the staple color scheme of my entire army, I just have the balance of layers better now. The other big improvement (sorry tangent, I know!) that probably doesn't come through in the pictures but makes me super happy is the visor itself. I totally wrecked a ton of bits parts playing with paints to get that damn visor to look like it was an actual glass/plexiglass (or whatever the glass substitute in Heresy era is) and if I didn't mention it, I'd probably go nuts. I'm using the technical paint Spiritstone Red in a way that I'm not sure it was actually meant to be used but the results are just awesome in person. The visor has a very matte look until light touches it and then it has a very slight gloss to it. Basically I base the visor with Mephiston Red, apply a thin layer of Wild Rider Red to the center of the visor leaving some room on the outer edges untouched, and then water down the Spiritstone Red so that it just gives a hint of brighter red and a slight sheen when it dries up that looks much more appropriate than a matte red with no inner light or glow to it. I did it on the Ogryn as well and I wish my cell phone video camera picked up the colors right because his eyes appear to get brighter and glow if you tilt him up under direct light because the gloss is so miniscule it just look like a tiny LED came on behind his eyes. OK back on topic! For dry brushing it really has to do with the colors placement and the depth of the model you're painting. So on the Vet Auxiliary, I'll walk you through exactly each step I took as it's become pretty uniform for my army after a lot of trial and error. Step 1 Due to the fact the uniform khaki is the lowest layer on the model, causing any dry brushing on it to bleed out on to other areas, I start with it. I try to make sure that when I'm dry brushing that the upper layers come last so that if the brush goes off the side of an armor piece it wouldn't hit the khaki uniform anyways because I have the brush elevated above it so there's no chance of touching. It should also be noted that the color ends up almost an light brown/khaki which is the lightest color on the model and thus the easiest to paint over and also would be the hardest to mask a dark color bleeding into it's areas. Also, you'll notice that I habitually have my dark base coat and then I use a wash on it that at times seems rather pointless considering I regularly paint back in the creases and recesses now but it's important to note that the wash serves another purpose here as well. I might be completely crazy (okay fine, I *might* is perhaps being a bit to kind to myself) but I've found that the dried wash causes dry brushing to apply easier thereby requiring you to use less pressure when going through the process. The less pressure you can get away with the more likely you're not going to have the bristles flying out and hitting other areas or paint going into recesses it should not be in. Uniform Khaki Colors Base: Snakebite Leather Wash: Agrax Earthshade Dry Brush: Baneblade Brown Dry Brush: Karak Stone Very thinned Rhinox Hide painted into the creases of the uniform to provide more definition. Another thing I highly recommend is picking up a Large Dry Brush but absolutely never use it to paint. This is part of how I've been able to fix a lot of the clumpy paint issues I ran into when dry brushing, after each section is dry brushed I basically dust it with the Large Dry Brush to ensure any flecks of paint (they are usually *everywhere*) are removed from the model before they have a chance to dry. This isn't as huge a deal when you're doing metallic colors but lighter colored paints tend to leave tons of loose bits of almost dry paint all over the model. Additionally, it solves issues where your model looks different after a couple of days as some of the paint has been blown off or removed by the model being touched as it was never actually wet enough to fully stick on the model. Step 2 Following the same methodology above I went to the next layer up, in this case it is the Gaiters on the calves behind the armor plate and the vest over his uniform (hard to see in my example pic but it's easy to see on the initial post). I also did the leather portions of the belts at this time too. Gaiters/Vest Colors Base: Rhinox Hide Wash: Nuln Oil Dry Brush: Doombull Brown Vallejo Dark Sea Blue thinned down and painted into the creases on the leather for definition. Belts & Straps: Belt Base: Rhinox Hide Wash: Agrax Earthshade Very Light Dry Brush: Skrag Brown Step 3 (Note: I do the visor before I paint the armor since it's recessed into the helmet but this is probably a matter of preferences as I've just become used to avoiding the visor slit when dry brushing them. It's a bit easier to do this on Auxilia as the visor is a more defined groove, I'd probably recommend on Space Marines doing a base color first and then adding brighter layers after because otherwise you're bound to have some of that dry brushing inadvertently mute the color of the eyes a bit.) The next layer up would be the armor plates themselves and the dusting that I mentioned above is critical here because the last layer I use on the 1905th is Ulthuan Grey and it is horribly finicky and dries up in weird clumps so you really have to stay on top of clearing off any loose flecks otherwise they will crop up all over your model when you look at it the next day. Not that it has EVER happened to me. Nope. Nothing to see here, please move along!!!! Armor Colors: Base: Skavenblight Dinge (I don't think I have a count on how many pots of this paint I have gone through but it's reaching epic proportions! lol) Wash: Nuln Oil Dry Brush: Stormvermin Fur (On this layer, I make sure that I get pretty good coverage on the armor plates as the Ulthuan in the next layer can be temperamental in how evenly it applies at times, so I want to make sure the Skavenblight is lightened up enough that the final layer just looks like aged weathering.) VERY Light Dry Brush: Ulthuan Grey Let me re-iterate the point on light here especially when it has to do with really light toned/white paints (I'm looking at you too Pallid Wytch Flesh ). You cannot trust your brush or these paints to play by the rules, I've had a dry brush where I literally could not see any paint on the back of my hand after 5-6 swipes and the brush felt *dry* and then, like a bad jump scare, the moment my brush swooped down across the surface a giant white line appeared as if by magic. This actually happened on the Vet Auxiliary and while I'm not in a habit of calling out places I have messed things up in detail , I'll do it for the sake of an example here.. That white line there was much thicker and more T shaped , I had to really tweak it to make it actually work out. I recommend whenever you're working with dry brushing colors this finicky that you start on areas you can easily correct and then once you absolutely know the paint is going on properly switch targets to more delicate areas. If you do have something go awry, grab that dusting brushing the moment it's dry to the touch just go to town on it. These paints do not hold up well initially, even once dry to the touch, to any kind of friction so you can usually minimize the error and make it easy to patch up. Step 4 Now for the metal/steel, I think I am a bit odd in that I habitually base all steel with Warplock Bronze as it helps avoid that flat metal look and gives it a natural tarnished/worn look. This also lets me sneak in a wash layer on the bronze so that the Boltgun Metal adheres easier when I go over it using the dry brush. Metal/Steel Colors Base: Warplock Bronze Wash: Agrax Earthshade Dry Brush: Boltgun Metal Wash: Nuln Oil (Watered Down, should just barely be misty gray) - Paint this directly into creases on the metal, for example I did this on the areas between each grenade in the launcher cylinder and in the glove metallic design where it was too small of a space to actually paint in a color. Step 5 Finally the gold trim which is for the most part on the very outer edges of the model. I have two different golds I use, I've opted for a slightly richer color on the infantry recently because it's cleaner in application and I think it helps provide a nice contrast. I'll include both recipes here for anyone that is curious. Infantry Gold Trim Colors Base: Mournfang Brown Direct Thin Layer, not dry brushed: Retributor Armour Wash (Thinned): Agrax Earthshade, try to get it mainly in the edges but allow for a thin layer over the retributor gold. Dry Brush: Runelord Brass Wash (very thinned): Nuln Oil, only in the crevices or trim Vehicle Gold Colors Base: Warplock Bronze Wash: Agrax Earthshade Dry Brush: Balthasar Gold Dry Brush: Runelord Brass Wash (very thinned): Nuln Oil, only in the crevices or trim Hopefully that helps with understanding my methodology (lol I wrote a lot ) and how I've managed to keep things clean when working on the models. If you have any other questions, please don't hesitate to ask! Edited October 23, 2018 by Audemus drogg, Shovellovin, DuskRaider and 7 others 10 Back to top Link to comment Share on other sites More sharing options...
Semper Fortis Posted October 23, 2018 Share Posted October 23, 2018 WOW! Awesome tutorial! Thank you so much, brother. And now I shall, forthwith, head for my brushes to try it out. Audemus 1 Back to top Link to comment Share on other sites More sharing options...
Shovellovin Posted October 23, 2018 Share Posted October 23, 2018 (edited) Thank you for the detailed tutorial. I especially like your method of painting metal/steel colors Edited October 23, 2018 by Shovellovin Audemus 1 Back to top Link to comment Share on other sites More sharing options...
Audemus Posted October 28, 2018 Author Share Posted October 28, 2018 WOW! Awesome tutorial! Thank you so much, brother. And now I shall, forthwith, head for my brushes to try it out. Glad I could help! Thank you for the detailed tutorial. I especially like your method of painting metal/steel colors Thanks! The method for painting metals has served me well for a long time, happy to pass it on for others to use. So I've been working like crazy on Lord Marshal 2.0 and I'm feeling really good about where it's going; decided I would put up a WIP while I was taking a break for my eyes this afternoon. The head is magnetized so I still have to paint the second head, weapons/arms, and then touch up everything but he really came together quickly once I dug into him last night/this morning. Lord Marshal, Brother Sutek, Pearson73 and 1 other 4 Back to top Link to comment Share on other sites More sharing options...
Pearson73 Posted October 29, 2018 Share Posted October 29, 2018 As I've said, this guy's a huge step forwards compared to the original, it's great to see the course of progression in peoples' work. The cloak really does look smashing. Glad that your arm's back fixed too. Audemus 1 Back to top Link to comment Share on other sites More sharing options...
Audemus Posted October 30, 2018 Author Share Posted October 30, 2018 As I've said, this guy's a huge step forwards compared to the original, it's great to see the course of progression in peoples' work. The cloak really does look smashing. Glad that your arm's back fixed too. Thank you so much for the awesome complement! I've been trying to push myself really hard on this guy and I'm feeling really confident that I succeeded in what I set out to do. I still have one more head, unhelmeted, to paint but I'm waiting on a new paint to show up in the mail before I tackle it. It should be here tonight or tomorrow morning but until then, here is a sneak preview outside of the photo tent. Arion, librisrouge, Pearson73 and 3 others 6 Back to top Link to comment Share on other sites More sharing options...
Pearson73 Posted October 30, 2018 Share Posted October 30, 2018 He's looking like royalty, just noticed how good the tassles at the bottom of the cloak look, super obscure but they look darn realistic in that second shot. Sadly, I must say that the blade isn't up to your normal standard, perhaps it's the angle, but it just looks like a block of gloss red. Have you used the same technique as for the visors/lenses? Link to comment Share on other sites More sharing options...
Audemus Posted October 30, 2018 Author Share Posted October 30, 2018 He's looking like royalty, just noticed how good the tassles at the bottom of the cloak look, super obscure but they look darn realistic in that second shot. Sadly, I must say that the blade isn't up to your normal standard, perhaps it's the angle, but it just looks like a block of gloss red. Have you used the same technique as for the visors/lenses? Thank you! I hated doing those tassels on my initial Lord Marshal and sword I would do them justice this time...and it still was not fun...at all. The blade was a real problem, I had to repaint the entire arm because the first attempt just fell flat because the blade has absolutely zero features and just making it metallic is not only bland but due to the pose and the ornate model, the blade really becomes obviously a weak point without something else going on. This ruled out flat metal but what I did was definitely not just a block of gloss red though. I basically applied a glaze, allowed it to dry, and then dry brushed in an orange close to the power node before going over it with a slight gloss because otherwise the glaze completely saps it of any metallic sheen. I'm just using my cell phone camera and it's a pain due to the angle he holds the sword, I've got him propped on a tea glass , but hopefully this provides a more accurate view of the blade. The shape of the sword really does away with most of the normal power sword methods where you block it off with alternating lines of brighter highlight, there is no real balanced way of doing that on the Lord Marshal's blade. So instead I made the brightest point at the node and then had it fade out in a sweep of how I envisioned the power field expanding out across the blade as it was keyed on. The actual power node itself is actually very obviously orange in person but my cell phone camera is failing there. Side Note: It's a relief that I can put the model at a completely bizarre angle like this and still not see any points I missed or didn't paint properly. lol Arion, Pearson73, MrBear and 3 others 6 Back to top Link to comment Share on other sites More sharing options...
Pearson73 Posted October 31, 2018 Share Posted October 31, 2018 The new angle certainly makes the blade look better and I can see the fade effect well. I know what you mean regarding the difficulty of painting some of the more featureless weapons and for a high commander like this, bare steel would not suffice. I struggle with power blades in the best cases. Audemus 1 Back to top Link to comment Share on other sites More sharing options...
Audemus Posted October 31, 2018 Author Share Posted October 31, 2018 The new angle certainly makes the blade look better and I can see the fade effect well. I know what you mean regarding the difficulty of painting some of the more featureless weapons and for a high commander like this, bare steel would not suffice. I struggle with power blades in the best cases. I ended up shading it a bit more in the end using screaming bell to blend the red and steel a bit better. I'm relatively happy with the results considering I've never even tried to make a real power blade looking sword before. lol So here is the man of the hour in the 1905th Solar Auxilia Cohort and I about killed myself painting him. Seriously though, I have never been one for painting faces even though I have done so in the past and I swore off trying to paint eyes even longer ago...but I promised myself going into this model that I wouldn't shy away from a challenge on any part. Which meant painting...EYES and I don't think I did a half bad job...although I want to hide behind my visors for the time being because damn if it isn't stressful to approach eyes in the middle of all that flesh tone. Also, while it was annoying initially, I am so glad I magnetized this guys head because it lets me change the look on the table easily and also it made painting the head an absolute joy because I could test put it on and see how it looked then immediately disconnect it for any little fixes without finding myself having to paint around the entire model. The cloak ended up drawing a lot of attention from people on Instagram and that was a great feeling since the color was one I self-mixed and shaded with gradually increasing components until the very top highlight. I have never been happy with the standard Khorne Red -> Nuln Oil -> Evil Scarlet Red etc. concept of doing red cloaks and the results never seemed rich in color and yet retaining a soft fabric look. So I threw out the entire rulebook and went off into the wild blue yonder of my own crazy machinations! I actually based the cloak using Rhinox Brown, washed with Secret Weapons Ruby wash, and then mixed Vallejo "Scarlett Red" with Demonbull Brown. With each layer I gradually increased the amount of Scarlett Red in the mix and then as it reached the upper layers I added Wazdakka Red to help soften the over all color. Finally, I went in with Dark Sea Blue very thinned down and painted into the creases of the cloak. It took a while and it made painting the gold particularly terrifying but in the end it was worth every minute. 1905th Solar Auxilia Cohort, 'Rust Scorpions' - Lord Marshal Marcalius Audacter Brother Sutek, Arion, Forward Assist and 2 others 5 Back to top Link to comment Share on other sites More sharing options...
Audemus Posted November 4, 2018 Author Share Posted November 4, 2018 Updated progress picture on my Rogue Trader Kill Team: Solar Auxilia Edition Spiky Norman, Brother Sutek, noigrim and 4 others 7 Back to top Link to comment Share on other sites More sharing options...
Pearson73 Posted November 4, 2018 Share Posted November 4, 2018 Great comparison, each member can easily be found in the parallel team. Audemus 1 Back to top Link to comment Share on other sites More sharing options...
Spiky Norman Posted November 4, 2018 Share Posted November 4, 2018 The Solar Auxilia models just beats the pants off of those new, and still nice looking, Rogue Traders for Kill Team. :-) It's a shame FW don't sell that Medicae model anymore. It's a nice model on it's own. Audemus 1 Back to top Link to comment Share on other sites More sharing options...
Audemus Posted November 7, 2018 Author Share Posted November 7, 2018 Great comparison, each member can easily be found in the parallel team. When I came up with the idea the hardest part was replacing the Death Cult Executioner but once I looked at Solomon Lok's model it became clear that it was totally doable. Really love how well they parody each other. The Solar Auxilia models just beats the pants off of those new, and still nice looking, Rogue Traders for Kill Team. :-) It's a shame FW don't sell that Medicae model anymore. It's a nice model on it's own. Thanks! I agree about the Medicae models, I'm still confused as to why they were discontinued since they were actually (before the Carnodon) the newest model released in the Solar Auxilia line. I can't think of any other time the newest model was discontinued before any other models in a line...especially a character series that represents a lot of work from the sculptor. It's really bizarre. Speaking of the Carnodon, I'm finally done with my first of three and I absolutely enjoyed the hell out of painting this tank. It's really surprising how small it is, I'll post some size comparisons later, but I tried to dig into all of the details and I really did a lot of work on the volkite weaponry for maximum CHOOM respect. 1905th Solar Auxilia Cohort - Saturnyne Pattern Carnodon Reyner, DuskRaider, Iron Hands Fanatic and 4 others 7 Back to top Link to comment Share on other sites More sharing options...
Pearson73 Posted November 7, 2018 Share Posted November 7, 2018 Love that tank, it's a cool design, the turret really does look small though. Audemus 1 Back to top Link to comment Share on other sites More sharing options...
Audemus Posted November 7, 2018 Author Share Posted November 7, 2018 Love that tank, it's a cool design, the turret really does look small though. It really is small, I had to actually trim the pintle gun down to even fit it on top. Not looking forward to doing it on the next two! lol Link to comment Share on other sites More sharing options...

Recommended Posts
Create an account or sign in to comment
You need to be a member in order to leave a comment
Create an account
Sign up for a new account in our community. It's easy!
Register a new accountSign in
Already have an account? Sign in here.
Sign In Now