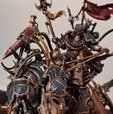
Doctor Perils Posted February 20, 2016 Share Posted February 20, 2016 Hi there, I've started writing a tutorial for the Gimp, I hope you'll enjoy it WIP ! I've got the cropping and resizing part done, but the form is horrendous. I'll get round to it soon. GIMP TUTORIAL The Gimp is a free, open-source image editing software. While it may not be quite as powerful as Photoshop, it provides its user with any functionality one might ever need in normal life (as in, not professionals, and even then...) I have used the Gimp for quite a few years now, and though I wouldn't call myself proficient, I've always been able to do pretty much anything I wanted with it, and rather easily. It is certainly powerful enough for any of your Warhammer 40k image editing needs, with the small exception of vector graphics; however, that's a whole other kettle of fish that I call Inkscape, for which I'll be doing another tutorial. Some day. Hopefully. One of the software's strengths is it's quality of being open-source: this means that anybody can provide modifications with the required coding skills. This shouldn't be directly useful for most people, but it does also mean that there is a wealth of free plugins that you can download if there are any extra functionalities that you might want for the few things that you can't do with Gimp quickly and easily. Anyway, we'll be starting off with a quick look at how to install the Gimp, then we'll see a couple of the most common examples for our needs on the Bolter and Chainsword. There will then be a longer overview of the tools in the Gimp so you can find all your needs that haven't been answered in the examples. If you can't find what you are looking for, don't hesitate to PM me, and I'll try to make this tutorial progress accordingly. INSTALLATION The Gimp is easy to install for most Operating Systems (OS), including Windows, Mac OS X and Linux (now that I think about it, it might well be one of the original applications that comes with Ubuntu and Mint?), and even some of the more obscure OSs like Solaris and BSD. I have only got a Windows and have only tested Linux out a couple of times, but I imagine that the following steps should be easily transferable for those OSs. The first step is to download an installer from the following website : https://www.gimp.org/downloads/ It should provide options for direct download or Torrent downloading. The 2.8.16 version only weighs 92.3 MBs so those who aren't comfortable with Torrents shouldn't have any problems with Direct downloading. Check the setup executable file with an anti-virus. There shouldn't be any problems, but it's always best to be on the safe side. Launch the Setup. In Windows Vista and up, a pop-up window will ask you if you really want to use your administrator rights to install this software. Simply click execute; as you have already checked the file with an anti-virus, it should be safe. The Install Wizard should open after you have chosen your language. You can choose to customize the installation options, but you'll get everything if you just click the install button. The installation shall then proceed, and that really is all there was to it. The Portable Option If you don't want to (or can't) install the gimp on your computer, there is a portable version that you can put on a USB key. You can download it from the following website: http://portableapps.com/apps/graphics_pictures/gimp_portable This version is a bit smaller (62MB for 2.8.16) but doesn't require installation. It might not have literally every functionality offered by the Gimp, but it's more than adequate for the average person's needs. Quick Additional Notes Launching and Opening The Gimp should normally open like a lot of other software (it might take a bit of time to load when you launch it). Hitting Ctrl+Oor going to File > Openand selecting a picture will open that file just like any other software would. Saving However, when saving an image, the Gimp's normal save ( Ctrl+Sor File > Save/Save as) can only save your work in it's .xcfformat. To save it under usable formats ( .jpeg, .gif, .png...), you have to export it. You'll find this option in File > Export as..., or simply by hitting Ctrl+E. Tool Box The Gimp Tool Box is very useful: it's got the most important tools, and you can dock or undock things that you might want to use by a simple click and drag. However, that means that it is sometimes possible to lose the main toolbox, or close it by mistake. In these cases, don't panic (I've been there Before, don't worry ): simply go to Windows > Tool Boxor hit Ctrl+B. In Windows > Dockable tools, you'll find most options that you might ever need, like tool options, brushes or (later) layers. EXAMPLES Let's start with some rather simple examples that you may like to use every day: cropping and resizing, and adding transparency. We'll then go on to more complicated things like testing out colour schemes and mashing pictures up to get ideas for conversions. Resizing a photo for the Boards When you take photos, inevitably a lot of the picture won't be that useful, especially when taking pictures of just one model. Not only that, but there's a good chance your camera is set at a resolution which will make the pictures look HUGE on forums. Not only that, but large pictures can take forever and a day to upload, especially when you're doing it 10 images at a time. In this kind of case, you'll want to crop and resize your pictures in an effort to make them more reader-friendly. Let's start off with the following picture: The file I had on my computer was actually about 5000x4000 pixels large, making the file more than 4mb. Since the bolterandchainsword's limit is 2mb, I've already downsized it (we'll see how to do that soon). Now, let's say I only want to keep the Terminator in the picture, and without being drowned in too much white. This will be the Cropping operation. Cropping One of the most useful yet underused functions in photo editing is cropping. Yes, it can be nice to keep a full photo in its 4/3 proportions for putting in a picture frame, but when posting it in a forum, you want the picture to contain the most important stuff only. In the Gimp, there is a little "cutting" tool which will do just that. Once you have selected the tool, you can click and drag to draw a thin white rectangle in your picture. When you let go of the mouse button, the area around this rectangle will become darker. You can reshape the rectangle as you wish by hovering near the corners or the edges with the tool, then clicking and dragging into place. Once you have the parts you want to keep, simply press Enter and the software will spit out an image which has been cropped. Be careful when you save this, as, if you replace the old file, the surrounding information will be gone. Another piece of advice I can provide when cropping is to keep a small amount of the surrounding background around the focal point, as it is more visually pleasing: In this case, it would be preferable to use the second picture. An easy guideline is using the small rectangles that appear when overing near to the corners. Resizing As you can see, the images are still pretty big for a forum; this is where resizing comes in. Unfortunately, this tool is hidden away a bit in the menus. Fortunately though, it is very easy to use. Simply go to Image > Scale and Size of Image. (Sorry my pictures are in french) This window will pop up: The important parts for the moment are: [ul] [li]The Width[/li] [li]The Height[/li] [li]The little chain links on the right of those boxes[/li] [/ul] quick note: It generally isn't necessary to look at different unit types instead of pixels, and I don't think I've ever touched resolution (the idea here is, the lower the resolution, the worse the image quality but the lighter it will be). I've also never looked at the Quality Interpolation, and you definitely don't need it for your resizing purposes. All you have to do here is type in a new value for Height or Width. Before you do this though, make sure the links button is activated: the links will all be joined together (as pictured above). If they are separated , simply click the button. This will calculate the new width or height proportionally to the value you chose for the other one. For Forum uses, the generally accepted limit is (iirc) 600px maximum of either height or width. Once you have selected your values, just click OK. And there you have it: a nice, forum-friendly image that you can share with all the members of the Bolter and Chainsword. Link to comment Share on other sites More sharing options...

Recommended Posts
Archived
This topic is now archived and is closed to further replies.