Arbiter7 Posted April 14, 2016 Share Posted April 14, 2016 As a new convert to the Ravenspire, I thought I'd do a tutorial on how to paint the Raven Guard Marines. It is suitable for begginers since I don't fancy myself as an amazing painter, but I do have some experience and can get good results. Please excuse the poor quality of some images... Unfortunately, while preparing this tutorial I did not have my SLR camera with me, so all pictures were taken with my smartphone, and may seem a bit off. But the end result will be photographed properly. The message to all new painters is: DON'T WORRY ABOUT BEING TOO NEAT, we can always correct errors later on in clever ways and speed up the painting process. Plus, unless you're going for a competition, minor mistakes won't show at arm's length which is where you'll be seeing your minis most of the time anyway. So, here goes: http://i92.photobucket.com/albums/l28/Arbiter_02/RG%20PG/Raven%20Guard/IMG_1181.jpg It is well worth it to make an initial investment in time and prepare stands for the various bits. I think marines are best painted if one does not glue anything together apart from the legs, torso and arms. The rest are best painted separately, in batches. This will significantly speed up your painting. I made these custom bases using corks, toothpicks and paperclips. Bits are attached to toothpicks with bluetack, and heads and bolters have been drilled and fixed on paperclips. Always carefully drill boltguns, they look so much nicer with an actual hole in the front. After a careful treatment of removing mould lines, filing and smoothening out any odds and ends, and spraying with Chaos Black, we mount everything on our custom bases and give every bit a coating of Abbadon Black (not thick!) http://i92.photobucket.com/albums/l28/Arbiter_02/RG%20PG/IMG_1953.jpg I usually add the basing before I undercoat them, but I did not have the materials at hand when I decided I would do this. Well discuss those in the end. Lets start with the shoulder pads. I chose to make mine as 3rd company because I simply like how red goes with black and white. Start by painting the trim a dark red colour, such as mechrite red, mephiston red etc. I did not have one myself so I mixed a lighter red with a dark brown in a ratio of 1 brown : 4 red. http://i92.photobucket.com/albums/l28/Arbiter_02/RG%20PG/IMG_1956.jpg Next, carefully highlight the edges using Evil Sunz Scarlet. This can be done effectively by putting paint on the edge of a brush with thin, long bristles. Don't worry about being too neat, since we can correct errors later. http://i92.photobucket.com/albums/l28/Arbiter_02/RG%20PG/IMG_1957.jpg http://i92.photobucket.com/albums/l28/Arbiter_02/RG%20PG/IMG_1958.jpg Next, highlight the top and the edges (both inner and outer) using a strong orange, such as Troll Slayer Orange. It is useful to add a dark grey line along the perimeter (about 2mm on the inside) using Eshin Grey. This will give more character to the pad and make it look less dull. http://i92.photobucket.com/albums/l28/Arbiter_02/RG%20PG/IMG_1973.jpg Now, the decals. I hate how the full tactical decal does not fit properly so I thought I'd make a change. Using a very sharp X-acto knife, carefully take out the middle of the arrow, as shown below. This missing piece will help the decal fit much more smoothly on the curved surface than if the entire decal was in place. http://i92.photobucket.com/albums/l28/Arbiter_02/RG%20PG/IMG_1974.jpg Don't worry about being too neat, since we will use black and white colours bring the arrow up to shape later. It takes some patience to place the transfer on the shoulder pad. I found that using a large brush, like the citadel Wash Brush, works best. Make sure the decal floats and has left the paper and then place the bristles underneath and lift it up. Always make sure the surface you'll be placing it on is already wet. Fiddle carefully and line it up properly: http://i92.photobucket.com/albums/l28/Arbiter_02/RG%20PG/IMG_1978.jpg http://i92.photobucket.com/albums/l28/Arbiter_02/RG%20PG/IMG_1961.jpg Before we shape the decal up, it is always a good idea to use some matt varnish to fix it into place. This holds here especially because we've tampered with the decal and it may even have broken up a bit. http://i92.photobucket.com/albums/l28/Arbiter_02/RG%20PG/IMG_1962.jpg Now, using a very thin brush and black and white paints, make the arrow look decent enough to fool the eye from arms length. http://i92.photobucket.com/albums/l28/Arbiter_02/RG%20PG/IMG_1980.jpg http://i92.photobucket.com/albums/l28/Arbiter_02/RG%20PG/IMG_1977.jpg They look quite nice all together. Finish the highlights by adding a hint of a bright yellow (e.g. Flash Gitz Yellow) at the edges and at the vert top. Now, for the other shoulderpad, start by highlighting the edges with Dark Reaper. http://i92.photobucket.com/albums/l28/Arbiter_02/RG%20PG/IMG_1959.jpg Highlight the edges using Thunderhawk Blue. Especially the top, middle and edges. http://i92.photobucket.com/albums/l28/Arbiter_02/RG%20PG/IMG_1960.jpg Add a final highlight of a 50:50 mix of Thunderhawk Blue and Ulthuan Grey, at the very top, and at the edges. Also add the same grey inner perimeter line and make sure its straight correcting with Abbadon Black. http://i92.photobucket.com/albums/l28/Arbiter_02/RG%20PG/IMG_1963.jpg At the moment of writing I'm waiting for the RG decals in the post, so you'll see those in the final pictures. Lets move on to the "Power - packs". Basecoat the parts shown with Leadbelcher. Once its dry, give them a thorough wash of Nuln Oil and add a second wash of Agrax Earthshade on specific bits that would be more "dirty" eg exhausts. http://i92.photobucket.com/albums/l28/Arbiter_02/RG%20PG/IMG_1965.jpg We then drybrush Ironbreaker and correct any mistakes with Abbadon Black. Then follow the same highlight procedure as with the shoulder pads on the various edges of the backpacks: Dark Reaper -> Thunderhawk Blue -> 50:50 mix of Thund. Blue and Ulthuan Grey, followed by a tiny highlight of Etherium Blue at the very edges. Correct any mistakes with abbadon black ONLY IN THE END, not after each stage. http://i92.photobucket.com/albums/l28/Arbiter_02/RG%20PG/IMG_1986.jpg Link to comment Share on other sites More sharing options...
Arbiter7 Posted April 14, 2016 Author Share Posted April 14, 2016 Follow the exact same procedure for the heads. For the eyes, use a dark red as base, then proceed with a lighter red, then orange, then yellow, and add a dot of white in the opposite side as shown in the pics: http://i92.photobucket.com/albums/l28/Arbiter_02/RG%20PG/IMG_1989.jpg http://i92.photobucket.com/albums/l28/Arbiter_02/RG%20PG/IMG_1991.jpg http://i92.photobucket.com/albums/l28/Arbiter_02/RG%20PG/IMG_1981.jpg http://i92.photobucket.com/albums/l28/Arbiter_02/RG%20PG/IMG_1992.jpg Time to move on to the main bodies. Start by paiting the metal areas with Leadbelcher. I like to include the joints and some details on the legs. http://i92.photobucket.com/albums/l28/Arbiter_02/RG%20PG/IMG_1972.jpg http://i92.photobucket.com/albums/l28/Arbiter_02/RG%20PG/IMG_1971.jpg Allow to dry and follow the same procedure as before: thorough wash oh Nuln Oil, followed by a wash of Agrax Earthshade in the joints. For the Aquila, use a slightly thinned wash of Drakenhof Nightshade. The blueish hue will go very well with the blue-black theme we've followed and will go even better with the white bits which make the army stand out so nicely in the Eavy Metal pictures. Proceed with highlighting the various parts of the body using the same procedure. Correct any errors ONLY IN THE END. See, for instance, how I've corrected the legs in the following picture in the very end. http://i92.photobucket.com/albums/l28/Arbiter_02/RG%20PG/IMG_1985.jpg I found it extremely useful to have a picture from the 6th ed codex open while I do this. Iron Hands and Raven Guard have the same black body so any of those pictures will guide you on how to effectively highlight the various parts of Power Armour. For the ammo pouches, a dark brown will do, and give it a good wash with agrax earthshade. Then highlight with a lighter brown and add some fine highlights using a fine detail brush of the previous brown, mixed with some light flesh colour in, to give it a "leathery" look. I used Rhinox Hide and Mourfang Brown, and for the highlight I added some Kislev Flesh in the end. http://i92.photobucket.com/albums/l28/Arbiter_02/RG%20PG/IMG_1994.jpg For the sergeant's tabard, basecoat the loincloth with Zandri Dust, the scrolls with Rakarth Flesh and the purity seals with Khorne Red. Metal bit is leadbelcher. http://i92.photobucket.com/albums/l28/Arbiter_02/RG%20PG/IMG_1990.jpg Give the loincloth and the scrolls a good wash of Seraphim Sepia. Allow to dry. Add highlights. For the loincloth, Ushabti Bone, and for the scrolls a second hand of Rakarth Flesh. For the Seals, Evil Sunz Scarlet and for the metal Ironbreaker. Metal could use a wash of Nuln Oil beforehand. http://i92.photobucket.com/albums/l28/Arbiter_02/RG%20PG/IMG_1997.jpg Final highlights include screaming skull for the loincloth, a bright orange for the seals, a 50-50 mix of Rakarth Flesh with White Scar http://i92.photobucket.com/albums/l28/Arbiter_02/RG%20PG/IMG_1998.jpg Faces. Basecoat with Pallid Wytch Flesh. http://i92.photobucket.com/albums/l28/Arbiter_02/RG%20PG/IMG_1996.jpg Thorough wash with Reikland Fleshshade and re-highlight with Pallid Wytch Flesh once dry. http://i92.photobucket.com/albums/l28/Arbiter_02/RG%20PG/IMG_1999.jpg Unfortunately I'm missing the next photos. Add a thinned down wash of Agrax Earthshade and re-highlight. Add a final highlight of a 50-50 mix of Pallid Wytch Flesh with White Scar. Bolters. Basecoat with Leadbelcher. Allow To dry. Thorough wash of Nuln Oil. Allow to dry. Pick out bits with Agrax Earthshade Wash. Allow to dry. Highlight lightly with Irobreaker. Paint the casing, the targeting thingy and the scope with Ironbreaker. Give the parts you painted with Ironbreaker a thinned down wash of Drakenhof Nightshade. Add detail to the scopes using the procedure we followed with the eyes. (see final photos) Sergeants Banner: Basecoat the Raven with Ulthuan Grey. For the banner I used an old base called Astronomican Grey and highlighted it with Ulthuan Grey and finally white. Give the Raven a thorough wash of Drakenhof Nightshade. Allow to dry and highlight with Ulthuan Grey. Add a final highlight on the very edges and far ends of the wings using pure white. http://i92.photobucket.com/albums/l28/Arbiter_02/RG%20PG/IMG_2002.jpg Pick up superglue and assemble your marines! http://i92.photobucket.com/albums/l28/Arbiter_02/RG%20PG/IMG_2005.jpg For the bases, I used sand and bits and bobs from the Rhino kit which I cut with pliers and added as rubbish. The base was undercoated with black, overbrush with scorched brown, then bestial brown, then ushabti bone and a final fine highlight of skull white. Add squad decals. http://i92.photobucket.com/albums/l28/Arbiter_02/RG%20PG/IMG_2008.jpg Better quality pics to follow soon, once the FW decals arrive. Mind you, these pics are blown up. The tiny errors do not show unless you hold the marine right in front of your eyes. Even from a distance of 50cm they look crisp and lovely. Hope you find this useful ! Cheers Link to comment Share on other sites More sharing options...
AndrewChristlieb Posted April 14, 2016 Share Posted April 14, 2016 Your blue-black looks really good on these, might have to try that on some Templars and see how it comes out. Link to comment Share on other sites More sharing options...
Arbiter7 Posted April 14, 2016 Author Share Posted April 14, 2016 The blue black looks lovely on my ex-templars, before I sold them: http://i92.photobucket.com/albums/l28/Arbiter_02/IMG_0234.jpg Link to comment Share on other sites More sharing options...
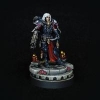
Arbiter7 Posted April 15, 2016 Author Share Posted April 15, 2016 As promised, here are the good photos taken with a proper camera, under proper conditions. http://i92.photobucket.com/albums/l28/Arbiter_02/RG%20PG/Raven%20Guard/IMG_1159.jpg http://i92.photobucket.com/albums/l28/Arbiter_02/RG%20PG/Raven%20Guard/IMG_1158.jpg http://i92.photobucket.com/albums/l28/Arbiter_02/RG%20PG/Raven%20Guard/IMG_1153.jpg http://i92.photobucket.com/albums/l28/Arbiter_02/RG%20PG/Raven%20Guard/IMG_1179.jpg http://i92.photobucket.com/albums/l28/Arbiter_02/RG%20PG/Raven%20Guard/IMG_1177.jpg http://i92.photobucket.com/albums/l28/Arbiter_02/RG%20PG/Raven%20Guard/IMG_1178.jpg http://i92.photobucket.com/albums/l28/Arbiter_02/RG%20PG/Raven%20Guard/IMG_1174.jpg http://i92.photobucket.com/albums/l28/Arbiter_02/RG%20PG/Raven%20Guard/IMG_1176.jpg http://i92.photobucket.com/albums/l28/Arbiter_02/RG%20PG/Raven%20Guard/IMG_1175.jpg http://i92.photobucket.com/albums/l28/Arbiter_02/RG%20PG/Raven%20Guard/IMG_1172.jpg http://i92.photobucket.com/albums/l28/Arbiter_02/RG%20PG/Raven%20Guard/IMG_1173.jpg http://i92.photobucket.com/albums/l28/Arbiter_02/RG%20PG/Raven%20Guard/IMG_1171.jpg http://i92.photobucket.com/albums/l28/Arbiter_02/RG%20PG/Raven%20Guard/IMG_1181.jpg Link to comment Share on other sites More sharing options...
elohimalpha Posted April 15, 2016 Share Posted April 15, 2016 Good stuff! Really loving the eyes/lenses Link to comment Share on other sites More sharing options...
NiceGuyAdi Posted April 15, 2016 Share Posted April 15, 2016 Thanks for this Arbiter. Your look is a lot like the Black Templars colour scheme from How to Paint Space Marines: Tactical Marines, which I've always liked. It's good to have a detailed write-up on how to get that effect. Link to comment Share on other sites More sharing options...

Recommended Posts
Archived
This topic is now archived and is closed to further replies.