MaliGn Posted October 29, 2020 Author Share Posted October 29, 2020 Moved on and finished the top of the wing, pretty happy with it for now, naturally the final highlights will be done after the whole thing is built. However I am still not sure about doing the underneath any further than it is already. Open to thoughts on whether the underneath is complete enough. Brother Captain Vakarian 1 Back to top Link to comment Share on other sites More sharing options...
MaliGn Posted October 30, 2020 Author Share Posted October 30, 2020 You may remember that a little while ago I test fitted the body and legs to the top of the pillar and realised that there were some large gaps, well today I finished the fix and went ahead and glued those parts together. While I was at it I went ahead and test fitted the wing This has helped me realise that I do need so!e highlights on the underside, but not to the same level, there's not a lot of light under there. As it starts to come together i'm increasingly glad I took on the challenge of this beast. Tallarn Commander, Dr_Ruminahui and WrathOfTheLion 3 Back to top Link to comment Share on other sites More sharing options...
MaliGn Posted October 31, 2020 Author Share Posted October 31, 2020 Pushed on a bit more and finished the neck, and did what I wanted with the underside of the wing, so I went ahead and assembled what I had. Let me know what you all think. Dr_Ruminahui, WrathOfTheLion and Tallarn Commander 3 Back to top Link to comment Share on other sites More sharing options...
Kythnos Posted November 1, 2020 Share Posted November 1, 2020 It's coming together splendidly! And I've got to say that I armire your attention to detail even in such a sometimes tiring model. Link to comment Share on other sites More sharing options...
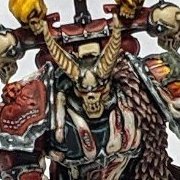
MaliGn Posted November 1, 2020 Author Share Posted November 1, 2020 It's coming together splendidly! And I've got to say that I armire your attention to detail even in such a sometimes tiring model. Thanks, the way I see it is that I'd be painting something anyway and having set out to lavish every attention to the entire army, conversions, paint jobs etc everything to the same level from the humblest cultist to massive Daemon engines all get the same treatment. Here's the talon I've been working on today, not much left to finish off here. And I also moved on with the back panels, I must say I'm surprised by the absence of a third party market for these, as it seems like a natural way of setting different Heldrakes apart, however I've never seen any. With the paint going on my customised versions are coming together. Dr_Ruminahui 1 Back to top Link to comment Share on other sites More sharing options...
MaliGn Posted November 6, 2020 Author Share Posted November 6, 2020 Still short a talon but the back panels are done and in place, they really make a difference to the overall look. I really reckon this is coming together more or less as I'd planned, and I'm really pleased with it. There's about four and a bit of the 20 Sub-assemblies left to go, then the final highlights and any other finishing touches. Reskin, Grotsmasha, Dr_Ruminahui and 1 other 4 Back to top Link to comment Share on other sites More sharing options...
Reskin Posted November 7, 2020 Share Posted November 7, 2020 Dude that is looking absolutely wicked!!Just curious though, with your positioning in the pics, is the base stable and why is he not lined up with the long edge of the eclipse base? Link to comment Share on other sites More sharing options...
MaliGn Posted November 7, 2020 Author Share Posted November 7, 2020 Dude that is looking absolutely wicked!! Just curious though, with your positioning in the pics, is the base stable and why is he not lined up with the long edge of the eclipse base? Thanks, the idea with the positioning was to increase the narrative connection with the charred guardsman remains on the base. As for stability there are a number of coins glued underneath the base to lower the centre of gravity, I'm thinking of adding a couple more. Link to comment Share on other sites More sharing options...
Irate Khornate Posted November 7, 2020 Share Posted November 7, 2020 Dude that is looking absolutely wicked!! Just curious though, with your positioning in the pics, is the base stable and why is he not lined up with the long edge of the eclipse base? Thanks, the idea with the positioning was to increase the narrative connection with the charred guardsman remains on the base. As for stability there are a number of coins glued underneath the base to lower the centre of gravity, I'm thinking of adding a couple more. The dragon protects the horde after all. MaliGn 1 Back to top Link to comment Share on other sites More sharing options...
MaliGn Posted November 7, 2020 Author Share Posted November 7, 2020 Dude that is looking absolutely wicked!! Just curious though, with your positioning in the pics, is the base stable and why is he not lined up with the long edge of the eclipse base? Thanks, the idea with the positioning was to increase the narrative connection with the charred guardsman remains on the base. As for stability there are a number of coins glued underneath the base to lower the centre of gravity, I'm thinking of adding a couple more. The dragon protects the horde after all. True that! I've been musing for a while that as I assemble the heldrake the base is looking increasingly dull and flat, a big empty void of a single colour and I felt it was starting to drag the whole thing down. To I sculpted a fallen banner at the bottom of the pillar, I'm currently waiting for the green stuff to cure but I'm pretty sure that it will prove to be the right call. I'm thinking I'll keep the design quite simple like on the venomcrawler so as not to detract from the heldrake itself. While I wait for that I started on the last 4 components of this lengthy project, the end is in sight my friends. MasterDeath, Tallarn Commander, Urauloth and 1 other 4 Back to top Link to comment Share on other sites More sharing options...
MaliGn Posted November 9, 2020 Author Share Posted November 9, 2020 Pushing on with basecoats - next step is to highlight the reds. Tallarn Commander 1 Back to top Link to comment Share on other sites More sharing options...
MaliGn Posted November 15, 2020 Author Share Posted November 15, 2020 All but ready to assemble the right wing and highlight the trim, gonna do the cables first though. Tallarn Commander 1 Back to top Link to comment Share on other sites More sharing options...
MasterDeath Posted November 16, 2020 Share Posted November 16, 2020 Awesome Paintjob and modeling! MaliGn 1 Back to top Link to comment Share on other sites More sharing options...
MaliGn Posted November 16, 2020 Author Share Posted November 16, 2020 Awesome Paintjob and modeling! Thanks dude! I've assembled the right wing and test fitted it to the rest of the Heldrake, still needs the trim highlighting so there's still (I know!) a fair ways to go. I'm going to try and resist showing many more photos before I'm all done, we'll see how I do. Because that's only held in place with a pin and gravity that is likely not the final wing position, but this gives the closest sense of how this will look when all done. Dr_Ruminahui 1 Back to top Link to comment Share on other sites More sharing options...
MaliGn Posted November 27, 2020 Author Share Posted November 27, 2020 I've finished the fallen banner on the base of the Heldrake. Last part is the highlights on the trim, I'll be working on those next - on the home stretch at last! Tallarn Commander and Dread 2 Back to top Link to comment Share on other sites More sharing options...
MaliGn Posted November 28, 2020 Author Share Posted November 28, 2020 Look, I know I said I wouldn't share any more until it was finished, but having started the final round of pure white highlights on the trim I wanted to show why they were so important. These have been finished along the side of the head the back and the rearmost parts of the wings, compare the finish to the dullness of the forewings. I know it is not the most polished NMM in the world, but it does kinda work in a way don't you think? Brother Captain Vakarian 1 Back to top Link to comment Share on other sites More sharing options...
MaliGn Posted November 29, 2020 Author Share Posted November 29, 2020 It's done! I'll take more photos in daylight next weekend, but the five month journey of painting this thing is over! I think I'm going to take a bit of a break from my word bearers and do some necromunda stuff for a bit. Tallarn Commander, Dr_Ruminahui and Brother Captain Vakarian 3 Back to top Link to comment Share on other sites More sharing options...
MegaVolt87 Posted November 30, 2020 Share Posted November 30, 2020 That is one majestic hell turkey looks great, the WB insignia you did really adds great character. I like the banner stripe, I'll have to remember that one for my IW's. Link to comment Share on other sites More sharing options...
tikhunt Posted December 4, 2020 Share Posted December 4, 2020 Honestly blown away by how great everything in this thread is. Link to comment Share on other sites More sharing options...
MaliGn Posted December 4, 2020 Author Share Posted December 4, 2020 That is one majestic hell turkey looks great, the WB insignia you did really adds great character. I like the banner stripe, I'll have to remember that one for my IW's. Thanks, I hope to get some more photos done either tomorrow or Sunday to show it off a bit more. Honestly blown away by how great everything in this thread is. Thanks for your kind words, it's been here a while, thanks for stopping by. Link to comment Share on other sites More sharing options...
MaliGn Posted December 6, 2020 Author Share Posted December 6, 2020 I promised more and better pictures: here goes. I present for you my recently completed Heldrake, I've spent the last six months on this beast of a model, it's been thoroughly enjoyable to be fair, I hope you'll think that I've done it justice. I made some slight alterations to the 'drake adding some Maulerfiend tentacles to bulk out the tail, and reposing the rear legs to mount it on the column crowing over the charred remains of its latest victim. It's taken approximately six months start to finish although there was a marked drop off in work rate in late summer due to heat and the truncated cricket season. This is also the first thing I've finished with Artis Opus brushes and I'd say they are easily thre best I've used so far, will be looking to pick up some more of those. I did use thier drybrush method at times, although using makeup brushes, which worked well, I'll be looking into how i can incorporate more of tht into future projects. Anyway, enough words, let's have some pictures! TrawlingCleaner, Dread, Brother Captain Vakarian and 2 others 5 Back to top Link to comment Share on other sites More sharing options...
Charlo Posted December 15, 2020 Share Posted December 15, 2020 Very very tasty!! MaliGn 1 Back to top Link to comment Share on other sites More sharing options...
MaliGn Posted December 30, 2020 Author Share Posted December 30, 2020 Very very tasty!! Thanks Charlo! I'd been sort of planning of taking a bit of a break from my Word Bearers and working on some Necromunda stuff that is long overdue some attention, but then my kids bought me this for Christmas: So I just couldn't resist the lure of building him up, I've only made some tentative beginnings, just starting out with settling on some scenery and pose alterations as the Helstalker clambers over some broken pillars. What can I say? I just won't learn... I've also been thinking of swapping the rider so I popped this spare Dark Apostle model on top. It'll need more work to make him sit more comfortably, but I'm thinking I could add a chainsword to the end of his Crozius to create a chainglaive would look ok. Tallarn Commander 1 Back to top Link to comment Share on other sites More sharing options...
tikhunt Posted January 1, 2021 Share Posted January 1, 2021 Can’t wait, you’ll make it look awesome. Link to comment Share on other sites More sharing options...
MaliGn Posted January 3, 2021 Author Share Posted January 3, 2021 Can’t wait, you’ll make it look awesome. I hope so! Been spending some more time on the Lord Discordant, have pretty much settled on the Dark Apostle model for his rider. I've started making the appropriate modifications to make him fit so I've added an old space marine Gordon back and will fill that in with green stuff in due course. I've also turned his Crozius into a chainglaive and am trying to decide what to do with his other arm, I'm thinking of using the flaming book from the dark apostle rather than the reins from the disco lord. (All input helpful on that front) I think I'll modify a standard CSM backpack to feature the mechatendrils rather than use his original backpack. I've still got to build a sub- assembly for the baleflamer and rebuild the saddle where I have used the alternative rider. I think I've got the rest of it more or less how I want it, I hope I'll be able to keep enough of the legs in their standard positions to make that a lot easier than my venomcrawler project. I also decided that I'll make the original rider into a master of possession and test fitted a concept, I'll try and shift his leg a bit so he looks a little less hunched, I think that I should be able to manage it with some careful cutting. Dr_Ruminahui and Tallarn Commander 2 Back to top Link to comment Share on other sites More sharing options...

Recommended Posts
Create an account or sign in to comment
You need to be a member in order to leave a comment
Create an account
Sign up for a new account in our community. It's easy!
Register a new accountSign in
Already have an account? Sign in here.
Sign In Now