Psykic_scribe Posted December 31, 2016 Share Posted December 31, 2016 I’ve got myself a new challenge in my Christmas stocking – Stormcloud Attack. After the initial celebration of adding a Stormtalon to my Black Templars and another Heldrake for my Night Lords, I realised these will both take some time (hence this, my new WiP blog). A description of the challenges I have set myself: • Standardise: The Stormtalon will need to match with my previous model, but as I extended the fuselage of the first one without taking measurements of the internal framework, I am going to be in the trial and (mostly) error approach on the new one. I am not planning to put in lighting (as I did before), but I will magnetise the cockpit pod in case I change my mind. • Customise: The Heldrake is a fragile beast to paint and assemble. I will probably repeat my Nightlord paint scheme, but I don’t want two models with the same pose. My plan is to modify the angle of the primary claw/wing mountings and heavy pin these across the two cuts. But I also need to make the neck curve downwards instead of upwards. I wish I could get a spare neck in case this is a major failure of my carving and sculpting skills, but spare Heldrake bits are as common as rocking horse droppings. The inspiration is that I will eventually have a neat Stormtalon Squadron together with a Heldrake Terror Pack. For now, I will start on the two bases whilst I gather my patience and courage. Completion date could be a millennium or two away, but I aim to post a few photos along this journey. Link to comment https://bolterandchainsword.com/topic/329341-stormcloud-attack/ Share on other sites More sharing options...
Psykic_scribe Posted January 16, 2017 Author Share Posted January 16, 2017 I have started on the easiest task first - extending the fuselage of the Stormtalon by 1.5 cm. A quick cut and hacksaw, plasticard supports for the panels, and sprue packed out to align the tail ........ Hidden Content Next, to cut some plasticard panels, with a thin one to follow the curve of the top surface. Link to comment https://bolterandchainsword.com/topic/329341-stormcloud-attack/#findComment-4624963 Share on other sites More sharing options...
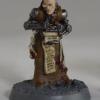
Psykic_scribe Posted February 6, 2017 Author Share Posted February 6, 2017 Some progress has been made, after a fight with the electronics (for an LED). I tried to fit a micro-switch in the belly but my clumsy fingers kept breaking the connections. So, for the final version, I fitted a more robust switch, with a bigger hole in the belly (same as my previous Stormtalon). Cockpit details have been completed, showing an ace Stormtalon pilot with Sword Brethren status. The cockpit will push-fit into magnets with the fuselage so that the battery can be removed (for storage) or replaced when expired. and the battery pack :- Hidden Content Next steps: - more Templar crosses on the wings - edge highlighting - cockpit hood painting - more magnets to hold the cockpit pod to the fuselage - base (still waiting on a parts order to be delivered) - transfers, for a/c number and kill markings Link to comment https://bolterandchainsword.com/topic/329341-stormcloud-attack/#findComment-4648129 Share on other sites More sharing options...
Psykic_scribe Posted February 10, 2017 Author Share Posted February 10, 2017 Part one (the easier part) of Stormcloud attack has been completed - here is a Stormtalon with an Ace techmarine pilot who has thus aquired Sword Brethren status. The top plate and twin-linked lascannon are magnetised, to make life easier in removing the cockpit pod so that the batteries can be changed or stored. The fuselage has been lengthened by 1.5 cm (to match my other Stormtalon); I prefer this to make it less of a brick. More photos: Hidden Content Hidden Content Now for the Heldrake. I am planning to be a bit more ambitious with the 'drake, but bear with me as my other 'drake took ages to paint. First step will be to rebuild the neck, as without that succeeding most of my new idea will crash. Link to comment https://bolterandchainsword.com/topic/329341-stormcloud-attack/#findComment-4652573 Share on other sites More sharing options...
Psykic_scribe Posted March 1, 2017 Author Share Posted March 1, 2017 Now for the DARK and MONSTROUS side! I have basecoated the 'drake on it's sprues with my usual mix of Kantor Blue and Abaddon Black, but here are the first steps on the base. This has a battery box to pwer the LED that will be in the body of the Heldrake, covered by a Rhino door that contains the microswitch - hopefully I have managed to solder it properly this time. Other items for the base are part of a fuel depot from MicroArt and a deceased First Company Ultramarine - much painting and base material still to be added. Link to comment https://bolterandchainsword.com/topic/329341-stormcloud-attack/#findComment-4670015 Share on other sites More sharing options...
Psykic_scribe Posted March 20, 2017 Author Share Posted March 20, 2017 It's not happening quickly, but here is the latest progress report. 1. The elecrtics for the LED have been finished - the battery box is from a Rhino door with an embedded microswitch, with the plasticard partially hidden under a mound of slate. 2. The Smurf (sorry, Ultramarine ) is definitely long-time dead and I have attempted to make him as faded and dirty as the fuel dump. 3. I have widened to slots on the lower body of the Heldrake to get a different (upwards) rake on the body and wings. To make this pose work, I must be successful with the modified neck. Wish me luck. Hidden Content Link to comment https://bolterandchainsword.com/topic/329341-stormcloud-attack/#findComment-4689872 Share on other sites More sharing options...
Psykic_scribe Posted April 9, 2017 Author Share Posted April 9, 2017 Some progress on the Heldrake !!!!!!!!!! I have completed the GS work on building a neck with a reverse (downward) curve. Apologies for the garish fire colours, but these are to match with my earlier "standard" Heldrake and the armour plates will tone this down eventually. Step one was to build a copper wire frame for the GS with two GS spheres to match the plastic neck joints, followed by GS infill and twisted wire cables. I have used some liquid GS over the cables to give a partial sheath to them, to imitate the Games Workshop neck detail, (but I have avoided the teardrops - too fragile for me). Now, THIS IS THE POINT OF NO RETURN ! The next step is to carve up the armour plates from the plastic neck, fit and fill in tyhe gaps to the reversed curve. Hope this works as spare necks from bit sellers are as rare as rocking horse s**t. Link to comment https://bolterandchainsword.com/topic/329341-stormcloud-attack/#findComment-4707252 Share on other sites More sharing options...
Psykic_scribe Posted April 17, 2017 Author Share Posted April 17, 2017 BIG SIGH OF RELIEF - THE NECK PLATES FITTED ! I managed to disassemble the GW neck plates from the Heldrake kit with hacksaw, craft knife and file, and remove the excess plastic inside with the same. If you should wish to do the same, be very careful of the angle of the blades away from your fingers and use a small vice whenever feasible. This is not easy. With hindsight, it would have been better to prepare the neck plates before moulding the top of the neck with greenstuff to fit the curve of the plates. I was lucky in that I moulded the top of the neck too narrow and thus I was able to fill out under the plates with more wire and GS. The fiery neck is proably not to everyone's taste, but it matches my earlier model. On balance, I prefer the box art approach with red/yellow highlights over black (or midnight) but it's too late for me to change now. I need to carve some spikes for the plates from sprue sometime, before applying washes and lightning. Painting of the body and wings is in progress. I prefer to paint each assembly separately to its conclusion to keep my focus. Painting one colour at a time across so much detail needs too much concentration on my part, although it might have saved on wasted paint. Photos of each assembly soon .... Link to comment https://bolterandchainsword.com/topic/329341-stormcloud-attack/#findComment-4713143 Share on other sites More sharing options...
Psykic_scribe Posted May 7, 2017 Author Share Posted May 7, 2017 Latest progress - PAINTING COMPLETED: All the components have now been painted and the various assemblies glued together before fixing the alignment around the body. This was the status about a week ago and I have put the Heldrake together. Hidden Content HOWEVER: The electronics are driving me CRAZY ! I have broken and replaced the microswitch. The joints are SO fragile. Hot solder tends to cook the microswitch (due to my lack of skill). Electric paint is just that, it has very low bonding properties. I have now built a plastic "clamp" for the wiring so that the wires to the switch are held in place for the paint to have enough conductivity. Still perseverving with this. Wish me luck, lots of it. Then I will be able to post some final photos. Link to comment https://bolterandchainsword.com/topic/329341-stormcloud-attack/#findComment-4732720 Share on other sites More sharing options...
Bjorn Firewalker Posted May 7, 2017 Share Posted May 7, 2017 Impressive work. Link to comment https://bolterandchainsword.com/topic/329341-stormcloud-attack/#findComment-4732834 Share on other sites More sharing options...
Psykic_scribe Posted May 9, 2017 Author Share Posted May 9, 2017 I have given up on the microswitch for now and bypassed it with an extra wire. When connected, there was too much resistance and onlt yje faintest glow in the LED. So the set up is: - Battery In - it's ON Battery Out - it'sOFF Simples ! So here are the photos of the finshed Heldrake. Why is there a dead Ultramarine on the base? 'cos the Dark Angel ducked ! I will take some photos of the LED later when it's dark. Link to comment https://bolterandchainsword.com/topic/329341-stormcloud-attack/#findComment-4734726 Share on other sites More sharing options...
Psykic_scribe Posted May 11, 2017 Author Share Posted May 11, 2017 With lower light levels last night, I have taken some photos with the LED on:- With hindsight, this was probably more trouble than it's worth, adds little to the impact of the Heldrake on the gaming table, but brings an extra "feature". I am not rushing to build another one ! Link to comment https://bolterandchainsword.com/topic/329341-stormcloud-attack/#findComment-4737486 Share on other sites More sharing options...
Recommended Posts
Archived
This topic is now archived and is closed to further replies.