Ezr91aeL Posted July 4, 2017 Share Posted July 4, 2017 Your 3d printer print very well! Can I ask you which is the model? Link to comment Share on other sites More sharing options...
Sister Alessia Posted July 4, 2017 Share Posted July 4, 2017 Literally printing awesome! They look really great! I wonder If you could print Catholic Mary Statues, to make your board more Religious looking? Link to comment Share on other sites More sharing options...
Drider Posted July 4, 2017 Author Share Posted July 4, 2017 Your 3d printer print very well! Can I ask you which is the model? It's a Tevo Tarantula. One of the cheapest i could find with a metal frame. It comes as a kit so you have to assemble it and do the wiring yourself. Took about a day to do that then a few weeks of tinkering with it and doing some after market upgrades like printing brackets to stiffen the frame and a part cooling fan which is a must have for printing with PLA. https://tevo3dprinterstore.com/products/2016-newest-tevo-tarantula-i3-aluminium-extrusion-3d-printer-kit-printer-3d-printing-2-rolls-filament-8gb-sd-card-lcd-as-gift Literally printing awesome! They look really great! I wonder If you could print Catholic Mary Statues, to make your board more Religious looking? I was thinking I'm going to print about a table and a half worth of industrial terrain, so I can fight for a shipping yard or a power plant / industrial complex. I have been thinking though that I really do have to get my girls sorted out with some sort of holy site or convent worthy of being the my Sisters' home turf. Sister Alessia 1 Back to top Link to comment Share on other sites More sharing options...
Drider Posted July 6, 2017 Author Share Posted July 6, 2017 Testing out how I'm going to weather/rust these containers. Mixed a bit of mournfang brown with a touch of mephiston red and dabbed it on with a heavy drybrush. Then added in a bit of averland sunset to the mix to lighten it up slightly and dabbed it on with a drybrush a bit lighter. Hit the whole thing with a homemade wash, an empty bottle of abaddon black filled with acrylic thinner and thoroughly shaken, it ended up reasonably close to null oil and was a damn sight cheaper considering how much i'm going to need to use. Finally hit the whole thing with a light drybrush of runefang steel (although i kinda messed up as the wash wasn't quite dry, but that's ok considering it's just terrain.) Pretty happy with how it's turned out. http://i.imgur.com/FYEep7i.png Thousand Eyes 1 Back to top Link to comment Share on other sites More sharing options...
Drider Posted July 8, 2017 Author Share Posted July 8, 2017 Faffed around with rusting up the cast bronze boxes the past couple days. Same drill as the cast iron boxes but with a different colour pallet for the rust because bronze/copper rusts a kinda cyanish colour. http://i.imgur.com/Ff42gRU.png?1 First box (test box) done. I went a little to heavy on the dry brush so this one is just 'lightly rusted'. http://i.imgur.com/t31LZb0.png?1 Same box different angle/lighting. http://i.imgur.com/VbDpcNf.png?1 Next two boxes i decided to go a lot heavier on the rusting, they're pretty much covered... This is them after rust and wash. http://i.imgur.com/O9KO4en.png?1 And here they are after a much lighter dry dry brush than the first. Beams and Atrus 2 Back to top Link to comment Share on other sites More sharing options...
Sister Alessia Posted July 8, 2017 Share Posted July 8, 2017 Fabulous stuff! I particularly like the heavy rusted boxes! Drider 1 Back to top Link to comment Share on other sites More sharing options...
Drider Posted July 8, 2017 Author Share Posted July 8, 2017 The fruits of today's labor 6 more boxes done. http://i.imgur.com/NFzGur2.png Taking advantage of good priming weather. Sprayed 3 metal boxes and 3 blue boxes. http://i.imgur.com/yl7jMuT.png Rust all the things! http://i.imgur.com/PQLLDau.png And a dry brush to bring it back in http://i.imgur.com/uIpN0oR.png Its a blue! http://i.imgur.com/gliFZrb.png Bit of wear and tear, some paint chipping and some corrosion. Tried out some typhus corrosion and I think I've messed it up... It'll do for terrain but i think for the next bunch of boxes i'll just stick with chipping and refrain from using the technical paint. Atrus 1 Back to top Link to comment Share on other sites More sharing options...
Sir_Gaea Posted July 9, 2017 Share Posted July 9, 2017 I am so jealous of how nice those look. I just can't get a 3D printer and just use it to print cargo boxes. Link to comment Share on other sites More sharing options...
Drider Posted July 9, 2017 Author Share Posted July 9, 2017 Got all 30 barrels finished, Primed 3 more containers in red. Ran out of acrylic thinner and tried to use water, just doesn't work the same so i'm going to have to pick up more thinner and re-wash the red boxes. I'm approaching a viable amount of terrain now so I couldn't help myself but to setup a 4x4 and get an idea of how this table is going to look when it's done. Couldn't help but add some 'atmospheric effects'. http://i.imgur.com/hrx7wZU.jpg?1 http://i.imgur.com/tSgeNED.jpg?1 http://i.imgur.com/mfHxnOh.jpg?1 http://i.imgur.com/9hvTUDY.jpg?1 Thousand Eyes, Atrus, Montford and 1 other 4 Back to top Link to comment Share on other sites More sharing options...
Bjorn Firewalker Posted July 11, 2017 Share Posted July 11, 2017 Well done. Link to comment Share on other sites More sharing options...
Sister Alessia Posted July 11, 2017 Share Posted July 11, 2017 Wow it really comes together with the minis! Absolutely gorgeous terrain and the effects are ace! Everybody to Drider's for gaming and tea then ;) Link to comment Share on other sites More sharing options...
Drider Posted July 16, 2017 Author Share Posted July 16, 2017 (edited) Finished off a bit more terrain this weekend. http://i.imgur.com/bUn0kVH.png last work in progress pic i took was just after dry brushing but before i added a little bit of paint chipping. http://i.imgur.com/OLlcBwS.png?1 Here it is all laid out on a 6'x4' http://i.imgur.com/NosLpeq.png?1 Bit of a close up for an almost models eye view from one corner. http://i.imgur.com/3Cn8iat.png?1 And the same again from another corner. Total amount of terrain:16 Freight Containers (6"x3"x3")32 Crates (2"x1"x1")30 barrels. Edited July 16, 2017 by Drider Sister Alessia 1 Back to top Link to comment Share on other sites More sharing options...
Drider Posted August 30, 2017 Author Share Posted August 30, 2017 Been a while since I last did a hobby update. Gonna start off by posting some porn! http://i.imgur.com/4ivize5.jpg?1 Big bag of goodies! http://i.imgur.com/IgbYbtw.jpg?2 1 Squad of seraphim, 4 Ladies with storm bolters and 5 Ladies with flamers. Moving on... Did another terrain project to add some area terrain to my table. http://i.imgur.com/VxYG9PS.jpg?2 All the bits. http://i.imgur.com/w2qKh29.jpg?2 Mid way on the build/paint. http://i.imgur.com/7uLnyok.jpg?1 All done but it looks a little bare. http://i.imgur.com/5CuAXEH.jpg?1 Classy photo of the finished product with some extra scatter. robofish7591 and Bjorn Firewalker 2 Back to top Link to comment Share on other sites More sharing options...
Bjorn Firewalker Posted August 31, 2017 Share Posted August 31, 2017 Excellent work. Link to comment Share on other sites More sharing options...
robofish7591 Posted August 31, 2017 Share Posted August 31, 2017 I really like the terrain you have made. Like you said though, it looks a little bare, have you thought about adding a few rivets to it? I can't wait to see that squad of seraphim painted up! Link to comment Share on other sites More sharing options...
Drider Posted September 3, 2017 Author Share Posted September 3, 2017 Taking a wee break away from hobby work at the moment, thought I'd post what I've done so far. Gonna convert me some of them there Inferno Pistols. Had a rummage around the bits box at my FLGS and picked up a few Melta Guns to hack up. Cutting the clip and barrel off of the bolt pistol then cutting the barrel and side bit off of the melta gun and transplanting them onto the bolt pistol. First pistol post transplant. looks alright. should look better once it's painted up. 3 more to go. Transplants all done and the squad is now on bases along with my four odd girls from ebay. Just waiting for the glue to dry before gap filling with milliput and leaving it to set overnight. Got the squad primed and based in black. Even for this simple task i feel an airbrush was my single best hobby investment. Trying out something new with the airbrush for the cloth areas, aiming for black at the top blended into red at the bottom through a layer of dark brown. This is first test model, I kinda like the outcome but I want the red to pop more at the bottom. robofish7591 and Dosjetka 2 Back to top Link to comment Share on other sites More sharing options...
Sister Alessia Posted September 5, 2017 Share Posted September 5, 2017 Airbrush work is looking good! Link to comment Share on other sites More sharing options...
Drider Posted September 10, 2017 Author Share Posted September 10, 2017 This Weekend's progress. Just about finished all of the major stuff. Converted Inferno Pistols tucked in behind the Superior, just in case folk were wondering about how they're turning out. Dosjetka, WarriorFish and robofish7591 3 Back to top Link to comment Share on other sites More sharing options...
Bjorn Firewalker Posted September 11, 2017 Share Posted September 11, 2017 The models look good, but why are the Sisters so pale? Overexposure during photography? Ash ritually smeared on their faces? I hope it's not due to mutation or Genestealer implants. Link to comment Share on other sites More sharing options...
Drider Posted September 11, 2017 Author Share Posted September 11, 2017 (edited) It's just over exposure. To much light and a phone camera. I'll get a day light shot with the SLR when their done. Edited September 11, 2017 by Drider Link to comment Share on other sites More sharing options...
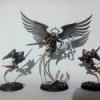
Drider Posted September 17, 2017 Author Share Posted September 17, 2017 As promised, a day light shot with the SLR. Started working on 4 lovely ladies with Storm Bolters. Just taking a wee break while waiting for the paint to dry. dracpanzer, WarriorFish, robofish7591 and 2 others 5 Back to top Link to comment Share on other sites More sharing options...
Bjorn Firewalker Posted September 17, 2017 Share Posted September 17, 2017 Excellent work. Are they fighting at a shipyard or a dock? Link to comment Share on other sites More sharing options...
Thousand Eyes Posted September 18, 2017 Share Posted September 18, 2017 Those are looking really well there, bravo. Fair play to you doing detailed airbrush work, I can never seem to manage that with mine. How do you handle cleaning up the gaps in the slotta bases? Link to comment Share on other sites More sharing options...
Drider Posted September 18, 2017 Author Share Posted September 18, 2017 Neither. They are posing for a photo shoot on my bedroom window. Gap filling is: Glue them in and fill it in with milliput. Link to comment Share on other sites More sharing options...
Servant of Dante Posted September 19, 2017 Share Posted September 19, 2017 Lovely seraphim :D Link to comment Share on other sites More sharing options...

Recommended Posts
Create an account or sign in to comment
You need to be a member in order to leave a comment
Create an account
Sign up for a new account in our community. It's easy!
Register a new accountSign in
Already have an account? Sign in here.
Sign In Now