Captain Caine 24th Posted January 10, 2017 Share Posted January 10, 2017 Yeah I'm going to have to edit this title. Over the years a lot of you have helped me in terms of creativity for new projects and in learning better ways to do things. I hope this WIP blog can help those that read it avoid the mistakes and pitfalls I made. I also hope this blog gets me motivated to paint this giant plastic heap of mine. Ok, we're looking at End Times Blood Angels for 40k. I want a mixed force of successor chapters that really looks like it's the last of all the Sons of Baal, back for one last party (I'm thinking like a shattered legions vibe). Don't know how to paint yellow, but we're getting it figured out. I've also got Alpha Legion, Imperial Guard, Inquisition, Assassins, Cult Mechanicus, and even a separate Militarum Tempestus to get working on. Let's do this. Link to comment Share on other sites More sharing options...
Captain Caine 24th Posted January 10, 2017 Author Share Posted January 10, 2017 Oh, I've been putting these guys off for far too long. Why am I building assault squads in 7th edition? Man, let's not start with that today. Ok, so Paint Stripping: So here are the assault marines. These were painted probably around 2000, and again in 2013, or so. They were Blood Angels, now they will be Flesh Tearers. The paint was stripped with LA's Totally Awesome. I find this works marginally better than Simple Green and Super Clean (purple). It was also very cheap at a local Dollar Store. Soaking for several days presented no issue. Super glue did appear to weaken at joints. I planned on cleaning up these models anyway, so it wasn't a problem. Totally awesome has worked for most all acrylic paints, but not for aerosol spray primers (which I expected). Magnetizing: 3mm x 1mm is a good fit for the jump pack and back torso section. I spun a razorblade/exacto knife to start a small circular hole, then used a 1/8 drill bit to drill out the hole. Be carefulGreen stuff (GS) is much easier to use than super glue--especially when getting magnet polarity to matchup. Green stuff avoids gluing your hands together, is easy to remove, and can be played with for a while to get the right fit. Also the torso section is empty, which can make it hard to seat the magnets. A flush fitting is very, very important. The jump pack with 3mm x 1mm does move around a bit, not sure if it'll be a huge problem. I have magnetized some death company like this in the past without issue. Ebay was a great resource for really cheap magnets. As far as lining up polarity, a lot of people use a marker. I just use a template of one correct model that all the other models are based off of. I dry fit every time. But again Green stuff avoids a lot of catastrophes. Well, time to figure out if I've gotten any better at painting over the years... Link to comment Share on other sites More sharing options...
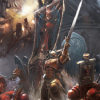
Captain Caine 24th Posted January 10, 2017 Author Share Posted January 10, 2017 Painting White: I was on YouTube and happened upon the Next Level Painting video on painting white death company (great video). I've been thinking about Angel's Encarmine death company for a long time. I figured I'd try it out. So the recipe calls for P3 colors; Heartfire, Menoth white base, Menoth white highlight (I also used Vallejo model air pure white). So, here we go 1) I started with a base of vallejo black primer; 2) thoroughly airbrushed the heartifre (essentially a deep yellow); 3) mix heartfire and menoth white base; 4) menoth white base; 5) mix of menoth white base and highlight. That's a lot of layers, but white is ordinarily difficult to airbrush. Definately keep a wet paper towel handy to wipe off the airbrush tip to prevent splatter (or a toothbrush). I'm not sure I like the choice of agrax earthshade as the pin wash, but I may play around with it. The gore effects: Haven't figured this out yet, but it is fun. Generally with mud effects and other technical paints used to splatter you can flick a paint brush off the end of a piece of plastic (or something flat) to get a controlled splatter effect. Generally you don't want to use your finger and a big dry brush as this might lack control. It's certainly easier to do too little than to try and correct over-doing it. This seems to be turning out ok so far, but not excellent. I'll keep trying. I also wonder if I even need the Citadel technical paint, or if I can just use Miniataire clear red... The other issue I couldn't figure out was what to do with the dreadnought claws. If they're covered in blood and gore I don't think a blue-hot power weapon effect is appropriate. I've just gone with boltgun metal. I'm not sure how i feel about it yet. Link to comment Share on other sites More sharing options...
abraxus Posted January 10, 2017 Share Posted January 10, 2017 Great title! switch out "Cainne's" for "Abraxus'" and it could be me, lol. I love the idea of doing all BA, but a mix of successors... keeps you from getting burnt out painting the same scheme over and over and over (and over.... repeat). Dread looks great! keep up the posting... I might be inspired to start my own ADhD thread in the future. Link to comment Share on other sites More sharing options...
Captain Caine 24th Posted January 22, 2017 Author Share Posted January 22, 2017 Thanks abraxus, at first I thought different colors for an army is a cardinal rule, under no circumstance to be broken. Then of course I realized I had black death company, golden sanguinary guard, red marines, and a white sanguinary priest... So here is the death company chaplain so far. There are some lamenters underway in the background. I didn't really need the chaplain, but it really is a great model. The challenge here was to practice a bit of wet blending and layering. After all these years I never put much work into it, so I'm trying to get better. The wings involved mixing progressively less black with Khorne red, then moving to mephiston red, and wild rider red. Often tutorials say to move from one paint to the next, and I'm sure that is what GW has designed. As I look at it now, it's not just moving to progressively lighter paints, but also mixing them from one to the next. (i.e. a seamless transition is using as many subtle layers as possible). There are 5 layers here, and definitely a huge improvement for me. Getting very precise edge highlights is still tricky but I'm going to keep working it. For now I've sealed the model with a gloss coat of Pledge to protect it. I did airbrush the jump pack. I saw a Next Level Painting video do that, and I'm liking it. I always used to do jump packs with a short of burnt metal look. The blue definitely adds color. Link to comment Share on other sites More sharing options...
Captain Caine 24th Posted January 22, 2017 Author Share Posted January 22, 2017 Basing. I certainly don't have it figured out, but I've come a long way and if you're starting out here are some tips. Basing for me started out as Goblin Green painted bases, with some flock maybe. I then did bases with superglue or pva glue, and sand with mixed sized rocks for a rubble effect. I then moved to using cork, plastruct (or Evergreen scale models) styrene i-beams. Styrene rod, sheet and tubes are also handy. For zone mortalis style, I've also purchased some 'diamond-plate' sheets from Greenstuff World (essentially a styriene sheet with stamped detail). Coated wire is nice for cables. Rivets can be stamped out of styrene to add detail for an industrial look as well. I like to add Pegasus Hobby scale model small bricks (do not buy red ones like me, buy the grey unless you plan to keep the bricks painted red) I've now moved on again and am using Vallejo grey pumice for basing. This is a miracle compared to gluing sand. Seriously there's no going back. To explain, it's a 200ml jar of textured paste which keeps a nice texture when dry. It isn't like a superglue or something very hard, but it's plenty sturdy for bases. There are different textures you can buy. I saw on YouTube some guys were using these pastes to cover entire display boards for tournament use. Just this weekend I picked up some "Amaco Wireform Contour Mesh" for steel grating on a number of projects I have going. There are a number of sizes, luckily I bought the right size. This stuff is very easy to bend and cut. I've already started on my next project: Belasarius Cawl. I've envisioned him on a destroyed steel catwalk. Secret Weapon Miniatures also makes some great extra fine brass etch mesh, but it's $15 for a tiny tiny sheet. I should note that I do use secret weapon for vehicle conversions (and it really is great), but for the same price you get several cubic feet of this contour mesh. So for basing and possibly a huge industrial terrain piece this stuff looks more and more like an exceptional find. I also finally found a place for that Scibor ruined statue basing kit. I've had it for years because it looks so awesome, but it never fits on my bases... now I need to figure out painting marble. Here's another tip, seal cork basing in a gloss coat before paint so it doesn't soak up much paint. Link to comment Share on other sites More sharing options...
deathspectersgt7 Posted January 22, 2017 Share Posted January 22, 2017 Some cool stuff here . Link to comment Share on other sites More sharing options...
Captain Caine 24th Posted February 5, 2017 Author Share Posted February 5, 2017 Thanks deathspectersgt7. Here's the latest bad idea. The last known imperial player to get an imperial knight. I was on eBay and found a M134 minigun for $14. I saw it a long time ago, but always felt like it'd be too much work to make it fit on anything. But, I finally ordered it just to see how it'd look. I love having more bits anyway. Somewhat surprisingly, it actually fits a knight well--the length of the barrel is the only real size issue. Most of the gun is fairly comparable to the stock Knight crusader. It could be glued in with minimal conversion. Alternatively, a while back, when knights first came out there was an excellent knight conversion with arms and a scratch-built gatling gun. That's a lot of work (and with the recent firing arc FAQ it might be trouble at a tourney). I suppose I could also just cut the minigun barrels down and I could make a renegade knight. I'm not sure what to do with this yet... I also ordered an ammo belt just to see how it might look. Anybody got any ideas on making arms? Link to comment Share on other sites More sharing options...
Captain Caine 24th Posted February 9, 2017 Author Share Posted February 9, 2017 Sons of Baal going for a ride! Home made transport case. There are a lot of good foam companies out there. I liked my Army transport case, and my KR Multicase. Quality. But, foam is expensive, and I find I have increasing numbers of non-standard sized miniatures. I've seen magnet cases work really well at tourneys for taking models in and out. YouTube has a few videos helpful videos (Dr. Faust's Painting Clinic in particular), search terms: warhammer 40k make transport case.And here we go... Sterilite Industrial bin (box, tub, whatever) 15 Gal 25 3/4 x 17 1/4 x 11 7/8 ~ $10 I got black, which was more expensive, but I don't really advertise my hobby. The height was the most important feature. Drop pods are about 6 1/4" tall. That's my baseline. I plan to keep my new imperial knight in two pieces for transport so that height isn't an issue. What I want is to store drop pods, and make a shelf for troops above them (with about 4" of clearance). I should note the 19 gal version of this tub is somehow less expensive and only slightly larger--but it makes a difference. I suspect the 19 gal would allow you to build a shelf and stack two full layers of drop pod sized models, instead of just a drop pod layer and a troop layer. The plan was for bottom shelf out of steel and 1/8" medium density fiber board ("mdf"). I then wanted handles on that shelf, and some kind of support that would hold up a top shelf roughly 6 1/2" high inside the tub to fit those drop pods in. I chose steel, or galvanized steel as I didn't think magnetic sheets would really hold my models. (another, much simpler way to do this is to just use a covered baking pan--no need to cut steel or mdf board...) Magnetic sheets 8 x 11" are much easier to cut and less dangerous. Magnetic sheets come in different thicknesses, of which I think 3mm is the one you want--thicker has more holding power. But, Magnetic sheets can be expensive, and I worried they really wouldn't hold like I wanted them to. Though, cheap magnetic sheets may be available from China, not sure. Steel sheet (plate) 12 x18" ~ $6 and a 12 x 24" ~ $10 you can do "22 gauge" steel, but try to get 26 or 28 gauge--this is thinner and therefore much easier to cut. 1/8" 48 x 96" Mdf board was ~$10 To support the shelf I just bought some poplar 1/2 square dowels and some screws. This is very easy to cut, and use, but I haven't figured out what I want to do yet. I mean it's fully functional right now, but I think my vision was to have a removable bottom shelf, below a removable top shelf. That is to say there is a more elegant solution for a support structure, but I'm still working it out. ~ $1.5 Also I found some nice drawer handles for $4 Tin snips were $13 (cutting metal is dangerous, watch some YouTube videos if you don't know what proper safety gear you need). you can get right/left/straight snips--when you cut there will be the piece you keep and the excess scrap, the side of the snips here refers to where the excess goes, thus you want a right or a left to cut a long section as straight doesn't leave room for the scrap Hidden costs: tools. You'll need a circular/table saw ($50), a drill ($30), and a drill bit for metal. Borrow or rent tools if you don't have them. After the metal is cut sharp edges should be taken care of to avoid injury I grinded the edges to remove burrs and also cut the steel so it was recessed back from the edge of the mdf. It's still a WIP and I think I can keep improving the design. I'm even wondering if I could paint this thing like a landing pad or something--essentially having it double as a display board. I should note the top shelf is a really good fit for an army (not a horde) and I think I could carry an army around a tourney on it. A newly painted gabriel seth and his Lamenter buddy are the magnet test subjects. Link to comment Share on other sites More sharing options...
Captain Caine 24th Posted February 9, 2017 Author Share Posted February 9, 2017 I'm backing up a bit to update on my lamenters progress. This has been an ongoing mess for a few months now. I figured I'd give Shapeways a try for some shoulder pads. They're expensive, but being honest, free hand painting these shoulder pads just isn't going to happen. Layering yellow with the airbrush was not as difficult as I thought, but I still didn't get the proper lamenters yellow. I did a base of averland sunset, layered with Yriel yellow and Flash Gitz yellow. In between each layer I did a layer of two colors mixed. Averland had great coverage I then experimented with Lamenters yellow glaze. And minitaire ghost tint yellow. I find that touching up mistakes on layered paint schemes is a lot easier than when dealing with glazes. Let me put it this way, the glazes really make a great imperial fist, but lamenters I'm not so sure of. I've painted up 10, but I'm still not sure where I'm going. Definitely still in progress. Unsolicited non-pro painter tip of the day: always write down your mixes, proportions, and attempts to paint. If you're like me and try to do to many things at once, it could be months before you go back... Link to comment Share on other sites More sharing options...


Recommended Posts
Archived
This topic is now archived and is closed to further replies.