Arvendragon Posted February 10, 2017 Share Posted February 10, 2017 I'm considering running an Allied Detachment of Kataphrons for that access to Grav weaponry. What alternative models are there for counts-as? Do you think people would judge if they're not on tank tracks? Link to comment Share on other sites More sharing options...
MajorNese Posted February 10, 2017 Share Posted February 10, 2017 Do you think people would judge if they're not on tank tracks? Considering the fluff side of techpriests converting anything and anyone to fit their purposes, no one would judge, as long as the weapons fit, and it's on the same base (60mm). Wargame Exclusive has some alternative models for kataphron, except for that some worse-armoured centurions could do. It's a 4+ armour at all, not that impressive. Shinespider 1 Back to top Link to comment Share on other sites More sharing options...
BassWave Posted February 10, 2017 Share Posted February 10, 2017 I used khador man-o-war legs from warmachine. You can find the bits on ebay for a decent price. Link to comment Share on other sites More sharing options...
Carlson793 Posted February 11, 2017 Share Posted February 11, 2017 Until they are 40K viable, I'm using my Mechanicum Myrmidons as Kataphron Breachers Vel'Cona, Cithaeron and Akrim 3 Back to top Link to comment Share on other sites More sharing options...
Subtle Discord Posted February 11, 2017 Share Posted February 11, 2017 Based on several questions I've seen for something like this, one of my many plans for a studio kit is to create a small walker chassis at roughly Kataphron and/or Rapier Platform scale. But, I have no idea when I'll actually be able to get around to doing them. My list of build ideas is getting quite extensive; good for having a pool of things to choose from, bad for choosing where to start. :) My plan is to do a type of hybrid kit that can both stand on its own, and be a conversion kit for the Kataphron model. Done right, I should be able to design it so the upper portion the model can accept the central body and chassis of the Kataphron model, or it can use my own weapon system designed to fit in the same position. Modular, it's a good thing! I'll be aiming to keep the footprint and height very similar to the Kataphron and Rapier models so they can fit right in scale-wise. Just 9 weeks until my these is finally done, followed by a bit of hobby sabbatical to decompress, and then the studio starts full-time. With Mechanicus becoming a major muse for me lately, expect to see some kits suited to the faction appearing sooner, rather then later. Carlson793 and Reyner 2 Back to top Link to comment Share on other sites More sharing options...
Arvendragon Posted February 13, 2017 Author Share Posted February 13, 2017 Actually, the Rapier Platforms are a great idea - I might incorporate those! Link to comment Share on other sites More sharing options...
Kilofix Posted February 13, 2017 Share Posted February 13, 2017 Hi Tech Minis? http://hitechminiatures.com/8-bio-tech-covenant?id_category=8&n=49 Link to comment Share on other sites More sharing options...
dramagod2 Posted February 16, 2017 Share Posted February 16, 2017 War games exclusive has some really interesting alternate models for mechanicus. While some of them are very sexual, the kataphrm alternates are really good looking and feature legs to boot. Check them out https://wargameexclusive.com/product-category/mechanic-adepts/ Link to comment Share on other sites More sharing options...
Trokair Posted February 19, 2017 Share Posted February 19, 2017 (edited) Pictures of what I did for my Dwarf Mechanicus (in spoiler due to size), still on tracks, but more like Rapier and other self propelling guns. The other option I have considered is Ogryn / Bullgryn, (actually for Obliterator converstion but simmialr princable should aply here). Use Bullgryn bodies, Ogryn gun arms and convert in/on the Grave gun/barrel. Give them some form of mech backpack (Skitarri ones are probably a bit small, but some of the Electro priest ones could work, or the actual Kataphrons ones) and some other mech addons/bits and you should be fine. A bit taller and less bulky on a 60mm base but add some debris and should be fine. Edited February 19, 2017 by Trokair Cactus, Battybattybats, infyrana and 1 other 4 Back to top Link to comment Share on other sites More sharing options...
Vel'Cona Posted February 21, 2017 Share Posted February 21, 2017 That's a pretty rad conversion! The cunning combination of various Kataphron bits and some splashes of dwarf bits really adds a lot of character to the proceedings. Nice work! :) Link to comment Share on other sites More sharing options...
Deadly Kafeine Posted March 22, 2017 Share Posted March 22, 2017 For my part, I just made some legs for my destroyers (for the breachers I will keep the tracks). Just waiting for them to be printed to test-fit them on the servitor torso. Some details to be added, it's mainly for proof of concept and to check the encumbrance of it all. http://yenlowang.free.fr/40k/AdMech/Kataphron_Pieces_1.png http://yenlowang.free.fr/40k/AdMech/Kataphron_Pieces_2.png http://yenlowang.free.fr/40k/AdMech/Kataphron_concept.png zewl, apologist, Dr_Ruminahui and 7 others 10 Back to top Link to comment Share on other sites More sharing options...
Magos Takatus Posted March 22, 2017 Share Posted March 22, 2017 Yes! Micro Onagers would be a fantastic idea! :) Those will really stand out when you make the finished version. I'll be nice to see your test pieces too. Link to comment Share on other sites More sharing options...
MithrilForge Posted March 24, 2017 Share Posted March 24, 2017 I was of the idea to use ranger bodies and the removed cowl heads holding a omnispex type thingy? linked to a track and weapon system from "Anvil Industires" kinda like a manned rapier system. (only cause its like 1/4 of the price to make a squad of three than it is to buy GW's awesome looking models) and stick it on a size legal base... will post pics when i get one done. Cheers Mithril Link to comment Share on other sites More sharing options...
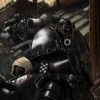
Deadly Kafeine Posted April 5, 2017 Share Posted April 5, 2017 Just recieved the prototype, the size is good, the collar for the servitor torso is not deep enough of 1mm or so, but the legs do fit in the base and can have some variety of posing. The leg shields are a bit too coarse, I'll revamp them a bit. Next step is to make several legs positions to allow variety. Not a fully poseable set, but 3 or 4 variants. http://yenlowang.free.fr/40k/AdMech/Kataphron_prototype_01.jpg MithrilForge, Trokair, Dr_Ruminahui and 6 others 9 Back to top Link to comment Share on other sites More sharing options...
Magos Takatus Posted April 5, 2017 Share Posted April 5, 2017 They are looking just fine. It's odd seeing the translucent parts but those Kataphrons will look awesome. Xisor 1 Back to top Link to comment Share on other sites More sharing options...
Battybattybats Posted April 6, 2017 Share Posted April 6, 2017 How do the secondary weapon arms fit? Do they conflict with the legs at all? Link to comment Share on other sites More sharing options...
Deadly Kafeine Posted April 6, 2017 Share Posted April 6, 2017 Shapeways acrylic is a pain to take picts of. I recieved them yesterday and I just washed the parts before dry fitting them. I shall have some time to basecoat them and the visibility will be better :). And build a breacher to put them side by side. The secondary weapons seem to fit, I'll post a picture of this when I glue the model. Now all I need is some time to make it mouldable, because direct print is still too expensive for a whole unit. Link to comment Share on other sites More sharing options...
MajorNese Posted April 6, 2017 Share Posted April 6, 2017 Those legs look great, I'd like to add that to my AdMech if possible. To make it mouldable, guess the leg hydraulics could be done in singles (like the onager ones) instead of double, would make it easier. Having no gaps between the upper armour and the legs would make it really easy to cast, at least with my method. Link to comment Share on other sites More sharing options...
Vel'Cona Posted April 7, 2017 Share Posted April 7, 2017 Man, those are some detailed sculpts for aftermarket parts! I wonder how easy that material is to work with . . . ? Link to comment Share on other sites More sharing options...
Subtle Discord Posted April 7, 2017 Share Posted April 7, 2017 (edited) Polyjet is a mixed bag to work with. I makes amazingly detailed parts with reasonably good surface quality, but it comes with the need for some labour if you want the parts to look really seamless. The process that's used tends to make some of the surfaces somewhat 'sandy' and porous, so they can be tricky to make moulds of and paint for good results, without the aforementioned labour. If you have it on hand, I highly recommend using some small folds and rolls of sandpaper and use them as tools to give ALL of the surfaces a light sanding to refine the surface. You may not be happy with how rough some of the surfaces are, otherwise. You may even want to consider a automotive scratch filler + primer product for the first coat; it will soak into the porous nature of that kind of Polyjet print and help to further refine the surface further; with it you can also check the surfaces, and if they are not good enough you can sand the product to get wonderfully smooth results. One more coat after that and all but the most stubborn flaws will be gone. I've been working on some Polyjet parts for my thesis model the last few days and really like the results I've got with the filler + primer. lots of work, but really clean with the effort. Also note that those parts will be rather brittle, so keep that in mind. They are robust enough that they're not at too much of a risk for breaking, but they will not take well to flexing or bending in any way. P.S. Stop reading my mind please. Your design is almost scary in how close it is to what I have in mind. Edited April 7, 2017 by Subtle Discord Vel'Cona 1 Back to top Link to comment Share on other sites More sharing options...
Deadly Kafeine Posted April 7, 2017 Share Posted April 7, 2017 (edited) Well, this prototype was for test-fitting only. The main issue I find with these Acrylic prints is, as you say the porous nature of the material. Also, this combined with the support wax used forces to thorougly clean the part to wash the wax and oil residue. And this combined with the porosity makes the piece "ooze" some wax if not cleaned. For small parts (I use this material a lot for my BFG ordnance) it's not a problem, but with big parts like this it can be really soaked with this greasy residue and requires some work, as you say. But, if going to the casting path, these acrylics need to be "smoothed" by a primer, because with its porosity the rubber will "mix" with the surface and properly ruin the mold (and the master in the same process). But this way you can easily ruin some tiny details. Another way is to make a real proper master with a dedicated printer which gives decent surface quality and details. And what can I do about great minds converging on similar and elegant solutions to a given issue . Edited April 7, 2017 by Deadly Kafeine Helomedic1171 1 Back to top Link to comment Share on other sites More sharing options...
twopounder Posted April 7, 2017 Share Posted April 7, 2017 I may use these: http://anvilindustry.co.uk/AFTERLIFE/Unity-Council/Ajax-Exo-Mechs I plan on designing some 3d printable weapons to match. Link to comment Share on other sites More sharing options...
Subtle Discord Posted April 7, 2017 Share Posted April 7, 2017 The best solution I've found to quickly dealing with the waxy/oily residue on Polyjet parts is a scrub (a toothbrush works perfectly) and rinse with isopropyl alcohol. It dries your fingers/hands out along with the process, but it works very well. It also evaporates very quickly so parts are ready right away, for whatever the next step of the process will be. walter h 1 Back to top Link to comment Share on other sites More sharing options...
CommodusXIII Posted April 11, 2017 Share Posted April 11, 2017 I've been kicking around plans for clockwork Kataphrons based on Stormcast bodies, but it's still pretty far down my to-do list. Vel'Cona and MithrilForge 2 Back to top Link to comment Share on other sites More sharing options...
Vel'Cona Posted April 12, 2017 Share Posted April 12, 2017 That sounds awesome, CommodusXIII. Maybe with a blend of the upcoming Karadron minis/bits? Link to comment Share on other sites More sharing options...


Recommended Posts
Create an account or sign in to comment
You need to be a member in order to leave a comment
Create an account
Sign up for a new account in our community. It's easy!
Register a new accountSign in
Already have an account? Sign in here.
Sign In Now