SWORD BROTHER RYAN Posted July 29, 2017 Author Share Posted July 29, 2017 So, if it's Centurions, do I make the Devastator pattern, Assault pattern, or attempt to magnatize the weaopns to have both? Othniel's Blade 1 Back to top Link to comment Share on other sites More sharing options...
SWORD BROTHER RYAN Posted August 3, 2017 Author Share Posted August 3, 2017 GRIMALDUS IS DONE!!! I am happy to have that project completed FINALLY! I'll get some pics up tonight, but I stayed pretty close to the color scheme that is seen on the GW site with some additional twists of my own. I have decided that it's now time to get some of my backlog painting done before I begin a new build. I have the Stormtalon Gunship to wrap up, a set of Sword Brethren to get painted, the other 5 Initiates that are supposed to be with my ATD SQD, 2 gun-bunny servitors with Heavy Bolters that came with my Techmarine with the harness, and a 2nd lased-out Predator that hasn't even been primer coated yet. I have decided to go ahead and do the new CDR and the CMD SQD set once my backlog is done because I already have the Standard built and really want to go to town on a freehand crusade banner. I'm still kicking around ideas about what it should look like, but I have time to decide before I even get started on that. Much to do! Othniel's Blade 1 Back to top Link to comment Share on other sites More sharing options...
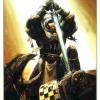
SWORD BROTHER RYAN Posted August 4, 2017 Author Share Posted August 4, 2017 A little later than I'd hoped, but here is my completed Grimaldus and Retinue! Once again, sorry for the pict size, but this is the best that I can currently do. Marshal_Roujakis, Othniel's Blade, Bjorn Firewalker and 2 others 5 Back to top Link to comment Share on other sites More sharing options...
SWORD BROTHER RYAN Posted August 30, 2017 Author Share Posted August 30, 2017 So, I have decided to go ahead with the Devastator pattern for my Centurions and enter them alongside my LRC in the Knightfall 2017 Challenge. I know that's kind of outside of our usual CC geared dogma, but hey, I won't have to use GS to true scale them (or better scale, whatever your view is) Firepower 1 Back to top Link to comment Share on other sites More sharing options...
SWORD BROTHER RYAN Posted October 1, 2017 Author Share Posted October 1, 2017 I have the LRC finished up! Turned out better than I expected. Now, on to the next part of my vow... Marshal Mattias, Othniel's Blade, The Spanish Inquisitor and 1 other 4 Back to top Link to comment Share on other sites More sharing options...
Bjorn Firewalker Posted October 1, 2017 Share Posted October 1, 2017 Good job on the Land Raider. Is the bank of monitors inside, meant to display images the Templars' helmet-mounted cameras capture, like the bank of monitors in the APC in 'Aliens'? Link to comment Share on other sites More sharing options...
SWORD BROTHER RYAN Posted October 1, 2017 Author Share Posted October 1, 2017 I never thought about that... not a bad idea. I'll have to work that into some narrative sometime. Link to comment Share on other sites More sharing options...
Hawklynn Posted October 2, 2017 Share Posted October 2, 2017 Loving all of this. There is a lot of great inspiration in your modeling. Which tutorials did you use for the marble technique? Link to comment Share on other sites More sharing options...
SWORD BROTHER RYAN Posted October 3, 2017 Author Share Posted October 3, 2017 (edited) For the overall technique, I relied heavily on both the Warhammer TV instructional video as well as another video I found for painting the base of the Arch Heretic Horus. After that, I searched the web for images of marble columns and other associated marble sculptures until I found a representation of the effect I liked. After that, I painted through the whole column (talking about the one in the Grimaldus Retinue here) in shades of grey lightening up through Pallid Wych Flesh. Once that was fully dried, I washed it over with Agrax Earthshade, then brought it back up to the Pallid Wych Flesh colour, leaving the underside of detail dark. I very lightly traced the line effect on with a pencil, then very carefully used a VERY diluted Dawnstone and glaze medium, like 1:2 ratio mix with Lahmium Medium or equivalent, and a very fine brush. It takes a while to dry, but after it is, go back over the line junctions with a small dab of the same mix to darken those areas up a bit more. Then one more darkening with Stormvermin Fur in the extreme junctions mixed the same way. Once dry, I used a gloss varnish on the portions of the column that were not broken, and a Lahmium Medium coat on the broken areas to keep them more of a dull white. It took a bit of practice, but the good thing about the glazed down mix is that if a mistake is made, you can quickly and easily wipe it off with a paper towel and start again. Keep the pencil lines thin and light and you will never see them again once the paint is applied. You can play around with the marble colour all you like, but I'd most definitely research real world images for inspiration. Hope that's a good enough explanation for you. Not really good at writing tutorials yet. Edited October 3, 2017 by SWORD BROTHER RYAN Hawklynn 1 Back to top Link to comment Share on other sites More sharing options...
Hawklynn Posted October 3, 2017 Share Posted October 3, 2017 Right now I am using a white primer that is not grainy. The name is Fine Surface Primer and it is available at Hobby Lobby. Link to comment Share on other sites More sharing options...
SWORD BROTHER RYAN Posted October 4, 2017 Author Share Posted October 4, 2017 I'm impressed with the finish. I'll have to try it out sometime. Link to comment Share on other sites More sharing options...
SWORD BROTHER RYAN Posted October 4, 2017 Author Share Posted October 4, 2017 (edited) edit- removed self-pitying comment. Onward with the Centurions! Edited October 4, 2017 by SWORD BROTHER RYAN Link to comment Share on other sites More sharing options...
SWORD BROTHER RYAN Posted October 4, 2017 Author Share Posted October 4, 2017 Psykic_scribe and Hawklynn 2 Back to top Link to comment Share on other sites More sharing options...
SWORD BROTHER RYAN Posted October 4, 2017 Author Share Posted October 4, 2017 I just learned how to post a larger pic! Oh, what fun! Hawklynn 1 Back to top Link to comment Share on other sites More sharing options...
SWORD BROTHER RYAN Posted October 12, 2017 Author Share Posted October 12, 2017 This may ne the last time I do Centurions... at least for a LONG time. I'm so far behind where I want to be ATM, but I've finished the basic resacle build. Just gotta Templar it up a bit, then on to paint...FINALLY! Link to comment Share on other sites More sharing options...
Bjorn Firewalker Posted October 13, 2017 Share Posted October 13, 2017 Good job on the Land Raider Crusader, Grimaldus and his retinue. Link to comment Share on other sites More sharing options...
SWORD BROTHER RYAN Posted October 26, 2017 Author Share Posted October 26, 2017 Yeah, the larger pics definitely lend to a better viewing of my work. Thank you for the kind words, although I am late to reply. I've spent almost every free moment since my last posting working on these Devastator Centurions, and well... these turds are as polished as I want to make them. I've had builds that were frustrating before, don't get me wrong, but this kit has been a nightmare for me. But, I'm happy to say that the battle with them is nearly done. All I have to do is finish off the bases and I'm calling them done... for a while at least. I may come back to them one day and redo some aspects of them, but I've reached my limit, and time is running out for Knightfall as well. I'll have pics up either tonight or early tomorrow. Once these are complete, I think I'm done with painting challenges for the rest of this year, at least. That is NOT to say that I am done painting, by any means. I think I just want to get back to painting for the fun of it is all. It's relaxing, and not having a time table to contend with allows me to take as long as I want to put my best work forward. I have a Sword Bretheren Squad to do up, a new Marshal model, a "Company Ancient" (I think that's what it is these days), 10 Assault Terminators, and 5 Initiates to get done that are all in various stages of assembly, and recently picked up a Redemptor Dreadnought (yes, Timmy got a new shiny!), another Apothecary and 2-3 more Initiates or a Company Champion from the Command Squad set to make (haven't really decided yet which way to go on all of them). The challenges are a great way to work through backlogs of models, but I miss just painting for the fun of it. Also, IRLO have been pushed to the side for far too long as I push through to not fail in my vows before my brothers here. It's time I got back to IRL a bit more. Anyways, my gripes are done. I'll still be posting new work, just at my own pace. Thank you all once again for your kind words of encouragement and CC. Link to comment Share on other sites More sharing options...
Marshal Wolfhart Posted October 27, 2017 Share Posted October 27, 2017 Pressure when painting is a horrible thing indeed. If you can't get POSITIVE motivation from the challenges you might better leave them be for a litte, however, taking a vow failed pic to the signature might be better than having yourself pushed from the hobby table (or IRL things that are rumored to be more important than plastic soldiers anyway ;) ). Sometimes we gotta lose a battle to win the war ;) Stemming from the Knightfall thread, at least it seems those models were worth the hastle, looking good! Link to comment Share on other sites More sharing options...
SWORD BROTHER RYAN Posted October 28, 2017 Author Share Posted October 28, 2017 (edited) So, here they are, after all of my griping about them. 3 Devastator Centurions to ride into Knightfall in the LRC I finished last month. This is my first attempt at using GS molded bits. C&C welcome. I thought I had the larger pic thing figured out, but I can't recreate it now. I have no idea why, but this pic is the best I can do. Edited November 1, 2017 by SWORD BROTHER RYAN Link to comment Share on other sites More sharing options...
Hawklynn Posted October 28, 2017 Share Posted October 28, 2017 Really nice work. I can see why you have been griping. I think I might have to get me some of these. Link to comment Share on other sites More sharing options...
SWORD BROTHER RYAN Posted October 28, 2017 Author Share Posted October 28, 2017 (edited) Be aware that it's a pain, but if you really are considering Centurions, I highly recommend checking this tutorial out: http://masteroftheforge.com/centurion-tutorial/ I followed it MOSTLY, but I also figured out some different ways to accomplish a more solid build: -Rather than using the GS that he recommends for the neck hydraulics, just skip that altogether. It doesn't seem to make that much of a difference -Skip using GS on the leg armor. File/scrape the interior ridge until it fits with the leg extensions, and just use copious amounts of glue to affix. (you can still use GS if you like, but I still recommend scraping at that ridge. It helps to make it lay flatter and aligns better with the top leg armor) -When you cut the bottom nub off of the feet, keep the pieces. Carefully cut the ball joint off and file a flat spot on the top of it. Also, file the bottom of the leg extension flat. Then glue the ball joint to the bottom of the leg. It helps ensure that the feet attach better and as they should. -Keep the small cylinders that you cut off of the shoulder/neck hydraulics. When you attach the leg hydraulics, the bottoms will not meet up to the leg extensions. File/scrape these small cylinders to fit the gap, and push them in. You shouldn't have any problem getting them glued in. -Definitely use a small ball of GS to raise the head up a bit. It's harder to see/paint otherwise. If you're planning on doing the Assault variant, make a press mold of the back part of the siege drills so you can maintain the same look on the bottom of the legs. I was thinking also that MAYBE the grav cannon bits may work, but I'll leave that up to you. Have fun with them, either way. EDIT: As an update, I'm finally back on to painting up my 5 Sword Brethren. This is my 3rd return to them. I'll actually get them done this time! Edited October 28, 2017 by SWORD BROTHER RYAN Link to comment Share on other sites More sharing options...
SWORD BROTHER RYAN Posted November 7, 2017 Author Share Posted November 7, 2017 Sword Brethren are nearing completion. I'm finding it to be an exorcise in patience, but at least I can just get into the painting and not worry about a timetable... That being said, I keep looking over at the Imperial Fists Expansion forum and grinding my teeth at not having signed up for it... I'm not sure I can contain my zeal and NOT JOIN! I have a few kits I can put together for this, and I know that I can get it done... I'll probably throw a unit (or 2, or a few) at that Challenge when I wrap up my SB. So much for staying out of Challenges! Link to comment Share on other sites More sharing options...
Marshal Wolfhart Posted November 7, 2017 Share Posted November 7, 2017 (edited) Why not enter with a small and manageable character or small unit? There's always more vows to be taken once the zeal reignites Edited November 7, 2017 by Marshal Wolfhart Link to comment Share on other sites More sharing options...
SWORD BROTHER RYAN Posted November 7, 2017 Author Share Posted November 7, 2017 Apparently, my ZEAL knows no bounds... especially self induced ones! I may have to temper it a bit, but I'll decide once this batch I'm working on is done. Link to comment Share on other sites More sharing options...
SWORD BROTHER RYAN Posted November 12, 2017 Author Share Posted November 12, 2017 Does anyone know if Scouts Neophytes still use the 25mm base, or did they change to the 32mm also? I'm trying to order expansion rings, and need to know how many to get. Link to comment Share on other sites More sharing options...

Recommended Posts
Create an account or sign in to comment
You need to be a member in order to leave a comment
Create an account
Sign up for a new account in our community. It's easy!
Register a new accountSign in
Already have an account? Sign in here.
Sign In Now