Dantay VI Posted November 27, 2017 Share Posted November 27, 2017 Yes it is.... :( Sounds like you are all prepped and ready to go. Which great company are you thinking of going for? Also pack markings. Yellow & red for the blood, swift, sky claws Red & black for Grey Hunters Yellow & black for Wolf Guard White & black for Long Fangs Link to comment Share on other sites More sharing options...
TiguriusX Posted November 27, 2017 Author Share Posted November 27, 2017 (edited) Yes it is.... Sounds like you are all prepped and ready to go. Which great company are you thinking of going for? Also pack markings. Yellow & red for the blood, swift, sky claws Red & black for Grey Hunters Yellow & black for Wolf Guard White & black for Long Fangs I am still undecided on Great Company but I have an idea that is nearly complete. I have started calling my force the Ghost Wolves based on how the armor looks. We are a lost company that has returned for the Wolf Time. Our wolf lord died in battle and we have decided to reinforce the Great Wolf and return home. My current army draft has Bjorn, 2 axe/shield dreads, an iron priest and Njal (we hang out with all the Great Wolf's best toys). No current wolf lord but we have 2 prominent WGBLs. Need ideas and color for pack markings though. I fear Logan might be killed off in the new Codex so I am hesitant to commit right now Edited November 27, 2017 by TiguriusX Link to comment Share on other sites More sharing options...
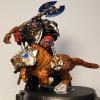
TiguriusX Posted November 27, 2017 Author Share Posted November 27, 2017 (edited) I was productive this morning and cleared my personal check list of chores (I even put up all the Xmas lights). That left me plenty of time Sunday evening for painting. I took all the advice to heart and got better details brushes. They made a HUGE difference. I put them next to the brushes I had been using previously Detail work was the goal tonight. Too many heads...all that flesh and eye detail work scared me. I decided to tackle it head on. The heads look fine from a distance but make me laugh under the magnifying glass. My wife reminded me nobody will be looking that close. I was tempted to leave them as creepy white eyes only but eventually I did put pupils in. This is the worst looking guy I have. His eyes are offline. Will try and correct him another night. Hair is on my to do list next. Good old Tron is looking decent if I say so myself. If I show up at a tournament like this I think it qualifies now right? Edited November 27, 2017 by TiguriusX Link to comment Share on other sites More sharing options...
TiguriusX Posted November 28, 2017 Author Share Posted November 28, 2017 Found a "deal" on ebay for goblin wolves. Got 5 for $5 When they arrived I noticed the tails were missing. No problem...I need to learn green stuff anyways. Here we go! Things I learned from this... Water OMG that stuff is beyond sticky. Thanks for warning me in advance. I can't put fur or sculpt b/c it is too soft. I collapsed the shape when I tried. I guess I need to let it cure for a while first Speaking of curing it is "drooping" and changing position. Had to prop it on something. Will check on it in every hour or so and see if I can start putting fur texture PeteySödes 1 Back to top Link to comment Share on other sites More sharing options...
PeteySödes Posted November 28, 2017 Share Posted November 28, 2017 Sometimes I'll use a pin or floral wire and build around a structure if i'm worried it'll droop. For fur on that thing do it in 2 or more stages, get the basic shape and let it cure, then do a layer of fur over it. If you need to cut down the first bit its np but i think its easiest to do fur when its soft. If you try to do it all at once your in for hurt. :D TiguriusX 1 Back to top Link to comment Share on other sites More sharing options...
TiguriusX Posted November 28, 2017 Author Share Posted November 28, 2017 I'm a total green stuff noob. The idea of doing it stages never even occurred to me. That is a great idea This batch will be the basic shape. Next batch a layer on top with texture (i can press one of the wolf bodies into it to get the same fur texture) Link to comment Share on other sites More sharing options...
PeteySödes Posted November 28, 2017 Share Posted November 28, 2017 I think honestly most people starting out don't think of it either and get frustrated. I'm still guilty of sometimes over extending on a layer and sticking a thumb in something i spent a while on haha. The other tip i have would be to seek out some silicon tipped color shapers, they are easily my favorite sculpting tools. Keep it up brother it's going to turn out awesome! Link to comment Share on other sites More sharing options...
TiguriusX Posted November 29, 2017 Author Share Posted November 29, 2017 (edited) Another green stuff morning using tips/advice from yesterday This is the best press I got after multiple attempts. I got sick of flattening it and watering everything and trying. Good enough... This is the cyber wolf assembly line These tails are lazier...just rolled pressed and flattened them a bit On the positive side I used 100% of the green stuff I mixed today. Woo hoo! Edited November 29, 2017 by TiguriusX PeteySödes 1 Back to top Link to comment Share on other sites More sharing options...
TiguriusX Posted December 3, 2017 Author Share Posted December 3, 2017 (edited) Has anyone done shoulder pads using something like this? https://www.shapeways.com/product/KJ2ZCB7A4/60x-wolf-rampant-shoulder-insignia-pack?optionId=63042709&li=marketplace Lets me do the Great Wolf Company (regardless of who is alive as the great wolf) and paint the proper black shoulder and white insignia If it works I think it beats my current idea of white shoulder pad and black decal I'm just not sure how well these icons will plop onto the shoulder pads (I assume they are actually made for this purpose but I think too much) Oh and your humor for the night...this was me practicing free hand following a step by step guide (start with S then V for head) Ya...I'm not artistic at all Edited December 3, 2017 by TiguriusX Link to comment Share on other sites More sharing options...
Dantay VI Posted December 3, 2017 Share Posted December 3, 2017 Carlsson793 did a decal sheet here on BnC for the great wolfs company I think Carlsson did most of the great companies. http://www.bolterandchainsword.com/files/file/458-space-wolves-logan-grimnars-great-wolf/ Depending on printer, for a laser jet some decal paper for ink-jet you need decal paper some decal sealant (microscale industries, who also do micro sol and microset, thereare other companies who do the same stuff) and you should be good to go. Failing that, paint the pad grey, apply the transfer and then paint over it with white. Fill the rest of the pad in with black when done. Like colouring in, and trying not to go over the lines :D FW also did a decal sheet with som of the great wolf symbols (covered most is not all great companies. was awesome for when I wanted to do some Wolves from Bran Redmaws company Link to comment Share on other sites More sharing options...
RikuEru Posted December 8, 2017 Share Posted December 8, 2017 Has anyone done shoulder pads using something like this? https://www.shapeways.com/product/KJ2ZCB7A4/60x-wolf-rampant-shoulder-insignia-pack?optionId=63042709&li=marketplace Lets me do the Great Wolf Company (regardless of who is alive as the great wolf) and paint the proper black shoulder and white insignia [/img] I bought some of the regular wolf head emblems a little while ago for my Primaris Space Wolves. They are amazing! They fit perfectly, sit into the right place by their own curvature, have the right thickness, don't need much filing. TiguriusX 1 Back to top Link to comment Share on other sites More sharing options...
TiguriusX Posted December 9, 2017 Author Share Posted December 9, 2017 Has anyone done shoulder pads using something like this? https://www.shapeways.com/product/KJ2ZCB7A4/60x-wolf-rampant-shoulder-insignia-pack?optionId=63042709&li=marketplace Lets me do the Great Wolf Company (regardless of who is alive as the great wolf) and paint the proper black shoulder and white insignia [/img] I bought some of the regular wolf head emblems a little while ago for my Primaris Space Wolves. They are amazing! They fit perfectly, sit into the right place by their own curvature, have the right thickness, don't need much filing. Thanks for the feedback. The idea kept growing on me and I think you pushed me over the fence. I'll pick some up :) I also brushed up on my lore and learned the Great Wolf company marking does not change if there is a change in leadership. So no curveballs in the lore to worry about. I can fit my guys in the timeline as I develop a backstory Link to comment Share on other sites More sharing options...
TiguriusX Posted December 23, 2017 Author Share Posted December 23, 2017 (edited) Been a while since I posted. Let me see if I can remember what I was up to. I spent a ton of time on heads and details. It was discouraging but I made progress eventually. Remember my Chunk looking guy from before? I did some repair work and he looks like this now Had lots of eye fails along the way After repairs Mr. hoot hoot was more acceptable Eventually I learned the secret to detail painting. WET PALETTE. Once I started using a wet palette (soaked paper towel under parchment paper) my fine detail painting improved greatly. Was able to manage a glowing eye effect as requested by my son (he wanted blue eyes and blue hair) I also spent some time on my greenstuff. I am horrible at it but proud of this chain sword repair. Got a bunch of dental torture tools and they didn't help my lack of skill much either. I was trying to add texture to the wolf tails with a 2nd layer of GS but ended up ripping the tails off the model (too much pressing I guess). Made a new batch of tails shorter this time. I like the new tails better so no harm no foul (except bubble butt guy....I didn't blend him well) Old tails first...new tails second I also finally settled on color schemes and found a way to improve speed in my process. Colored spray! Added uniform grey (army painter equivalent for my dawnstone) and white. Gave the wolf pack a sampling of each I really like the white snow looking wolf at this stage. I found it funny the grey looks exactly like unpainted plastic. Everything in that photo has uniform grey spray except the single head on the left for comparison. It looks nice with the nuln oil wash applied after and is REAL fast compared to painting each individual item. I tried my hand at power weapons....wasn't happy with my blending. I think I need another blue in between Kantor and Teclis to blend better I tried my hand at plasma guns and wasn't happy with that result either. Was also my first time attempting dry brushing And finally my shapeways order arrived today I washed in warm water and soap then brushed for the first time ever (everything I read said resin needs it) I tacked together a test shoulder on trusty old Tron the ultimate volunteer I think it is gonna work out like I hope. Phew...large update complete....also...I hate drilling bolter barrels. I destroyed 3 bolter pistols yesterday and every slip pierced my fingers holding it in place. I literally stabbed myself 3 times. Actual stabs with blood and pain when I type this. No more drilling bolter barrels for me... Edited December 23, 2017 by TiguriusX Link to comment Share on other sites More sharing options...
Deadnaughty Posted December 23, 2017 Share Posted December 23, 2017 Looking good :) Yes drills are sharp and will stab you. A tip is to use a knife to prick a hole in the center so that the drill has something to latch on to rather then skirt off a flat surface into your thumb. TiguriusX 1 Back to top Link to comment Share on other sites More sharing options...
Brother Talon Posted December 24, 2017 Share Posted December 24, 2017 Not of the wolf kin, but my roommate happens to field them. On the subject of drilling out barrels? If you have a round file (you can usually pick up a pack of assorted small files 5-8 different ones for cheap), you can use that as a safe alternative to starting the foundation for your drill slot. It also may help to draw/paint/marker a thin cross, so you can get a more accurate bead on the center of the barrel. Good work so far, my roommate steadily approves. So do I. Link to comment Share on other sites More sharing options...
TiguriusX Posted January 7, 2018 Author Share Posted January 7, 2018 Holidays have come and gone. It is a New Year and time for resolutions. This was the state of my hobby area and it made me realize something. I have too many projects in process at the same time. My resolution was to bear down and finish 1 specific squad. I decided the plasma long fangs would get the honor. I had everything I needed including the shapeways company markings. I just needed to do all the little projects. Step 1...finish the heads. All my long fangs have magnetized torsos and heads so i can swap around as rules change (and as I paint better heh). I had a set of devastator heads that it was time to work on. I did the easy base coat using my new gray spray can and then applied nuln oil. I drilled (using the tip to pre cut with my hobby knife to avoid injuring myself) I magnetized...then it was time for painting details Step 1A in my glowing eye lens recipe book is a coat of Ceramite White (I suck at detail painting ignore the mess) Step 1B is apply bloodletter glaze and that is enough for now (fine detail work can be done later) After heads I needed shoulder pads and company markings. Step 2 Company markings for the left shoulder Great Company needs black shoulder pads so I took my black primer and did those. I then planned to get some terminator pads primed black (I have TDAWG in my LF packs) but this happened Ran out of black spray....now I know what that is like and it also tells you how many things I have in progress! Decided to prime with my new white can instead and carry on This is my error shot Shoulder pad on the far left...see that notch? Doesn't belong on the left arm. Pulled my icon off quickly once I noticed it. See my test icon? First icon on the far left. i forgot to scrape the mold attachment point...that was what it looked like after I scraped it off but before I painted over for repair Step 3 Pack markings for the right shoulder Tried to free hand and knew I made a mistake with the 1st stroke. I was using my favorite brush a 2-0 round and I forgot to wipe it along the palette to remove all the paint. First stroke left a big blob but I carried on. I grabbed my 3-0 liner brush (the smallest detail one I think I have) and drew the outlines instead And then it was done... Long Fangs assemble in Charlie's Angel formation!!! Turn around and show the goods! (I mean the pack markings obviously...) And finally give em the business!! Dantay VI 1 Back to top Link to comment Share on other sites More sharing options...
Dantay VI Posted January 7, 2018 Share Posted January 7, 2018 Looks brilliant TT :tu: Nice to see the step by step way you are doing it :) Link to comment Share on other sites More sharing options...
Wispy Posted January 7, 2018 Share Posted January 7, 2018 I almost lost myself to the rage of the wulfen during my shopping spree. I eventually came home with 25 more pots of paint. No excuses now...time to slather on additional colors and do detail work and faces I still need to decide on my shoulder pad scheme. Haven't decided if I follow the yellow/red or not....but I have the paints! Averland sunset and mephiston red were part of my purchases. Speaking of mephiston red....I hate that name and really didn't want to buy it That is a common SW player hang up right? i use khorne red. no problems with it. Link to comment Share on other sites More sharing options...
TiguriusX Posted January 7, 2018 Author Share Posted January 7, 2018 Ever have one of those days? I was happy after finishing my Plasma Fangs and karma said nope... I tipped over my mostly full bottle of Nuln oil shortly after I posted that update and it went all over my table...pants...leg...and floor. Took a break after that... Back at it today...next project is my lascannon pack Link to comment Share on other sites More sharing options...
TiguriusX Posted January 8, 2018 Author Share Posted January 8, 2018 (edited) 5 assembled and ready for painting and shoulders etc. That will probably take a while as I usually paint on weekends only. Learned the negatives of priming before assembly with this batch (see pic above showing separate components). Super glue with paint to paint connections is crap. Simple filing isn't enough to get rid of the paint either. I had to get rubbing alcohol and file the hell out of it and then slice a thin layer off with the exacto knife as the final step. It was a royal pain in the butt and something I don't want to repeat in the future. Need to reconsider logistics if I prime separate pieces in the future. I have read blue tack where I plan to glue is an easy way to address it. Also...assembling errors while putting them together. I was accidentally grabbing the plasma cannon arm (it is slightly bent) instead of the lascannon arm (straight). The first few times i glued it together nothing lined up. It wasn't until I put those aside and decided to try other pieces that I realized what I did. Lesson learned...try to keep my pieces separated prior to assembly. Next update will be after the lascannon squad is completed. Edited January 8, 2018 by TiguriusX Havok13 1 Back to top Link to comment Share on other sites More sharing options...
Rockythedog Posted January 9, 2018 Share Posted January 9, 2018 Answered my question about priming/painting before assembly there before I had even asked it. Looking awesome tho. Loving the colour scheme. Link to comment Share on other sites More sharing options...
TiguriusX Posted January 16, 2018 Author Share Posted January 16, 2018 Made better progress than expected and completed all of my long fangs for now The lens was the sticking point for me and I ended up buying guilliman glaze. I like how it turned out. Other than that the red/chrome scheme was easy to apply here Had my next plasma fang pack mostly done as well so I tackled them next. Had to put 2 more together and paint the plasma coils (failed again...can't figure an easy way to look good) Side note...2 of these guys have the new gray primer spray can and the others are original dawnstone. Tried one of my cyber wolves. The army so far... I think I am done with Long Fangs. 2 plasma squads and a lascannon squad are my normal heavy support builds now. I have missile launchers but will assemble as needed. Just need the wolf guard pack leaders in TDA plus basing (think I'll do that last in a giant batch). Next up....grey hunters? Link to comment Share on other sites More sharing options...
TiguriusX Posted January 22, 2018 Author Share Posted January 22, 2018 My hobby journey has moved into planning for army transport. Was watching the latest podcast from frontline gaming and someone asked how to transport their models to the upcoming LVO. The guys gave their opinions on things ranging from carry-on to checked options. I thought it was an interesting topic and decided to look into it. I followed that up with my own research and it was cool learning about an entire industry I had no idea existed before. There are sooooo many foam and bag options out there. I narrowed my final 2 down to KR and Battlefoam. Read a ton of discussions on both options and they both look appealing. I started with battlefoam and liked the 352 and 432 because of the potential for airplane travel. I eventually settled on the Go because I couldn't get the KR backpack out of my head (if it was cheaper I would be going KR) and it helps justify the purchase. I can use the backpack for other stuff besides holding foam. The bag is comparable to other hardshell bags you can get online and I can see it becoming my default travel bag to avoid checking luggage. Speaking of KR, I really like KR's cardboard modular system for storing in the house then grabbing what you need in your travel case. Looks better than leaving foam everywhere. I also liked their backpack 2 option. What I didn't like was the pricing. One of the arguments in favor of KR was as much as 50% cheaper than BF. Maybe that is if you are local in the UK? The prices I am seeing online using US as my location are higher than the Battlefoam options. The item I was looking at the most was their 2 KRU storage backpack for bag + custom foam for $189.99 https://www.krmulticase.com/product/cases/BP22-B The BF Go is priced at $169.99 for bag + custom cut foam http://us.battlefoam.com/go-p-a-c-k-go-custom-foam-load-out/ If the pricing is fairly similar I think Battlefoam wins out. I really like their overall product line. I really like their foam options as well. Now the hard part...figuring out what models fit where and ordering the right foam trays. The army I have in my head is 3 dreads (Bjorn and 2 axe/shield friends) full detachment of long fangs (the lascannons stick out a great deal) and the power armor and TDAWG guys to fill in the gaps. Some HQs with jetpacks and everyone with 32mm bases and a range of dynamic poses. Need to figure out what cut out size works for those before I order. Link to comment Share on other sites More sharing options...
TiguriusX Posted January 26, 2018 Author Share Posted January 26, 2018 (edited) Ok so I have spent the better part of a week running numbers and driving myself (and my wife) crazy. Back and forth between Battlefoam and KR options...the only thing I knew for certain was I wanted the backpack style carrying case. I have been measuring my models...estimating what can fit and what combinations of foam I would order from both companies. The final variable that spurred me to action and finally paying for something was a 50% off deal for the KR backpack. $116.97 (including shipping) got me a backpack that can carry 2 KRM worth of troops and 1 KRM case with custom foam I chose the following foam options: -SM58 1/3 tray (32mm deep) (1.25) (Tall GHs with chainswords etc) 20 (50mm x 32mm) (2 x 1.25) -SM7 (70mm deep 2 3/4") 3 dreads -SM4 (70mm deep) 6 bikes -SM47 1/2 tray (51mm deep) (2) (Terminators and cyber wolves and HQs) 15 (55mm x 40mm) (2.16 x 1.5) -SM62 1/2 tray (51mm deep) (2) (GH dynamic poses and long fangs) 25 (40mm x 32mm) (1.57 x 1.25) It "should" hold the following army: 3 Dreads 45 Power Armored troops 15 Terminator slots 6 bikes That fits all of my current 2k list I have brainstormed with room for extras. The backpack can still hold 1 more KRM case so I can increase my capacity in the future if I keep adding to my collection (I imagine armor or flyers depending on how I do with the current army). I really really love their backpack specs and I kept going back to it after looking at the Battlefoam options. If you want to know the true depths of my Lovecraftian madness let me share (warning it is LOOOONG) I researched the personal AND carryon size of the local "cheap" airlines as part of this decision. I quickly learned that there is a generic airline size and there are the real life constraints due to smaller planes a passenger has to deal with. Despite the fact some bags were "designed" for carryon/personal there are smaller airlines that don't match the dimensions. I used the following economy type airlines in my area for sizing -Carry On 24 x 16 x 10 (SouthWest) 24 x 16 x 10 (Frontier) -Personal 18.5 x 13.5 x 8.5 (SW) 18 x 14 x 8 (Frontier) KR BP22 -BP 450mm (17 23/32) 310mm (12 13/64) 160mm (6 19/64) (Only 1 KRM case) or 290mm (11 27/64) (2 KRM cases loaded) -KRM box itself 400mm (15 ¾) 270mm (10 5/8) 120mm (4 23/32) BattleFoam Go Backpack 457mm (18) 406mm (16) 279mm (11) (I researched the HELL out of this watching videos and reading forums discussions. This is a collapsible dimension if you don't load the "extra" pockets etc. I am 100% sure it would be able to squeeze into the carry on space) It quickly became apparent to me that none of the "airplane" bags would realistically fit in the personal space area. So I focused on the carry-on dimensions and eliminated smaller offerings (the BF 352 and BF432 specifically). Surprisingly, the KR pack with my current 2k point army only requires 1 KRM case and DOES fit in the personal space (i.e., under the seat). I can probably shove clothes and overnight stuff to easily handle a tourney if I fly and still fit (my bucket list is travel to a tourney like Las Vegas Open one day). If I need more models I can put the backpack filled with 1 KRM case and clothes in the overhead carry on and place the 2nd KRM case in the personal space section. I LOVE the modular design and the flexibility 2 carrying spaces provide me. It was the one major design difference from the BF Go bag that I couldn't get around. I love the BF Go bag and foam options. But the BF system is all or nothing. You take a fully loaded full sized bag or not. There is 1 massive foam storage area. While I LOVE the BF offerings (I spent countless hours researching the trays and even designing my own for custom layouts) I simply am not at that level of collection at this point in time. I simply don't need the superior model capacity. The flexibility of the KR backpack has more value to me even if it holds less. The BF Go backpack I priced was $192.11 (including shipping) and it held a MASSIVE army: 22 bikes 4 rhinos 1 dread 15 Terminator 64 Power armor 10 wolves It almost seems wasteful to me to get such a massive carrying system with my current army. If I get the collecting bug and my army expands I have a plan B. I can commit to the battlefoam system at that time. Edited January 26, 2018 by TiguriusX Link to comment Share on other sites More sharing options...
Rune Priest Jbickb Posted January 26, 2018 Share Posted January 26, 2018 (edited) A bit late to the party on this, but I have a few battlefoam cases and I love their stuff. But I may be a bit partial as they are local for me and I work literally 300 feet from their front door lol. I haven't got their cases for my wolves yet but that is in the plan for sure. I am curious to hear how you like the kr backpack over tome though. As I have not tried their stuff. Edit cuz phones are mean Edited January 26, 2018 by jbickb TiguriusX 1 Back to top Link to comment Share on other sites More sharing options...

Recommended Posts
Create an account or sign in to comment
You need to be a member in order to leave a comment
Create an account
Sign up for a new account in our community. It's easy!
Register a new accountSign in
Already have an account? Sign in here.
Sign In Now