TiguriusX Posted November 18, 2017 Share Posted November 18, 2017 Did some random posturing and made a mini iron priest using the missile launcher backpack (that missile loading claw looks like a mini servo harness to me) Was curious if something like this would fly if used as "counts as" Iron priest. Could you show up to a tournament with something like this? PeteySödes 1 Back to top Link to comment Share on other sites More sharing options...
GrandMagnus Posted November 18, 2017 Share Posted November 18, 2017 I personally would not mind counting that guy as an iron priest. I don't remember if iron priests have red armour too, like regular tech marines? If so you could do that to make it easier for the other players to distinguish. In any case you would just have to point out to your opponent what he is. Link to comment Share on other sites More sharing options...
Ciler Posted November 18, 2017 Share Posted November 18, 2017 Seems perfectly fine to me. You could possibly improve on it by using the mechanicus shoulder pad found in most vehicle's gunner kits. Also, as an alternative : the apothecary backpack has a shoulder lamp and there is also a bit in the Onagre kit that makes a decent looking servo-arm that can be attached to it devastator legs have a cog-like pattern at the bottom. Stoic Raptor 1 Back to top Link to comment Share on other sites More sharing options...
clanfield Posted November 18, 2017 Share Posted November 18, 2017 the claw from the onagar kit is basicly the tech marine claw as well Link to comment Share on other sites More sharing options...
jerrys Posted November 18, 2017 Share Posted November 18, 2017 (edited) It looks fine to me. I like the guy's idea about the mechanicum shoulders from e.g. the rhino kit. I think there're also mechanicum looking helmets in there if you want. There're also mechanicum-looking doodads of various kinds that you can get on ebay. I got some of these to stick on the shoulder armor of this "thunderwolf": Maybe there is something like that if you are looking for something to cover up the rockets on the backpack or something. Edited November 18, 2017 by jerrys Link to comment Share on other sites More sharing options...
Dantay VI Posted November 18, 2017 Share Posted November 18, 2017 download by Danny Taylor, on Flickr Link to comment Share on other sites More sharing options...
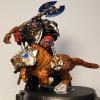
Stoic Raptor Posted November 19, 2017 Share Posted November 19, 2017 (edited) You could possibly improve on it by using the mechanicus shoulder pad found in most vehicle's gunner kits. devastator legs have a cog-like pattern at the bottom. Castellated greaves are a great way to make it look more Iron-Priest'y. I think the metal model had them too. I had kitbashed an Iron Priest on a Thunderwolf (this is a WIP shot, I don't have it anymore): Edited November 19, 2017 by Ulfgrim Alvsbane Link to comment Share on other sites More sharing options...
Jarl Kjaran Coldheart Posted November 19, 2017 Share Posted November 19, 2017 That looks like an Iron Priest to me Link to comment Share on other sites More sharing options...
Xenith Posted November 19, 2017 Share Posted November 19, 2017 Looks cool, my suggestions: 1) extend hammer haft to base using spare hammers, to make him look more like the old model. 2) crennelate the greaves or the torso trim, he looks a little plain in places. easy enough to do with GS. 3) cut off and reposition servo arm so it's poking over his shoulder. 4) cut off right vent on backpack and add wires, cables, etc to make it look more like a servo arm backpack. 5) greenstuff and cover up the missiles on that backpack! 6) awesome wolf/ad mech icon for top of backpack? Link to comment Share on other sites More sharing options...
Freman Bloodglaive Posted November 19, 2017 Share Posted November 19, 2017 Good Iron Priest. The plastics allow people to make a fair Ragnar Blackmane replacement too, which they need to because the original is nearly thirty years old. Link to comment Share on other sites More sharing options...
Closet Skeleton Posted November 19, 2017 Share Posted November 19, 2017 No, he's not an acceptable proxy. Bring a paint pot with a post it note instead or your effort will start giving proxies a bad name. A kitbashed conversion is just not a proxy, sorry to break it to you. Stoic Raptor 1 Back to top Link to comment Share on other sites More sharing options...
TiguriusX Posted November 19, 2017 Author Share Posted November 19, 2017 Thanks for all the feedback guys. Remember I literally just started on the hobby side so my selection of parts is limited. I have 2 SW Terminator and 1 SM Terminator box I have 4 Grey Hunter boxes I have 1 Space Wolf venerable dreadnought box (plan is to make this Bjorn) I also have some random bits to make long fangs I picked up via ebay (tons of plasma cannons, lascannons and a few missile launchers and a few cyclone missile launchers) I am going to get at least 1 more dreadnought (ideally 2) for axe and shield escorts for bjorn I was hoping to go to go cheap on the Iron Priest using bits I have if possible Link to comment Share on other sites More sharing options...
Freman Bloodglaive Posted November 19, 2017 Share Posted November 19, 2017 Yes, he's a good, acceptable, Iron Priest. Link to comment Share on other sites More sharing options...
Karhedron Posted November 20, 2017 Share Posted November 20, 2017 If someone brought along a model they had spent time and effort customising, I would congratulate them. That isn't proxying, that is modelling! :) Link to comment Share on other sites More sharing options...
Riptor Posted November 20, 2017 Share Posted November 20, 2017 Looks great, and I would be happy to play against it. Just make sure your opponent knows what is what in your army beforehand (which is a good habit to be in, even if using all the 'official' models. Kitbashes like this are what makes the hobby great, in my opinion. Could we also see a photo of the model from behind? Just interested to see if you have done anything with the missiles inside the backpack. If not, it might be worth looking at least cutting/green stuffing the bottom one so it is not so obviously a missile launcher backpack. All the others inside the loaded will look fine painted, as they will just look like pistons, but the bottom piece of the missile launcher backpack is obviously a missile ready to be loaded. Link to comment Share on other sites More sharing options...
TiguriusX Posted November 20, 2017 Author Share Posted November 20, 2017 I have done nothing with the rear pack. I have a package of green stuff but have never used it. Need to figure out what to do with the back to hide missiles and give it an iron priest spin Link to comment Share on other sites More sharing options...
Dantay VI Posted November 24, 2017 Share Posted November 24, 2017 Green stuff is super sticky, so keep your hands damp and the same to any tools you use to work with the GS. Take a similar sized piece of each color and thoroughly mix together. Place over the area you want covered and using something with a nice flat edge start moving it around to cover the missiles. GS is notoriously hard to file so try to get it as smooth as possible, then leave it for a good 24 hours to fully cure. Remember keep hands and tools damp so the GS doesnt stick to them and ruin your hard work. a cup of water to dip your tools/ fingers in beside your work station is always handy. Link to comment Share on other sites More sharing options...
jerrys Posted November 24, 2017 Share Posted November 24, 2017 (edited) I (as someone with no artistic ability) have had trouble with greenstuff making smooth surfaces (I'll try wetting it next time) ... but I have noticed that it's pretty easy to make fur/pelts. Just sort of poke a small flathead screwdriver (or equivalent) into it and sort of drag it out in the direction you want the fur to go, repeatedly. Maybe could do something like that on the backpack? Only if you want to learn about greenstuff, though. If you don't want to deal with it then I think gluing a symbol or shield or something over it would work too. Or you could just leave it the way it is. Edited November 24, 2017 by jerrys Link to comment Share on other sites More sharing options...
Karhedron Posted November 24, 2017 Share Posted November 24, 2017 I have never really got on with green stuff. I use knifing putty which is much easier to work with. It can be worked almost like butter and can be filed without too much difficulty when it is dry. Link to comment Share on other sites More sharing options...
Yoyo ninja Posted November 28, 2017 Share Posted November 28, 2017 Clay Shapers for basic GS shaping. They are silicone tiped tools for working clay (they look like silicone paint brushes), but they are also great for green stuff as it doesn't stick to silicone much at all. I also find it really easy to get a flat surface with them. I use them for getting basic shapes right, then I let the GS cure for half an hour or so, then work in details with smaller metal tools. Once the GS has cured for a bit it gets past the sticky stage and sticks to your metal tools less. Link to comment Share on other sites More sharing options...
Yoyo ninja Posted November 28, 2017 Share Posted November 28, 2017 These sort of things... https://m.ebay.co.uk/itm/Set-of-5pcs-Silicone-Rubber-Shapers-Polymer-Clay-Sculpting-Fimo-Modelling-Tools/263222610299?epid=511831659&hash=item3d494a497b:g:-WsAAOSw7eFZxLfm Link to comment Share on other sites More sharing options...
Kinstryfe Posted November 29, 2017 Share Posted November 29, 2017 Seems good to me. Can't remember if iron priests wear red. Even if not, paint an arm or something red. Red Marine amongst a bunch of grey Marines? Gotta be a techmarine equivalent. Link to comment Share on other sites More sharing options...
TiguriusX Posted November 29, 2017 Author Share Posted November 29, 2017 I'm playing with green stuff for the first time ever This is what I did to the backpack Missiles covered and mechanical sprocket (only thing I could find in my house...its the star wars monopoly set) PeteySödes 1 Back to top Link to comment Share on other sites More sharing options...
Yoyo ninja Posted November 29, 2017 Share Posted November 29, 2017 That looks great. Let it cure and cut away the excess. Job done. Link to comment Share on other sites More sharing options...

Recommended Posts
Create an account or sign in to comment
You need to be a member in order to leave a comment
Create an account
Sign up for a new account in our community. It's easy!
Register a new accountSign in
Already have an account? Sign in here.
Sign In Now