sneakybamsen Posted February 9, 2018 Share Posted February 9, 2018 (edited) This is an attempt for me to make my own progress log of my big love (apart from my wife and kids) - my Dark Angels. As I am writing this I have a total of barely 6000 points (wargear included) of painted models, of which a few are not completed, but only painted to a degree, and as such will need revisiting at some point. I'd like to try and take pictures of all of my fully painted stuff, and get them uploaded here, but that will probably be a while before that is done. For now I'll start out with the pictures I have already, and I hope you can accept that my painting skills are far from a lot of the awesome work that is being posted on these very pages. Also I don't have the best lighting at home, so some pictures are quite dark. I shall try to fix this in the future. My Librarian and (interrogator-)chaplain on bike My Ravenwing Apothecary My Land Speeder Vengeance My Imperial knight warden/crusader (he's magnetized) Techmarine Librarian in terminator armour Interrogator-Chaplain Company Master Land Raider Razorback Rhino Drop pod Contemptor Dreadnought Venerable Dreadnought Dreadnought from Assault on Black Reach Dreadnought Another Dreadnought Deathwing Devastators with grav cannons Assault squads I will try to update this with the work I am doing, but will probably not be taking a lot of WIP shots. The idea of this log is to try to keep my motivation going, so I can reduce my backlog of over 9000 points. Edit: Updated a couple of pictures as I now have a lightbox for taking photos of my models. Edited September 4, 2019 by sneakybamsen Greenz, robofish7591, Pearson73 and 8 others 11 Back to top Link to comment Share on other sites More sharing options...
sneakybamsen Posted February 9, 2018 Author Share Posted February 9, 2018 I finished the apothecary last night, and the land speeder vengeance on wednesday last week. The next model to be treated will be my take on Sableclaw. Right now he is just primed, but here's to hoping I can get started on applying base colors this weekend. Link to comment Share on other sites More sharing options...
Pearson73 Posted February 9, 2018 Share Posted February 9, 2018 That's some nice work, I especially like the green of the Knight. Link to comment Share on other sites More sharing options...
sneakybamsen Posted February 9, 2018 Author Share Posted February 9, 2018 Thank you Pearson, I tried to make it as DA-like as I could, so good to hear that worked to some extend at least Link to comment Share on other sites More sharing options...
sneakybamsen Posted February 27, 2018 Author Share Posted February 27, 2018 Here's my take on the company champion. I am not a great modeller by any means, and the photo isn't exactly awesome either, but it does give an idea of the pose of the model, which I absolutely stole from Rizaras beautifully modelled primaris company champion, which you can see here robofish7591, Lostrael, Rizara and 4 others 7 Back to top Link to comment Share on other sites More sharing options...
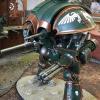
Project XXVIII Posted February 28, 2018 Share Posted February 28, 2018 Champion conversion looks great, don't downplay the skills, keep it up. I have to ask about the headlights on the bikes, particularly the Chaplain. It really pops, besides what appears to be white and blue paint (sorry the names of which escape me as I'm still in old GW paint), what techniques did you use to get this effect? One drawback to getting to the end of a piece is realising you have to pop some $$$ on 2 or 3 paints just to finish up headlights/windows/lenses etc. Was hoping for some insight before I bite the bullet. Link to comment Share on other sites More sharing options...
Pearson73 Posted February 28, 2018 Share Posted February 28, 2018 The Champion's looking good brother; I do feel the sword may be a little oversized and the pose could be improved by changing its angle so that it's pointed over the top of the shield, however some photos from different angles would determine this a bit better. Link to comment Share on other sites More sharing options...
sneakybamsen Posted February 28, 2018 Author Share Posted February 28, 2018 Champion conversion looks great, don't downplay the skills, keep it up. I have to ask about the headlights on the bikes, particularly the Chaplain. It really pops, besides what appears to be white and blue paint (sorry the names of which escape me as I'm still in old GW paint), what techniques did you use to get this effect? One drawback to getting to the end of a piece is realising you have to pop some $$$ on 2 or 3 paints just to finish up headlights/windows/lenses etc. Was hoping for some insight before I bite the bullet. Thank you for the kind words. The bike headlights I kept simple - white with Baharroth Blue near the edges. Used small brush and tried to keep it tidy. No fancy tricks to that, although if you invest more time and effort than I did, I think you could easily improve it. I only did it that way because I feel yellow headlights is not something that belongs in the 42nd millennia. Regards Link to comment Share on other sites More sharing options...
sneakybamsen Posted February 28, 2018 Author Share Posted February 28, 2018 The Champion's looking good brother; I do feel the sword may be a little oversized and the pose could be improved by changing its angle so that it's pointed over the top of the shield, however some photos from different angles would determine this a bit better. Thank you. I can see what you mean, but I felt it had to be more than a regular powersword (it's the one GW uses for Sableclaw, as far as I know) while still made for power armour use, as it afterall is a Blade of Caliban. With regards to angle and being pointed over the shield, I am not sure what you mean? I know the way the blade is twisted in relation to the models hand and arm is a bit off, but damn shoulderguard wouldn't let me do it any other way. Photos of it now will be different, it's been primed black just after I took that shot. I'll see if I can get some shots of the model if/when I get that lightbox I ordered. Pearson73 1 Back to top Link to comment Share on other sites More sharing options...
sneakybamsen Posted March 1, 2018 Author Share Posted March 1, 2018 (edited) Here's how my Sableclaw ended up looking. Edit: Updated photo with one taken in my lightbox. Edited August 24, 2018 by sneakybamsen Interrogator Stobz 1 Back to top Link to comment Share on other sites More sharing options...
Pearson73 Posted March 1, 2018 Share Posted March 1, 2018 The Champion's looking good brother; I do feel the sword may be a little oversized and the pose could be improved by changing its angle so that it's pointed over the top of the shield, however some photos from different angles would determine this a bit better. Thank you. I can see what you mean, but I felt it had to be more than a regular powersword (it's the one GW uses for Sableclaw, as far as I know) while still made for power armour use, as it afterall is a Blade of Caliban. With regards to angle and being pointed over the shield, I am not sure what you mean? I know the way the blade is twisted in relation to the models hand and arm is a bit off, but damn shoulderguard wouldn't let me do it any other way. Photos of it now will be different, it's been primed black just after I took that shot. I'll see if I can get some shots of the model if/when I get that lightbox I ordered. That's a good point regarding the need to differentiate between the blade and a regular power sword, it might just be me to be honest, I find the space marine relic blade from the vanguard kit to be way too long too... With the sword/shield angle, it looks to me as if he's stabbing over his shield or in a guarding stance, almost akin that held by a warrior in a shield wall, however the angle's not quite right. If this wasn't the intended pose, then no worries. I get what you mean with the arm positioning too, shoulder pads with the larger trim/guards have been the bane of my chaos arm-positionng attempts. Link to comment Share on other sites More sharing options...
sneakybamsen Posted April 25, 2018 Author Share Posted April 25, 2018 (edited) My Ravenwing Dark Talon which I finished last night Edited August 24, 2018 by sneakybamsen Pearson73, Lostrael, Phaeton and 6 others 9 Back to top Link to comment Share on other sites More sharing options...
Galthan Ironsturm Posted April 25, 2018 Share Posted April 25, 2018 Really beautifull DA ! Your black Death Wing is juste Amazing! Great job! sneakybamsen 1 Back to top Link to comment Share on other sites More sharing options...
sneakybamsen Posted April 25, 2018 Author Share Posted April 25, 2018 Really beautifull DA ! Your black Death Wing is juste Amazing! Great job! Thank you, that is very kind. And welcome back :) Link to comment Share on other sites More sharing options...
Helycon Posted April 25, 2018 Share Posted April 25, 2018 Very nicely painted! Those black Deathwing Terminators look very unique! If I may, I'd like to give you the tip to drill out the barrels of guns. It really adds that extra bit of realism. sneakybamsen 1 Back to top Link to comment Share on other sites More sharing options...
sneakybamsen Posted April 25, 2018 Author Share Posted April 25, 2018 Very nicely painted! Those black Deathwing Terminators look very unique! If I may, I'd like to give you the tip to drill out the barrels of guns. It really adds that extra bit of realism. You may, and have already done so elsewhere. My Sableclaw has the Heavy bolter muzzles drilled, and I'll try to get it done as I go along, but until it becomes habit, it's hard to remember :) Helycon 1 Back to top Link to comment Share on other sites More sharing options...
Helycon Posted April 25, 2018 Share Posted April 25, 2018 Very nicely painted! Those black Deathwing Terminators look very unique! If I may, I'd like to give you the tip to drill out the barrels of guns. It really adds that extra bit of realism. You may, and have already done so elsewhere. My Sableclaw has the Heavy bolter muzzles drilled, and I'll try to get it done as I go along, but until it becomes habit, it's hard to remember :) Fair enough! I sometimes forget if I've told specific folks before. Since this topic didn't have a post of mine, a assumed I hadn't! I tend to drill them as soon as I build something. If you need to do it afterwards for 9000 points of backlog, it'll take some time indeed. I recommend putting on some good music and start drilling :D sneakybamsen 1 Back to top Link to comment Share on other sites More sharing options...
Interrogator Stobz Posted April 25, 2018 Share Posted April 25, 2018 So, you’ve stopped being a Slacker? Fantastic news and wonderful work brother Sneaky. :tu: sneakybamsen 1 Back to top Link to comment Share on other sites More sharing options...
sneakybamsen Posted April 26, 2018 Author Share Posted April 26, 2018 Very nicely painted! Those black Deathwing Terminators look very unique! If I may, I'd like to give you the tip to drill out the barrels of guns. It really adds that extra bit of realism. You may, and have already done so elsewhere. My Sableclaw has the Heavy bolter muzzles drilled, and I'll try to get it done as I go along, but until it becomes habit, it's hard to remember Fair enough! I sometimes forget if I've told specific folks before. Since this topic didn't have a post of mine, a assumed I hadn't! I tend to drill them as soon as I build something. If you need to do it afterwards for 9000 points of backlog, it'll take some time indeed. I recommend putting on some good music and start drilling Perhaps it was an overstatement on my part, you haven't told ME to do it before, but you suggested it to another user, and I seconded your opinion. I think the GW drills will enable drilling bolters, heavy bolters and maybe even storm bolters and bolt pistols. Perhaps plasma pistols will be drilled too in time. Yes Stobz, I've stopped being a slacker, at least for now. Somehow that ETL motivates, especially now that I know I can pledge my knight. So much so, that I started painting a scout squad and some plasma devastators last night! :o Helycon and Interrogator Stobz 2 Back to top Link to comment Share on other sites More sharing options...
Greenz Posted April 26, 2018 Share Posted April 26, 2018 Terrific work here brother, solid paint jobs all around! Your green looks really great on the vehicles too I’m curious about the black DW. Why did you choose that, if you don’t mind me asking? They look awesome, don’t get me wrong! I’m just curious as to why Link to comment Share on other sites More sharing options...
sneakybamsen Posted April 26, 2018 Author Share Posted April 26, 2018 (edited) Thanks a bunch, Greenz! I don't mind the question at all, and I'm happy to answer, that I am not a fan of the bone theme GW gave them. I much enjoy the story of how they went from black to bone though, a squad defending against a Tyranid infestation (yeah, that's how badass Deathwing should be). So my Blackwing, as I call them from time to time, is paying homeage to that particular part of our fluff. Luckily we have the rule of cool to "refer" to when deciding on how to model our little dolls and how to paint them, so there is no obligation to do as GW suggests. It has a downside, though. I'm not too fond of painting black, which I found out after I had painted my first terminators, but I'm not going to redo what I have done just because the future work might be slightly offputting (Belial, chaplain in TDA and 20'ish terminators if I want to have Tartaros too). That said, black does take less basecoating, which is nice Edited April 26, 2018 by sneakybamsen Link to comment Share on other sites More sharing options...
sneakybamsen Posted May 2, 2018 Author Share Posted May 2, 2018 (edited) I've sort of come to the realisation that my bases are dull and don't do enough for my models. I have been basing them i simple and quick, but it's not going to cut it. Luckily it's not all my painted stuff that I'll have to rebase, a lot of it hasn't had the treatment I used to use. A good example is the knight crusader and my Blackwing. For instance my Deathwing Ancient is missing a tuft on his base. It was glued in place, but the stuff just drops off. The same goes for the flock, it falls off as it sees fit. Been trying PVA both watered down and not, doesn't seem to make a difference. Neither does the thickness of the layer of glue. Some of my dreadnoughts have themed bases from their boxes, I could lean towards creating similar looks for the rest of my models. I'd like some input to this if possible, preferably some thing fairly simple, as I'll never get anything done if I am to spend an hour per base Let's hear what you do. Regards Sneaky Edited May 2, 2018 by sneakybamsen Link to comment Share on other sites More sharing options...
Chmur Posted May 2, 2018 Share Posted May 2, 2018 I've sort of come to the realisation that my bases are dull and don't do enough for my models. I have been basing them i simple and quick, but it's not going to cut it. Luckily it's not all my painted stuff that I'll have to rebase, a lot of it hasn't had the treatment I used to use. A good example is the knight crusader and my Blackwing. For instance my Deathwing Ancient is missing a tuft on his base. It was glued in place, but the stuff just drops off. The same goes for the flock, it falls off as it sees fit. Been trying PVA both watered down and not, doesn't seem to make a difference. Neither does the thickness of the layer of glue. Some of my dreadnoughts have themed bases from their boxes, I could lean towards creating similar looks for the rest of my models. I'd like some input to this if possible, preferably some thing fairly simple, as I'll never get anything done if I am to spend an hour per base Let's hear what you do. Regards Sneaky I use PVA glue only for flock and/or sand. Everything else (=bigger/coarser) i just dab into CA glue and superglue in. Good practice, if you are not doing that already is to go over it once or twice with varnish. That really seals the things in, especially flock. But generally, I water down my PVA 1:1 and leave it to cure at least 24 hours, seems quite okay and solid bond. With paint coat afterwards and the varnish, it holds fairly okay. Unless I chip at it with fingernail, try really hard to "smudge" it off with my finger or the mini falls off table or terrain in very unpleasant way, it is good. Link to comment Share on other sites More sharing options...
sneakybamsen Posted May 2, 2018 Author Share Posted May 2, 2018 Haven't been using varnish, but I might have to, depending on what I'll end up doing. That said, this is as much a cry for help to what it should look like as the techniques to achieve something nice. Regards Link to comment Share on other sites More sharing options...
sneakybamsen Posted May 8, 2018 Author Share Posted May 8, 2018 Was talking to a guy at the club the other day, after listening to him I have decided to try the cork-mat method to give that rock-like look. Ripping out chunks from the mats, put the model on them, maybe add sand around the base, prime. It means I'll have to paint the bases, but even the ones my dreadnoughts are on didn't take long, so I think I'll be happer with that. Hopefully I'll seen get more work done on my ETL pledge. Link to comment Share on other sites More sharing options...

Recommended Posts
Create an account or sign in to comment
You need to be a member in order to leave a comment
Create an account
Sign up for a new account in our community. It's easy!
Register a new accountSign in
Already have an account? Sign in here.
Sign In Now