Kierdale Posted February 28, 2018 Share Posted February 28, 2018 Down in the forge I decided to start remaking the boards (in time perhaps the whole game) of Space Crusade. Yesterday I decided to make it, rather than a generic hulk with various Marine Chapter icons on it (as the original was), a Dark Angels hulk as I have a fair bit of DA stuff (bitz and decals). And surely there’d be some good stuff in a drifting First Legion hulk that would attract other chapters, Orks, Chaos Space Marines, etc... So, a thread here in the lair of the First too. For reference here is the first (of 4) board I’m making: I added decals, dirt and Mars Dust. Will add some dirt and stains to the (Greenwing) Companies room and I hope to get the corridor grating put down tonight. And then weather the grating. For future boards: Holes in the grating. Hatched in the floor of rooms. Stone floor and wooden floor. Chains, spent ammo etc. on floor. Missing tiles showing pipes and pistons and stuff underneath. One room a cell. Room 42? 101? Oh and I did get some patterned plasticard to use too :tu: And this is what the next three boards will be (based on): Ideas and suggestions are welcome but bear in mind this is being done on a budget ;) Ways to make it more ‘First Legion’, etc. A name for the hulk, that I can paint on it? Komodo, sneakybamsen and Interrogator Stobz 3 Back to top Link to comment Share on other sites More sharing options...
sneakybamsen Posted February 28, 2018 Share Posted February 28, 2018 That is looking super cool! Kierdale 1 Back to top Link to comment Share on other sites More sharing options...
Komodo Posted March 2, 2018 Share Posted March 2, 2018 Great idea and execution. We used to play SC with my friends, so random and hilarious sometimes. I like your corridors, can you make a few closeups for them (to copy your style of painting them :) ) Kierdale 1 Back to top Link to comment Share on other sites More sharing options...
Kierdale Posted March 2, 2018 Author Share Posted March 2, 2018 Thanks for the comments. In the above photo the corridors aren’t finished. The photo shows what’s under the grating (which I’ve now put on): wires, guitar wire and rust coloured weathering powders, artist’s pastels ground up. The board was sprayed black then I put the grating over and sprayed it all Leadbelcher so the black shadow of the grating would be left in the void beneath the flooring. I’ve now attached the grating (it’s plastic grating designed for gardening, so it doesn’t like paint or glue. Sprayed on undercoat sticks though and I’ll varnish the whole thing a lot in the end for protection) via the careful application of staples, superglue and copious amounts of foul language :D And added the trim. I’ll be painting this Leadbelcher, then black where the room walls are, and marking out the doorways...then weathering the trim and grating. Typhus Corrosion, Ryza Rust, Agrax Earthshade, etc. Bryan Blaire, Cpt_Reaper and Komodo 3 Back to top Link to comment Share on other sites More sharing options...
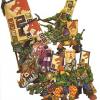
Kierdale Posted March 5, 2018 Author Share Posted March 5, 2018 The first board is done. I went with yellow/red hazard stripes where the doors will be as I used black to mark where room walls are. The red looks lighter here than it actually is. Greenwing room And a quick in-use shot :) I’ll get on with the other boards once I’ve finished off some nearly-done noise marines. :) I want to the the board with the engineering room next. Komodo 1 Back to top Link to comment Share on other sites More sharing options...
Komodo Posted March 5, 2018 Share Posted March 5, 2018 Great progress. Do you plan to do wall as well? Link to comment Share on other sites More sharing options...
Kierdale Posted March 6, 2018 Author Share Posted March 6, 2018 Great progress. Do you plan to do wall as well? The ‘walls’ inside each of the four boards will not actually have upright walls. Just the black lines I’ve painted, for a couple of reasons: 1. So the boards can be stored flat. 2. The squares are 25mm, as the originals were. Back then (and more now with 32mm minis overlapping beyond ‘their square’) arms and weapons stuck out ‘through’ walls, so adding internal walls would compound this problem. But I will do the four walls that stand between the boards. Might add some detail to these in relief. I did plan to make the boards as flat as possible so I could make them double-sided, but having added that small vent to the dirty metal room already it’s not flat :D so out the window goes the idea of making them double sided...but that also no longer means I’m limited to making them totally flat, so I might do some with slightly raised floor. Enough to squeeze in some LEDs, with a switch and watch battery on the underside perhaps... Slave to Darkness and sneakybamsen 2 Back to top Link to comment Share on other sites More sharing options...
Slave to Darkness Posted September 30, 2019 Share Posted September 30, 2019 · Hidden by WarriorFish, September 30, 2019 - Necro Hidden by WarriorFish, September 30, 2019 - Necro You still working on this??? Cant believe I missed this thread. Link to comment


Recommended Posts
Create an account or sign in to comment
You need to be a member in order to leave a comment
Create an account
Sign up for a new account in our community. It's easy!
Register a new accountSign in
Already have an account? Sign in here.
Sign In Now