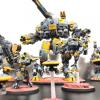
Shas O R'alai Posted May 1, 2018 Share Posted May 1, 2018 Greetings my fellow T'au! As I have stated before, I am both thankful and honored to be a part of this community. A little bit about me: I am a Paramedic by day and painter by night! I have been a part of the hobby since the very first release of the T'au. I took a hiatus from the hobby and thankfully returned back in 2013 thanks to my brother JeffJedi. My wife is very supportive of the hobby and is always motivating me.You can follow me here on Instagram if you want also! https://www.instagram.com/cruciblecustoms/ I will be posting my [WIP] pictures of my massive +ETLVI+ vow. Every model painted in my vow will be painted to the following standard (and better, I strive for perfection and advancement and welcome criticism and suggestions!): This is my current formula for how I paint my Ke'lshan Sept: 1) Primer = Stynylrez Gray SNR-322 2) Layer 2: Minitaire D6-111 Coal, 3) Layer 3: 50:50 ratio of D6-111 to D6-110 Charred Stone, 4) Layer 4: Charred Stome, 5) Layer 5: 50:50 D6-110 to D5-109 Badger Fur, 6) Layer 6: D6-109 Badger Fur. 7) Layer 7: D6-199 Gloss Coat (I now make my own), 8) Layer 8: Nuln Oil wash into all recesses, 9) Layer 9: D6-197 Flat Coat (I now make my own). 10) 2nd color: Averland Sunset with Wicked Reducer 50:50 {very thin coat} 11) Repeat step 11 5x times, allowing the yellow to dry before you continue. 12) Edge Highlight: Yriel Yellow & Flow Aid 3:1 13) After step 13 is complete, Glaze ALL yellow surfaces with Lamenters Yellow 3x times (allowing each time to dry completely) 14) Edge Highlight: Vallejo Cold Grey & Flow Aid 3:1. 15) Weapon Effect 1: Nihilakh oxide x2 (moderate layers, allowing them to dry) 16) Weapon Effect 2: Kantor Blue : Vallejo Glaze Medium (50:50 ratio) x2 17) Layer 10: Matte Varnish entire model. I always spray top down. Think of it as the light hits it, that area would be brighter. By gloss coating the entire model with an airbrush you make it harder for washes to stick to your model. Ergo, the nuln oil goes right into the recesses and the excess can be wiped away with a gloved hand with no stain left. Once it's dried properly, follow up with a matte varnish and continue on! Basing: 1) Cut cork board to difference size and superglue to base 2) Prime Stynylrez Black 3) Layer Mephiston Red 4) Heavy coat of Martian IronEarth 5) Drybrush KindleflameThis is some pictures of my shop The Crucible: After the dremel has stopped and the airbrushing is complete, I return inside to my Artificer Station: Not going to lie, I am a sucker for paint. I am always adding more and more and am eager to any new suggestions. I plan on purchasing the complete Warcolours and Scale 75 set soon :D I felt the first model I should begin with is none other than the mighty KX139 Ta’unar Supremacy Armour Suit! First I had to create a pinboard. I do this by using a spare piece of wood (waste not want not), then make a 1 inch grid throughout. After making the 1 inch grid, I use a 1.1mm drill bit (0.1mm wider than the paperclips I use) and drill out holes halfway down the board. Gray Primer: I always use 2 pinboards per model so that I can move back and forth. From "A" to "B": D6-111 Coal: Well that is all for now, the daughter just woke up so we are going to go on a 2-3 mile walk and then I will return to the Titan while she naps -Shas'O R'alai Link to comment Share on other sites More sharing options...
elmo Posted May 1, 2018 Share Posted May 1, 2018 Looks like the Earth Caste have been hard at work ;) Looking forward to seeing the progress Link to comment Share on other sites More sharing options...
The Pounder Posted May 1, 2018 Share Posted May 1, 2018 Woooow!!!! The standard of your work is fantastic. Your colour scheme is very striking. Honestly, can’t wait to see you achieve your vows and giving us a MASSIVE boost in pts! Link to comment Share on other sites More sharing options...
Triszin Posted May 1, 2018 Share Posted May 1, 2018 love the workshop. I've been slowly drawing up some plans for a workshop of my own i'd like to build int he next 5-6 years Link to comment Share on other sites More sharing options...
Shas O R'alai Posted May 2, 2018 Author Share Posted May 2, 2018 Hey Elmo, how was the quality of the Shapeways Blue Print Stormsurge pieces? Link to comment Share on other sites More sharing options...
MithrilForge Posted May 2, 2018 Share Posted May 2, 2018 Awesome... your workshop is the size of my house Great to see your fully prepared , those mega vows of yours need some serious paint time and it looks like you can deliver on that good luck, Cheers, Mithril Link to comment Share on other sites More sharing options...
Shas O R'alai Posted May 2, 2018 Author Share Posted May 2, 2018 Awesome... your workshop is the size of my house :lol: Great to see your fully prepared :tu: , those mega vows of yours need some serious paint time and it looks like you can deliver on that B) good luck, Cheers, Mithril I got lucky. My wife is the complete opposite of a gamer/need but she picked the house out because she knew I’d say yes due to the Workshop. My vow is going to push me to my limits....but that’s the point of a “crucible” hehehe. I have maybe 2-4 hours of hobby time each day so I’m going to make the absolute best of it. Also, I really want that Artificer Badge!! I’m going to earn it :D Link to comment Share on other sites More sharing options...
MithrilForge Posted May 2, 2018 Share Posted May 2, 2018 Yeah it's a nice badge isn't it... ... i'm sure if the army is as good as what i see in your first post..you have a good chance Mithril Link to comment Share on other sites More sharing options...
elmo Posted May 2, 2018 Share Posted May 2, 2018 Hey Elmo, how was the quality of the Shapeways Blue Print Stormsurge pieces? A little surface roughness and the material was thin but I believe these problems where addressed in the redesign. I had one of the earliest versions. Link to comment Share on other sites More sharing options...
Shas O R'alai Posted May 4, 2018 Author Share Posted May 4, 2018 Update: ..... and I didn't even pledge this weapon :P Link to comment Share on other sites More sharing options...
Shas O R'alai Posted May 5, 2018 Author Share Posted May 5, 2018 Link to comment Share on other sites More sharing options...
Shas O R'alai Posted August 8, 2018 Author Share Posted August 8, 2018 Soooo, I completely forgot to use this during the ETL. However, I will just continue to use this throughout the year as I work on my T’au. I have decided to keep on trucking through my massive (10k+ points of T’au). Right now I’m working on some strike and breached fire warriors. Link to comment Share on other sites More sharing options...
Shas O R'alai Posted August 11, 2018 Author Share Posted August 11, 2018 Here is what I am currently working on at the moment. FireWarriors and Pathfinders as far as the eye can see! Link to comment Share on other sites More sharing options...
brother_b Posted August 11, 2018 Share Posted August 11, 2018 Do you bottle your own GW paints like that or can one actually buy them that size in that kind of bottle? Great minis btw. Link to comment Share on other sites More sharing options...
Shas O R'alai Posted August 11, 2018 Author Share Posted August 11, 2018 Do you bottle your own GW paints like that or can one actually buy them that size in that kind of bottle? Great minis btw. Sadly you can not. I was tired of opening a pot of GW paint only to see it had dried up. So, I went on Amazon.com and purchased 100x 15mL dropper bottles and 50x 30mL dropper bottles. I added 1mL of Liquitex Professional Flow Aid and 1x AK interactive Stainless Steel Ball Bearing to each GW pot, shook it, then decanted into each bottle. For the washes I just decanted and dropped in a AK Interactive bearing as well. I need to order another one of these racks (from amazon.com as well, black nail polish rack haha). Link to comment Share on other sites More sharing options...
brother_b Posted August 11, 2018 Share Posted August 11, 2018 Amazingly organized ! I see you printed labels or something too! Dedication. I have quite a few 20+ year old paints from citadel old GW that still flow. And just to reiterate you've got some great minis there very nice pairing. Link to comment Share on other sites More sharing options...
Shas O R'alai Posted August 11, 2018 Author Share Posted August 11, 2018 Amazingly organized ! I see you printed labels or something too! Dedication. I have quite a few 20+ year old paints from citadel old GW that still flow. And just to reiterate you've got some great minis there very nice pairing. Thank you! Actually, I just cut the original labels on the citadel pots, pulled them off and stuck them to the dropper bottles haha! Link to comment Share on other sites More sharing options...
Melete Posted August 11, 2018 Share Posted August 11, 2018 I need to do that with my GW paints. I've got some GW airbrush paints rebottled but tons of other ones just sitting in their pots. I like a lot of the GW colors but their pots are just such a pain to use with a palette or an airbrush compared to a dropper bottle. Link to comment Share on other sites More sharing options...
The Pounder Posted August 13, 2018 Share Posted August 13, 2018 That's a hell of a lot of Troops! Looking forward to seeing them in your grey and yellow scheme. Link to comment Share on other sites More sharing options...
brother_b Posted August 14, 2018 Share Posted August 14, 2018 Does gloss spray from a can work as well for the nuln oil seeping into the lowest points? That sounds like a good trick and may be what I need Link to comment Share on other sites More sharing options...
Shas O R'alai Posted August 16, 2018 Author Share Posted August 16, 2018 Does gloss spray from a can work as well for the nuln oil seeping into the lowest points? That sounds like a good trick and may be what I need Honestly I do not know buddy. I would imagine so, you just run a much higher risk of frosting. I would try and obtain an airbrush if possible. That's a hell of a lot of Troops! Looking forward to seeing them in your grey and yellow scheme. Hahahaha. Just wait for the picture I will be posting tonight :P Link to comment Share on other sites More sharing options...
Shas O R'alai Posted September 4, 2018 Author Share Posted September 4, 2018 Sorry I have been super busy with work as of late. Working mad overtime to make that extra hobby money haha.Over the past week I have been very lucky and have managed to acquire these 5 ethereals, all legitamite and metal!! Last but not least, the crown jewel! Oh elmo!!!! Do you have one of these :PI will be painting these in the Ke'lshan colors :D Link to comment Share on other sites More sharing options...
elmo Posted September 4, 2018 Share Posted September 4, 2018 Not yet.... Bah ha ha ha aaaa Link to comment Share on other sites More sharing options...

Recommended Posts
Archived
This topic is now archived and is closed to further replies.