DuskRaider Posted December 19, 2018 Share Posted December 19, 2018 Excellent job, brother... such an epic Knight. It's difficult to tell the modifications to the greaves aren't from GW themselves. Your friend is quite lucky! Pandoras Bitz Box 1 Back to top Link to comment Share on other sites More sharing options...
KrautScientist Posted December 19, 2018 Share Posted December 19, 2018 The glow effects are looking fantastic, and I just cannot wait for photos of the finished model! One final piece of nitpicking, though: I think those tubes to either side of the vox-grille on the Salamander helmet would profit from being picked out in a different colour (silver, for instance). Otherwise, the helm still looks slightly unfinished. Also, holy moly, is that hook going through the poor Space Wolve's mouth? I actually winced when I noticed that ;) rednekkboss and Pandoras Bitz Box 2 Back to top Link to comment Share on other sites More sharing options...
Pandoras Bitz Box Posted December 22, 2018 Author Share Posted December 22, 2018 (edited) Well that it. It's finally over, two and a half months in the making but the Knight is finally boxed up and ready to go to its new home. Its not perfect but I'm pretty thrilled with how well this project went thanks in no small part to you guys. Thanks everyone for being so encouraging, supportive and for all the useful feedback. You have been awesome co-pilots on this project. Now I think your owed some higher resolution photos? there are more on the Blog but here's most of them... I guess I better start thinking of my next project... Have a lovely Christmas everyone and I hope to catch up with you all soon. Edited December 22, 2018 by Pandoras Bitz Box firestorm40k, Closet Skeleton, Augustus b'Raass and 6 others 9 Back to top Link to comment Share on other sites More sharing options...
Kor Dalron Posted December 22, 2018 Share Posted December 22, 2018 Great Job, he turned out fantastic, I think you nailed the paintjob with the small lighting effects and the weathering/battledamage! For some reason the neck/throat really draws my eyes in with the cheffron cables Pandoras Bitz Box 1 Back to top Link to comment Share on other sites More sharing options...
rednekkboss Posted December 22, 2018 Share Posted December 22, 2018 (edited) Lots of great elements here. The foot tread, foot impact and glow effects are my favorites and I love the whole head and neck. Not to mention the pose. Well done, sir. Bravo! Edited December 22, 2018 by rednekkboss Pandoras Bitz Box 1 Back to top Link to comment Share on other sites More sharing options...
KrautScientist Posted December 22, 2018 Share Posted December 22, 2018 The finished Knight is absolutely incredible and easily one of the best hobby projects I have seen this year! Your friend is just incredibly lucky to receive this as a gift -- as are we for now seeing the model in all its glory. Thanks for taking us along for the ride! :) Pandoras Bitz Box 1 Back to top Link to comment Share on other sites More sharing options...
Pandoras Bitz Box Posted December 23, 2018 Author Share Posted December 23, 2018 @Kor Dalron Thanks man! Painting is not my strong point, i'm much happier building. So its really nice of you to say so. The Glow in the eyes was an after thought and they it was Kraut who suggested I match the centres of those chaos stars with the same OSL, I'm really glad you like how those look. Weathering is something I really need to practice, I have just started chatting to a guy I might meed up with in the new year who will show me some weathering techniques. All I really did on this was the mud and scratches, i've never really nailed the flaking paint which might have worked quite well. It's cool you mentioned those cables because that's the exact point of their existence when I was chatting to some of the Brothers about breaking up the form of the cables and how other things were distracting from the head, so I tried to strategically pick out some cables by puttting hazard stripes on that would do just that! perfect, thank you! @Rednekkboss Ha ha ha ha, I like how many things you listed there, thanks so much. I like all of it (thankfully), I mean I know there are still things I could work on but Im very happy having left it where I did, but my favourite parts are probably the pose and foot impact and anything else that helped convey the motion and weight. It was such a huge focus for me. I am really happy you like the other bits too though, its funny how you like the food and I pretty much winged that over one or two sessions... It was the last thing I did when I noticed "Holy crap, his foot doesnt have a bottom!", then it all just happened. Really glad you like it man, thanks for being involved. @Krautscientist I might just screenshot your comment and frame it above my hobby desk. Thanks so much for getting involved, Its thanks to you and the other Fraters that it is what it is. I mean, Im not saying it would have been bad, but I don't think it would have been as good. So many elements came from my activity on bolter... The colour scheme change, the trophy heads, the pilot, the cracks in the armour!... I mean these are not subtle aspects and those are just a few examples. Thanks to all of you I really pushed this project hard, the feedback meant that I didn't get bored and I was driven to hammer out each detail to completion. I'm really happy you like it and are speaking so highly of it, I've had an overwhelming response over on twitter as well that I just didn't expect. So yeah, thanks for all the help... you all only get involved because you care about the projects and that's what makes me love this community. Becoming active here in May is the best thing I have ever done for my Hobby. So when you thank me for having you along for the ride... Id argue that its the passengers that make the journey what it is. Thanks man. It seems... SUPER WEIRD to not be working on this project now. I sat down at my hobby table the night before last and looked at the space where the Knight use to be... and it was like i'd changed jobs or moved house... I just had to come to terms with the fact that things were different now. It felt strange. I think I might just work on some normal stuff for a while, possibly intersperse with some creative projects. I have so many mini's on sprues I should really knuckle down and deal with them and any other grey plastic to at least try to make a dent. Thanks again for all your help everyone, If I could be hugging you all right now, I would be. This is all ready an amazing Birthday and Christmas... oh yeah it was my Birthday yesterday so I picked up the Noise Marine and Krakendoomcool got me Magnus! I hope your all having a good break and have a great Christmas if I not speak to you before then everyone. KrautScientist and Thousand Eyes 2 Back to top Link to comment Share on other sites More sharing options...
Mechanist Posted December 24, 2018 Share Posted December 24, 2018 Your mate's jaw is going to hit the floor on this one, you've added a really solid paint job to a stellar build. I just read through your blog post and I'm so stealing how you did the bulk head though Mine will be press moulded copies as I'll need the original bits to mount the head. Pandoras Bitz Box 1 Back to top Link to comment Share on other sites More sharing options...
DuskRaider Posted December 24, 2018 Share Posted December 24, 2018 This is just too perfect. You've done an absolutely fantastic job on this PBB and I'll be checking the mail daily for its arrival ;) Pandoras Bitz Box 1 Back to top Link to comment Share on other sites More sharing options...
Augustus b'Raass Posted December 24, 2018 Share Posted December 24, 2018 Undeniably one of the best projects I've seen on this board - and dare I say the internet of 2018. Thanks for sharing and for involving us in it, for taking the time to post all those pictures and update everyone on your process and progress, and for me personally and in particular for the tutorial you posted on the chaosification of armour - it was most inspiring and helpful! Happy Christmas and a merry, hobby-filled year to you too, buddy! Pandoras Bitz Box 1 Back to top Link to comment Share on other sites More sharing options...
Brother Carpenter Posted December 26, 2018 Share Posted December 26, 2018 I just discivered this thread yesterday. Sweet builds. Man your mate is lucky with a mate like you. Thanks for the enormous amount of joy and inspiration this thread gave me. Pandoras Bitz Box 1 Back to top Link to comment Share on other sites More sharing options...
Pandoras Bitz Box Posted June 24, 2020 Author Share Posted June 24, 2020 (edited) Mechanist Really pleased you found it useful! I'm a little behind... like, delorian behind, so it would be cool to see what you have done since if you have a link! My friend loved it and its his profile pic on his Twitter hobby Account now Duskraider Ha ha ha, really pleased you like the end result and I was really grateful for all of your help and feedback with the project, sorry if you havent had it yet, must have got lost in the mail... Augustus B'raass Hey man, honestly the pleasure was mine. This project wouldnt have been what it was if it wasnt fro the constructive feedback I got from yourself and numerous other poeple on bolter. I miss posting on here but sort of fell out with the process when I no longer had an easy way to post my pics on here. I want to figure out a new convenient way though because I really like the community here and I miss it a lot. if you liked this project then you might like my come back posts I'm mentally preparing myself for. Krakendoomcool pointed your insta out to me so I'm following you there, if you look at mind then the finished product is there and is right up your disgusting street ; ) Brother Carpenter Happy I could be of some inspiration, god knows that the community deserves something back from me after everything I've had from it. RIGHT!... so. I've been absent for some time. I really want to get back into posting on here again, just have to iron out some kinks. for my first post back, I have a dilemma though... the "wip" that I want to post is technically finished. Its not painted, but its no longer mine, my end of the project, the build, is done. So... Should I post on here as if I just started, go through the processes that I did to make it sort of like a tutorial, which could be confusing for people who think I'm still working on it (and I also run the risk of getting loads of good advice I cant follow XD)... OR... do I post the final result, and then respond with more specific photos of areas people ask about? the second way is how I'm thinking of doing the blog post, because I have about 250 progress photos and I don't REALLY want to use them all.1. Post as if Wip/Tutorial2. Post the final project and then post how I did the different parts? 3. or I suppose since its no longer actually in progress... don't post it. although I think some of you will enjoy seeing it so I would really like to post it I would really appreciate everyone's thoughts. Thanks everyone, and its good to be back... hopefully to stay. Edited June 24, 2020 by Pandoras Bitz Box Link to comment Share on other sites More sharing options...
Mechanist Posted June 24, 2020 Share Posted June 24, 2020 Good to see you back. Go option 2, post the end result to make it clear it's finished and then some of the WIP shots of your favourite bits to work on. Pandoras Bitz Box 1 Back to top Link to comment Share on other sites More sharing options...
Thousand Eyes Posted June 24, 2020 Share Posted June 24, 2020 I would suggest post the final piece and if people ask for a breakdown of something you can respond. Pandoras Bitz Box 1 Back to top Link to comment Share on other sites More sharing options...
ElDuderino Posted June 24, 2020 Share Posted June 24, 2020 I'd go with mechanist's idea, I often find the process more interesting than the result. Also, good to have you back:) Pandoras Bitz Box 1 Back to top Link to comment Share on other sites More sharing options...
Pandoras Bitz Box Posted June 25, 2020 Author Share Posted June 25, 2020 Ok brill, thanks guys. Everyone seems to be cool with that option so I'll try my best to post up some pictures and see how that goes. So what have I been doing? for the last 7 months at least I have been working on a Nurgle Knight. I was making it for Krakendoomcool for his birthday and he had it a couple of weeks ago (it was actually going to be for Christmas but I overshot a touch). After i gave it to him he was kind enough to do a little spine around for me on his electric turn table which you can see here! So lets get the finished results out of the way so I can see what people think and get some feedback on what I achieved. So just to clarify, IT IS FINISHED. I built it and handed it over and now he is going to paint it. I will not be doing any more conversion on this thing. I'd still love feedback though so I can just learn from the experience. Warbringer, DuskRaider, Grotsmasha and 2 others 5 Back to top Link to comment Share on other sites More sharing options...
Verux Posted June 25, 2020 Share Posted June 25, 2020 Outstanding work. It truly twists the knight form in to a creature of chaos. Pandoras Bitz Box 1 Back to top Link to comment Share on other sites More sharing options...
Mechanist Posted June 25, 2020 Share Posted June 25, 2020 Wow. I scrolled down and my jaw jut hit the desk man. That thing is amazing, the greenstuff work is beautifully crisp and sharp. Please make sure we get to see it painted. Pandoras Bitz Box 1 Back to top Link to comment Share on other sites More sharing options...
Bjorn Firewalker Posted June 25, 2020 Share Posted June 25, 2020 Impressive work on the Knight of Nurgle. Pandoras Bitz Box 1 Back to top Link to comment Share on other sites More sharing options...
Pandoras Bitz Box Posted June 25, 2020 Author Share Posted June 25, 2020 Right I've started to work on a Blog Post for the Scythe arm, so hopefully when I've finished that i'll have a better idea of what the best pictures are to use, I have 40 photos to look through for that side of the Knight so it will take a bit of sorting, but hopefully not too long, maybe the end of the week or sometime next week Verux Thanks! yeah I wanted it to be very torn open and fleshy, I got it on the hobby roundup on warhammer TV and it was quite fun to listen to Nick Bayton say "it looks like... its just BURST" Mechanist Thanks very much! I'm certainly proud of it, it was a fun project to work on, and trust me, I'm as eager to see it painted as you are if not more so Bjorn Firewalker Thanks Bjorn Link to comment Share on other sites More sharing options...
Marius Perdo Posted June 26, 2020 Share Posted June 26, 2020 That looks absolutely brilliant, so much detail to keep spotting. Pandoras Bitz Box 1 Back to top Link to comment Share on other sites More sharing options...
DuskRaider Posted June 27, 2020 Share Posted June 27, 2020 Okay, now that is an awesome Knight. Great job, PBB! Pandoras Bitz Box 1 Back to top Link to comment Share on other sites More sharing options...
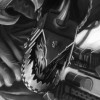
Pandoras Bitz Box Posted July 2, 2020 Author Share Posted July 2, 2020 Thanks guys! hopefully these next few posts will help pick out some of the details. Right... so first the chain scythe. The Scythe of the knight was the catalyst for this project, so I wanted it to be something pretty cool. I had an approximate concept for a pose and size of the scythe, not to mention that Mortarion already has one. Although that poses some problems of its own… I don’t exactly want to copy it, but should I use some of its aesthetic for reference? So I sort of used its profile for reference, but changed the design in a significant enough way to make them different, I would reverse the positions of the chain and blade… making a big Chain Scythe. To make the blade, I drew the shape I wanted to blade to be on some 2mm plasticard. even thought its pretty substantial, to fit a the teeth on there I new it would need to be thicker so after cutting it out I made a copy, glued the together and then once glued I filed/sanded/scraped the edges so that it was even all round. I already knew that for the part holding the blade I wanted to use the front of the Skull Cannon, a kit I significantly made use of for the Khornate Knight. So when I made the blade I made sure that the base of it was narrow enough to fit through the mouth. The other tricky part was to remove the chain teeth from the knights reaper chainsword and transfer them over to the scythe blade. (I’ve since discovered while looking for other parts that Zinge Industries do teeth for chain weapons). Next I started working on the haft which I made from the reversed body of one of the guns, part of the rapid fire battle cannon and part of the skull cannon barrel, that fit in quite nicely with the other part of the same kit. I also added the bevel on the front axe like, blade edge of the Scythe. Once I did this structural bit, I really had to mesh all the components together, make them seem like they were meant to belong. So I started green stuffing up gaps with textures that matched adjacent areas. The side of the blade was obviously quite bland being unmarred plasticard so I added some more plasticard decoration, battle damage/corrosion and some green stuff to that. It still looked a bit like a hatchet thought with all of the weapon at one end of the “grip”, so I used most more of the rapid fire battle cannon as well as the axe haft from the lord of skulls to give it a bit more length and I was much happier with this look. I was also hilariously monstrous, even compared to the size of the knight, but I loved how lop sided it made the knight when i offered the piece up, I could already see it shambling. Now for an important bit, attaching the arm. I had originally planned to attach it normally, but not only would this no allow for sufficient range of motion, it wasnt long enough. This posed a new challenge, I needed to be able to suspend the arm in just the right place away from the body while I fixed it. so I drill 3 holes in the body of the knight and 3 in the arm, glued paperclips into the arm and then put bends in them before threading them into the little holes I’d drilled into the body. Now I just had to adjust the wires like legs on a tripod to get the angle the way I wanted it, once it was in the right place I glued the wires into the holes and let it set. There was obviously still some give in the wires after this and I didn’t want to accidentally bend them out of shape while working on it, so using plastic glue I attached plastic struts to it to make it a lot more ridged. I had no idea really how I wanted the arm to look from this point, I had used a heat gun to twist the arm socket a bit before fixing it, as if the stresses on of what ever was moving it was buckling the metal. The body had lots of organic fatty lumps on it and it would make sense for it to look strong enough to wield the scythe. So I started using Milliput to create muscle strands, mostly to help bulk it, with the assumption that I would end up green stuffing over it it skin once I had the volumes in place. While I was doing it though I quite liked the aesthetic so I just ran with it, adding more layers of muscle, sinuous tissue, and tendons instead of pistons. I then started to layer up some details around the shoulder to get it to blend with the rest of the Knight a bit. Sculpting flesh onto the surface and then blending it in with the fatty bits surrounding it, adding damaged Shoulder guard (enough to tie the arm to the body but not so much as to obscure everything I had done). I also at this point had got some wires from Zinge industries, they were recommended to me by Rictus of Recalcitrant Daze. They make among other things, wrapped wire, which looks just like guitar strings but is considerably easier to manipulate. I also felt like the back of the handle haft was missing something, I didnt like that it ended flat, and when I was given some Nurgley bits by someone I found some bells on chains, which when added give a bit of a sense of movement which I liked. Near the end of the project I noticed that at the front of the knight were there would normally be a weapon and heraldry shield, there was only space for one after the alterations I made. I didn’t want to lose an item that had a functions… but at the same time I like the shield that comes with the Chaos Knight kit. So i asked about to find out what people thought of the Nurgle texture on the side of the gun and if I should swap it for the shield… enough people came back with “why not both?” that I just moved the texture over onto the featureless part of the shield. I had to cut the back of the shield away to get it to fit snugly enough for it to look like it belonged as well as make some alterations to the part of the shield that looked like they were defying gravity in their new position. I also started filling in more areas like underneath the pauldron, and in areas where the muscle met the body to have a nicer transition. I hope that give an idea of the work that went into that arm anyway. The next post I'll do about the gun arm. Dr_Ruminahui, Marius Perdo, DuskRaider and 3 others 6 Back to top Link to comment Share on other sites More sharing options...
noigrim Posted July 2, 2020 Share Posted July 2, 2020 The muscles work great nit too sure about the bells tho Pandoras Bitz Box 1 Back to top Link to comment Share on other sites More sharing options...
Bjorn Firewalker Posted July 2, 2020 Share Posted July 2, 2020 Impressive work on the Chaos Knight. Pandoras Bitz Box 1 Back to top Link to comment Share on other sites More sharing options...

Recommended Posts
Create an account or sign in to comment
You need to be a member in order to leave a comment
Create an account
Sign up for a new account in our community. It's easy!
Register a new accountSign in
Already have an account? Sign in here.
Sign In Now