Parweke Posted September 22, 2018 Share Posted September 22, 2018 yeah, I have the same problem with my first warlords right leg too, I might just try to use some force :) to break it... again actually, I might have an idea, soak it in fairy power spray. if I remember corretcly it works... but my memory is not to be trusted Captain Semper 1 Back to top Link to comment https://bolterandchainsword.com/topic/350330-captain-sempers-adeptus-titanicus-project/page/4/#findComment-5171223 Share on other sites More sharing options...
Captain Semper Posted September 22, 2018 Author Share Posted September 22, 2018 I’ll check it out. Although it might be superglue we’re talking about. :( Link to comment https://bolterandchainsword.com/topic/350330-captain-sempers-adeptus-titanicus-project/page/4/#findComment-5171225 Share on other sites More sharing options...
Captain Semper Posted October 11, 2018 Author Share Posted October 11, 2018 WE ARE BACK AND COMBAT READY! After almost three weeks of downtime, the B&C is back on line! During this time I was very productive and completed by Titan. I did get pictures of the process so I'm going to post them here and discuss various issues that I faced during the process. I had left this with the shin guard of the left foot not fitting properly due to the inclination of the leg. Well I worked around that by trimming the slot in the back of the armour plate as meeting the protrusion on the leg was an impossibility. Here's the result (including the right leg armour): Another problem that I encounter was the small pieces of armour between the "toes". The one in the back of the left leg hardly made it into the proper slot as you can see in the picture above, whereas the one in the front (sorry no picture for that), I had to trim the ball joint as it could not fit in the appropriate position - there is a limit to the angle of the leg relative to the foot that can accommodate those small pieces of armour... So my advice is: DO NOT GO FOR A VERY DYNAMIC POSE FOR YOUR WARLORD TITAN THEY ARE NOT SUPPOSED TO BE VERY DYNAMIC ANYWAY! On the painting front, I used my airbrush and some masking tape to make the stripes, using the bolts on the armour rim as indicators so the angle of the stripes be aligned with each other. The masking tape is 6mm although for smaller Titans it might be too wide... The colour was 2/3 Army Painter "Army Green" and 1/3 Mechanicum Grey. The "white" part is Ulthuan Grey - no mix. The gold is Hashut Copper, Reikland shade and highlight with Sycorax... Captain Idaho, Brother-Chaplain Kage, Brother Handro and 3 others 6 Back to top Link to comment https://bolterandchainsword.com/topic/350330-captain-sempers-adeptus-titanicus-project/page/4/#findComment-5171683 Share on other sites More sharing options...
Supe robot gangster #1 Posted October 11, 2018 Share Posted October 11, 2018 Haha nice to see someone was productive :p all I got done in the three week downtime was build two knight, another reaver and work on some 4grounds scenery and some bolt action... Link to comment https://bolterandchainsword.com/topic/350330-captain-sempers-adeptus-titanicus-project/page/4/#findComment-5171685 Share on other sites More sharing options...
Captain Semper Posted October 11, 2018 Author Share Posted October 11, 2018 Haha nice to see someone was productive all I got done in the three week downtime was build two knight, another reaver and work on some 4grounds scenery and some bolt action... Well it's not like you've been idle mate! ;) :lol: Link to comment https://bolterandchainsword.com/topic/350330-captain-sempers-adeptus-titanicus-project/page/4/#findComment-5171689 Share on other sites More sharing options...
Cyrox Posted October 11, 2018 Share Posted October 11, 2018 Ah nice to see an update on this - nice work Captain Semper 1 Back to top Link to comment https://bolterandchainsword.com/topic/350330-captain-sempers-adeptus-titanicus-project/page/4/#findComment-5171769 Share on other sites More sharing options...
Burni Posted October 11, 2018 Share Posted October 11, 2018 Love these Legio colours, great work and glad you solved your fitting issue. I did hear that you can pose so the panels don’t fit, now I see the problem! I had a pretty productive 3 weeks also, got my 3 knight finished and also did my Reaver. Will have to get the camera out and update my own plog. Looking forward to your 4 Warhounds Captain! Captain Semper 1 Back to top Link to comment https://bolterandchainsword.com/topic/350330-captain-sempers-adeptus-titanicus-project/page/4/#findComment-5171877 Share on other sites More sharing options...
Captain Semper Posted October 11, 2018 Author Share Posted October 11, 2018 Yeah, get that camera and show us your progress! Thx mate, I will continue posting the progress of the Warlord here, although the actual model is complete by now, so I can share the various little problems that I faced in the process. And I really like the colour too, it works very well... now the next challenge will be the Warhounds, I’m really excited about that.... :yes: Link to comment https://bolterandchainsword.com/topic/350330-captain-sempers-adeptus-titanicus-project/page/4/#findComment-5171880 Share on other sites More sharing options...
Kilofix Posted October 11, 2018 Share Posted October 11, 2018 Those stripes are boss! Captain Semper 1 Back to top Link to comment https://bolterandchainsword.com/topic/350330-captain-sempers-adeptus-titanicus-project/page/4/#findComment-5172169 Share on other sites More sharing options...
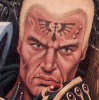
Captain Semper Posted October 11, 2018 Author Share Posted October 11, 2018 OK, the head. First off it is a great idea to have two heads there. Secondly, the two halves did not match exactly after I inserted the "eye" between them - there was a small gap. Frankly, I went for a black head in order to sort of mask it... Brother Dallo, Chaplain Raeven and Brother-Chaplain Kage 3 Back to top Link to comment https://bolterandchainsword.com/topic/350330-captain-sempers-adeptus-titanicus-project/page/4/#findComment-5172177 Share on other sites More sharing options...
Captain Semper Posted October 11, 2018 Author Share Posted October 11, 2018 Those stripes are boss! Thanks mate! :lol: On to the weapon systems: And the armour part of the two cannons: Chaplain Raeven, Captain Idaho, Bryan Blaire and 3 others 6 Back to top Link to comment https://bolterandchainsword.com/topic/350330-captain-sempers-adeptus-titanicus-project/page/4/#findComment-5172181 Share on other sites More sharing options...
Parweke Posted October 11, 2018 Share Posted October 11, 2018 show us the whole titan already! :) looks so cool Link to comment https://bolterandchainsword.com/topic/350330-captain-sempers-adeptus-titanicus-project/page/4/#findComment-5172208 Share on other sites More sharing options...
Captain Semper Posted October 11, 2018 Author Share Posted October 11, 2018 Ask and you shall receive: PROVOCATOR NAVUS WARLORD CLASS TITAN OF LEGIO KRYTOS Brother Dallo, Grimoire, Bryan Blaire and 21 others 24 Back to top Link to comment https://bolterandchainsword.com/topic/350330-captain-sempers-adeptus-titanicus-project/page/4/#findComment-5172246 Share on other sites More sharing options...
Kilofix Posted October 11, 2018 Share Posted October 11, 2018 That’s really nice Captain Semper 1 Back to top Link to comment https://bolterandchainsword.com/topic/350330-captain-sempers-adeptus-titanicus-project/page/4/#findComment-5172256 Share on other sites More sharing options...
Parweke Posted October 11, 2018 Share Posted October 11, 2018 it really is. good job Captain Semper 1 Back to top Link to comment https://bolterandchainsword.com/topic/350330-captain-sempers-adeptus-titanicus-project/page/4/#findComment-5172287 Share on other sites More sharing options...
Chaeron Posted October 11, 2018 Share Posted October 11, 2018 Just caught up on this Captain: looking brilliant! Love the stripes and colouring generally, so neat! Captain Semper and Brother_Doom 2 Back to top Link to comment https://bolterandchainsword.com/topic/350330-captain-sempers-adeptus-titanicus-project/page/4/#findComment-5172376 Share on other sites More sharing options...
Brother Handro Posted October 11, 2018 Share Posted October 11, 2018 Great work Captain! I knew the Krytos scheme would come good in the end! For the record, always take one of the ankle pieces and dry fit in in all eight positions whilst your feet are drying, in case you need to re-pose. It is a bit of an oversight by GW not to warn people that 'overdoing' the pose will lead to ankles and/or shinplates that don't fit. Also, in my experience, a hairdryer will unstick plastic glue! Captain Semper 1 Back to top Link to comment https://bolterandchainsword.com/topic/350330-captain-sempers-adeptus-titanicus-project/page/4/#findComment-5172413 Share on other sites More sharing options...
Bjorn Firewalker Posted October 11, 2018 Share Posted October 11, 2018 Excellent work. Captain Semper 1 Back to top Link to comment https://bolterandchainsword.com/topic/350330-captain-sempers-adeptus-titanicus-project/page/4/#findComment-5172451 Share on other sites More sharing options...
Orpheus Black Blood Posted October 13, 2018 Share Posted October 13, 2018 Really impressive work, i'm astonished.... Captain Semper 1 Back to top Link to comment https://bolterandchainsword.com/topic/350330-captain-sempers-adeptus-titanicus-project/page/4/#findComment-5173190 Share on other sites More sharing options...
Captain Semper Posted October 13, 2018 Author Share Posted October 13, 2018 That’s really nice it really is. good job Just caught up on this Captain: looking brilliant! Love the stripes and colouring generally, so neat! Thank you guys - I set out to do two new things for me: magnetising and airbrushing. Not only I did both, but I also did my first stripping of any scale, so thats a useful thing to learn and try out! So a steep learning curve and I look forward for the next Warlord... Great work Captain! I knew the Krytos scheme would come good in the end! For the record, always take one of the ankle pieces and dry fit in in all eight positions whilst your feet are drying, in case you need to re-pose. It is a bit of an oversight by GW not to warn people that 'overdoing' the pose will lead to ankles and/or shinplates that don't fit. Also, in my experience, a hairdryer will unstick plastic glue! Thank you for your kind comments! I did something similar. by not glueing the right knee and leave it free to adjust as a balancing factor. But I did glue the left leg in place and suffered the consequences! ------------------------------------------------- Now I decided not to go for an Axiom but for a Venator Light Maniple with Provocator Navus (the Warlord) attached. So I though of recreating the Maniple in the book, because, why not? I have already ordered the 4 Warhounds and they are on the way! As you can see there is a minor problem: every single one has a Vulcan Mega Bolter and Havoc has two!!! That means (assuming that there are two of each weapon in the box, I'm one Vulcan Mega Bolter short. I also need to do the Black Arrow - the Reaver Titan of the Maniple: Obviously the Volcano Cannon is not yet available but I can wait... Let's finish the Warhounds first... So if anyone has a spare and wants another weapon, pls PM me. shandwen 1 Back to top Link to comment https://bolterandchainsword.com/topic/350330-captain-sempers-adeptus-titanicus-project/page/4/#findComment-5173271 Share on other sites More sharing options...
Parweke Posted October 13, 2018 Share Posted October 13, 2018 (edited) what is fist stripping? do I even want to know? :) Edited October 13, 2018 by Parweke Captain Semper 1 Back to top Link to comment https://bolterandchainsword.com/topic/350330-captain-sempers-adeptus-titanicus-project/page/4/#findComment-5173304 Share on other sites More sharing options...
Captain Semper Posted October 13, 2018 Author Share Posted October 13, 2018 what is fist stripping? do I even want to know? :) The scale of it is what should worry you... :lol: - typo fixed! Parweke 1 Back to top Link to comment https://bolterandchainsword.com/topic/350330-captain-sempers-adeptus-titanicus-project/page/4/#findComment-5173316 Share on other sites More sharing options...
Grandmaster damion Posted October 13, 2018 Share Posted October 13, 2018 Cool really liking where this is going cannot wait to see more Captain Semper 1 Back to top Link to comment https://bolterandchainsword.com/topic/350330-captain-sempers-adeptus-titanicus-project/page/4/#findComment-5173353 Share on other sites More sharing options...
Burni Posted October 14, 2018 Share Posted October 14, 2018 (edited) These are going to look amazing. I’ve just started painting my 2 Warhounds. Lovely kit apart from a couple of sprue attachment positions and the amount of seams to be cleaned on the legs. That’s just about the only seams I’ve encountered on any of the AT stuff. I’m pretty happy with the 6mm tape width on the carapace, so you could use that for yours. Will post some pics soon for reference. Edit: I’ve got a spare Mega Bolter you can have for the cost of the postage. Edited October 14, 2018 by Burni Link to comment https://bolterandchainsword.com/topic/350330-captain-sempers-adeptus-titanicus-project/page/4/#findComment-5173826 Share on other sites More sharing options...
Captain Semper Posted October 15, 2018 Author Share Posted October 15, 2018 Thx guys, I am really driven to see the Krytos project through, can’t wait for my Warhounds to arrive! @ Burni: if you have any pics with the 6mm stripes, it’ll be great help. I am inclined to seek out narrower masking tape - or even use the 6mm but with uneven spacing... many options there... As regards the Bolter, thank you very much, I’ll PM you once I’m home from work! Link to comment https://bolterandchainsword.com/topic/350330-captain-sempers-adeptus-titanicus-project/page/4/#findComment-5173983 Share on other sites More sharing options...
Recommended Posts
Create an account or sign in to comment
You need to be a member in order to leave a comment
Create an account
Sign up for a new account in our community. It's easy!
Register a new accountSign in
Already have an account? Sign in here.
Sign In Now