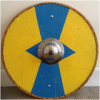
Brother Dallo Posted February 9, 2019 Author Share Posted February 9, 2019 I’ve only tried it on flat panels, but I’d assume the principle is similar for curved plates. Paint the entire surface the lighter of the two colours (yellow in the above case). Place your first strip (this will remain yellow - it’s the first yellow strip starting from the bottom left of my photo). Place the next strip just touching the first (this one will end up black). Using the second strip as a guide, place the third (yellow) strip. I then removed the second strip and it became my 4th strip, acting as a spacer between the yellow strips. You can just cover the entire thing in tape and remove half of them when you’re ready to paint, but reusing your spacer saves on tape. Once you have placed down all of your “yellow” strips, smooth over the tape with your thumb, ensuring that it’s all flattened down. Using your darker colour (black in the above case), paint in the other strips. Try to stay in the lines but getting total coverage is more important than neatness at this stage. Let the paint dry fully. This is important. Pull off the tape and marvel at your nice crisp lines. In my first test piece, I didn’t smooth a piece of tape properly, so got some paint where it shouldn’t be. One final piece of advice would be to keep the black paint reasonably thick (within reason). Using really thinned down layers is likely to leech under the tape. If you’re feeling fancy, you can then mess about with highlights and weathering. Hope that makes at least a little sense. I grabbed 3mm modelling masking tape from eBay, for maybe £3 or there abouts. Obviously you can go up or down in sizes if you want, but I think 3mm is a good size and you can always double up layers if you want wider stripes. Let us know how you get on. Dallo Link to comment Share on other sites More sharing options...
Mendi Warrior Posted February 10, 2019 Share Posted February 10, 2019 Neat work. Eager to see the results on your titans. I have been eyeing 1mm and 2mm masking tapes, on my shopping list. I have some larger ones from DIY stores (18mm - 25mm), unfortunately much too large for stripes at AT scale. Brother Dallo 1 Back to top Link to comment Share on other sites More sharing options...
Brother Dallo Posted February 10, 2019 Author Share Posted February 10, 2019 Neat work. Eager to see the results on your titans. I have been eyeing 1mm and 2mm masking tapes, on my shopping list. I have some larger ones from DIY stores (18mm - 25mm), unfortunately much too large for stripes at AT scale. In my opinion, anything much thinner than 3mm and it's going to start getting twisted, but YMMV. Your wish is my command. I started out on two middle shoulder plates, which I had painted white. In this photo, you can see I used one piece of tape as a spacer, to ensure all of my stripes were more or less perfectly spaced. I also added tape to one side of a leg plate. The results were slightly sloppy, as I'd not flattened down the tape properly, but overall I was happy with the results. You can see part of an MDF building I painted up for Kill Team yesterday in the background. I used a small brush to neaten up any overspill. My next attempt worked better and didn't need cleaning up. At this point, I wanted to dryfit my panels to see how Gulgoleth is shaping up. I'm pretty pleased with how he's looking. I think I'll paint proper hazard stripes on the rectangles at the end of his shoulder plates, to draw the attention to his head and to hopefully tone down the "Looted Warlord" look as Orks don't really use hazard striping as a defining part of their paint scheme in the same way Imperials do. Here's a better picture of the shoulder pad in place. As you can probably tell, there is a lot of brass trim that needs neatened up, I need to paint the weapons & base, think about some highlighting and apply some weathering, but I think it's beginning to look like something. C&C Welcome. Dallo Link to comment Share on other sites More sharing options...
Zhiv Posted February 10, 2019 Share Posted February 10, 2019 Tip: run a toothpick along the trim to press the masking tape against it. This way you don't end with small gaps by trim. splayedpaintbrush and Brother Dallo 2 Back to top Link to comment Share on other sites More sharing options...
Brother Dallo Posted February 10, 2019 Author Share Posted February 10, 2019 That’s a good idea Zhiv. I ended up using my thumb nail for the second one and it worked out, but a toothpick would be better for delicate detailing. Dallo Link to comment Share on other sites More sharing options...
Gamma310 Posted February 11, 2019 Share Posted February 11, 2019 Nice idea for the strips. Might have to steal that for my Gryphonicus machines. Painting strips is a chore and not so much fun for me;). The way your Warlord is leaning into the stride makes him look menacing as heel. Wouldn't want to cross that guy.. Brother Dallo 1 Back to top Link to comment Share on other sites More sharing options...
Captain Semper Posted February 12, 2019 Share Posted February 12, 2019 Well, i had my reservations on the jaw, but it seems that the overall result works quite well! Also, the posing is great! There is still work to be done obviously but it's shaping up nicely. I now wish I used red as a spot colour for mine... :rolleyes: Brother Dallo 1 Back to top Link to comment Share on other sites More sharing options...
Brother Dallo Posted February 12, 2019 Author Share Posted February 12, 2019 Thanks Captain. With regards to using red as a spot colour, now I’m thinking of painting the armour above the head red, to form a triangle with the red on the knees forming the other two points. This should draw the eye to the head quite naturally as it’s in the centre of the triangle. If I do this and add hazard stripes to the shoulder pads, it might be too much, visually speaking, so I’ll think about it. Steal away Gamma. I found using strips is an easy (if slightly time consuming) way to up your painting game. I’m glad you guys like the pose. He’s looking pretty mean, which I like. Cheers. Dallo Link to comment Share on other sites More sharing options...
Achinadav Posted February 13, 2019 Share Posted February 13, 2019 Arghhh, its coming right for me! The paint really makes him look a menacing beast. I think the red is a lovely contrast and that your idea of putting some red up top would really balance things out nicely. Brother Dallo 1 Back to top Link to comment Share on other sites More sharing options...
Mendi Warrior Posted February 13, 2019 Share Posted February 13, 2019 Very nice. I also think the armour panel above the head could be nice in red. If you are unsure, have a try with photoshop or an alternative (e.g. paint or even powerpoint). Gulgoleth charging at you really conveys the message "I'll smash your face!" I feel. Brother Dallo 1 Back to top Link to comment Share on other sites More sharing options...
Chaeron Posted February 14, 2019 Share Posted February 14, 2019 Looks great Dallo - the stripes help to break things up nicely, and the jaw definitely works. Excellent stuff! Brother Dallo 1 Back to top Link to comment Share on other sites More sharing options...
Brother Dallo Posted March 3, 2019 Author Share Posted March 3, 2019 Thanks for the kind words folks, and sorry for not posting for a while. Just a quick update today to let you know I'm still hopefully on track for completing my Vow on time. I ended up painting the top panel red and I much prefer the colour balance. In terms of what still needs to be done, I need to paint on some more brass, drybrush the base, paint the base rim, wash the brass trim and think about some weathering for the panels. Once I get the remainder of my Titans painted to this tabletop standard, I may go back and add some highlights to the armour panels, but I'm happy enough with them as they are for now. The knights will take a bit more work. I definitely prefer painting green compared to yellow. When I get my vow complete, I'll have to sort out some better lighting and a nicer backdrop than my counter top. Dallo Gamma310, Parweke, Warsmith Uveron and 2 others 5 Back to top Link to comment Share on other sites More sharing options...
Achinadav Posted March 3, 2019 Share Posted March 3, 2019 Red panel at the top looks great, nice job! Brother Dallo 1 Back to top Link to comment Share on other sites More sharing options...
Mendi Warrior Posted March 4, 2019 Share Posted March 4, 2019 Great work! Brother Dallo 1 Back to top Link to comment Share on other sites More sharing options...
Chaeron Posted March 4, 2019 Share Posted March 4, 2019 Looking solid Dallo - great work! Keep it coming :) Brother Dallo 1 Back to top Link to comment Share on other sites More sharing options...
Brother Dallo Posted September 18, 2019 Author Share Posted September 18, 2019 Well, it's been a while, but I'm still kicking. One of my gaming group has showed an interest in AT, and some others may follow, so I'm trying to get back to this project. It's only a small step, but I've made a start on the armour panels for Vestiges of Mercy. I have to say, I really like how the dark gold trim works with the black shoulder pad. I plan to use black as the spot colour on this Warlord, rather than red on Gulgoleth. I may use a third spot colour on Terio Aestus when I get around to it, to give each Warlord a bit of a unique identity. Hoping to keep up some progress on this log. I have a Maniple to finish. Dallo Gore Crow 1 Back to top Link to comment Share on other sites More sharing options...
Fajita Fan Posted September 18, 2019 Share Posted September 18, 2019 Don’t we all? Black and gold is a great scheme. Brother Dallo 1 Back to top Link to comment Share on other sites More sharing options...
Chaeron Posted September 18, 2019 Share Posted September 18, 2019 Welcome back Dallo - looking forward to seeing the next steps! Brother Dallo 1 Back to top Link to comment Share on other sites More sharing options...
Brother Dallo Posted September 19, 2019 Author Share Posted September 19, 2019 Thanks folks. Not a huge update tonight, just got some more paint on the armour. Takes a surprising amount of time with a tiny brush for the details. http://i.imgur.com/NxXLNYxh.jpg Still, moving in the right direction. Dallo Link to comment Share on other sites More sharing options...
Mendi Warrior Posted September 19, 2019 Share Posted September 19, 2019 Small progress is still progress! Welcome back! Brother Dallo 1 Back to top Link to comment Share on other sites More sharing options...
Brother Dallo Posted September 21, 2019 Author Share Posted September 21, 2019 Hi folks, I've made some decent progress on Vestiges of Mercy. The armour plates are just blu-tacked on to get an idea of colour balance and I'm pretty happy with it. I've shortened the barrel on my converted Quake Cannon and I'm much happier with it now. One comment was that the barrel was not on straight, which is much less noticeable now the barrel is shorter. Here's the two Warlords hanging out. I was sharing my progress with my friends, who asked for a banana for scale. It was then pointed out that they didn't know how big the banana was, so I sent this. Cheers. Dallo Mendi Warrior, Gore Crow and Dosjetka 3 Back to top Link to comment Share on other sites More sharing options...
Fajita Fan Posted September 21, 2019 Share Posted September 21, 2019 “Banana for scale” is an internet joke that was popular on imgur.com Brother Dallo 1 Back to top Link to comment Share on other sites More sharing options...
Mendi Warrior Posted September 26, 2019 Share Posted September 26, 2019 Nice progress! Nicely getting along with Gulgoleth! Brother Dallo 1 Back to top Link to comment Share on other sites More sharing options...
Chaeron Posted September 26, 2019 Share Posted September 26, 2019 Really nice progress Dallo - what will you do with them next? Brother Dallo 1 Back to top Link to comment Share on other sites More sharing options...
Bjorn Firewalker Posted September 27, 2019 Share Posted September 27, 2019 Good job on the Titans. Brother Dallo 1 Back to top Link to comment Share on other sites More sharing options...

Recommended Posts
Create an account or sign in to comment
You need to be a member in order to leave a comment
Create an account
Sign up for a new account in our community. It's easy!
Register a new accountSign in
Already have an account? Sign in here.
Sign In Now