Dosjetka Posted February 6, 2019 Share Posted February 6, 2019 The decals on the left leg just need some weathering or a couple of thin filters of some colour to knock off the "newness" they have. The rest of the model looks fantastic though. :tu: Link to comment Share on other sites More sharing options...
blackbabyjesus Posted February 6, 2019 Author Share Posted February 6, 2019 Well done. What do the three suns on the Lamenter's left leg symbolize? That he killed three enemy champions? Or does it commemorate a certain campaign, maybe a battle fought in a three-sun star system? It's a take on an ultramarine devastator model from the 1989 Space Marine Painting Guide book where shell bursts were used to denote significant kills. I'm not home til the 15th but when I am I'll get a photo of the page and put it up here. Kierdale 1 Back to top Link to comment Share on other sites More sharing options...
blackbabyjesus Posted February 6, 2019 Author Share Posted February 6, 2019 The decals on the left leg just need some weathering or a couple of thin filters of some colour to knock off the "newness" they have. The rest of the model looks fantastic though. :tu: 100% agree, going to have a go at a medium brown filter at some point to try and tie it in with the yellow. Great stuff mate, you should be proud of your work. Any chance of a tute on the checks on the shoulder pads? I'll try and remember to do a step by step the on the shoulder pad of the next one. Link to comment Share on other sites More sharing options...
blackbabyjesus Posted February 13, 2019 Author Share Posted February 13, 2019 Been asked a couple of times on Instagram and Facebook for a how-to on a couple of bits for these, so I'll post them here too. Step 1: Prime! Primer went a little rough on this guy, wasn't overly pleased but the gloss coat later will sort it out. Step 2: Base coat Vallejo Chocolate Brown (yes, we're painting yellow) Step 3: Highlight/modulate with 50/50 Chocolate Brown / Vallejo Ivory, I airbrush this phase because it's loads easier than wet blending the whole lot! Step 4: Further highlight with pure Ivory. Step 5: Edge highlight the whole lot with pure Ivory, I find a little flow improver and a brush with a good point really helps here. Step 6: Glaze the whole thing with GW Lamenters Yellow, again I use an airbrush here because it's loads quicker to build up the colour than brushing it on. Step 7: No picture for this, haven't done it yet! Gloss varnish the whole model, get it REALLY shiny. Pin wash with GW Agrax Earthshade Gloss (this stuff is literally magic). Shovellovin, Gederas, Brother Aiwass and 3 others 6 Back to top Link to comment Share on other sites More sharing options...
blackbabyjesus Posted February 13, 2019 Author Share Posted February 13, 2019 1. Paint the whole pad with the lightest colour you're going to use (Coat D'Arms Elf Grey for me). 2. With a slightly darker grey (I just add a dot of black to the elf grey I already have out) divide the pad vertically into 8 sections, I split it 50/50 down the middle, then divide the 2 halves, then divide the quarters, you can be pretty rough here, it's just a guideline. 3. Divide the pad into several equal rows, try to make squares towards the bottom, you won't really be able to at the top, but that's ok. With these lines, make sure they're all parallel with the bottom of the pad. 4. Colour in half the squares, be as neat as you can and use a small brush with a good point, I find some flow improver in the paint really helps here. 5. Using Elf Grey again I tidy up all the left over guidelines and make sure all the black squares have flat sides. FormelyKnownAsSmashyPants, Brother Aiwass, Dosjetka and 8 others 11 Back to top Link to comment Share on other sites More sharing options...
FormelyKnownAsSmashyPants Posted February 15, 2019 Share Posted February 15, 2019 Thanks mate, that tute you’ve made looks easy to follow, I will definitely be looking forward to trying it out. Link to comment Share on other sites More sharing options...
blackbabyjesus Posted April 3, 2019 Author Share Posted April 3, 2019 Finally finished this guy. Another 2 to go and then I can paint a few more after that! Markus_, Subtle Discord, Brother Pheidias and 8 others 11 Back to top Link to comment Share on other sites More sharing options...
Brother Aiwass Posted April 3, 2019 Share Posted April 3, 2019 Brother, those are amazing. blackbabyjesus 1 Back to top Link to comment Share on other sites More sharing options...
MagicMan Posted April 4, 2019 Share Posted April 4, 2019 Really nice. Cool technique as well, thanks for taking the time. How does the gloss work? That stage was missing. The final model doesn't look glossy. Would love to see how you painted the ''Circle Heart'' symbol too. Always the trickiest bit IMO. Link to comment Share on other sites More sharing options...
blackbabyjesus Posted April 4, 2019 Author Share Posted April 4, 2019 Really nice. Cool technique as well, thanks for taking the time. How does the gloss work? That stage was missing. The final model doesn't look glossy. Would love to see how you painted the ''Circle Heart'' symbol too. Always the trickiest bit IMO. The gloss varnish allows gloss washes to run into the recesses loads easier, gives that super clean recess shade without any of the hassle. I would normally use oil paints but the drying time is ridiculous so for these I'm using acrylics. Link to comment Share on other sites More sharing options...
MagicMan Posted April 4, 2019 Share Posted April 4, 2019 So do you use a Matte Varnish at the end to reduce the shine? Looks like a great technique. Thanks again for sharing. Link to comment Share on other sites More sharing options...
blackbabyjesus Posted April 5, 2019 Author Share Posted April 5, 2019 So do you use a Matte Varnish at the end to reduce the shine? Looks like a great technique. Thanks again for sharing. Yeah, all my minis look like a mess until the varnish stage at the end! Link to comment Share on other sites More sharing options...
blackbabyjesus Posted May 12, 2019 Author Share Posted May 12, 2019 Finished another 2! They can also now begin their lives as gaming pieces as they've fulfilled their destiny as a Golden Demon entry, no trophy sadly but the competition was FIERCE! I did however get a finalist pin which I'm super happy about. http://www.bolterandchainsword.com/gallery/image/258546-img-20190512-191711-01/ Only another 5 to go and I'll have a whole tactical squad! Kierdale, Majkhel, robofish7591 and 8 others 11 Back to top Link to comment Share on other sites More sharing options...
The_son_of_Dorn Posted May 12, 2019 Share Posted May 12, 2019 Beautiful work. Very crisp! Link to comment Share on other sites More sharing options...
Bjorn Firewalker Posted May 12, 2019 Share Posted May 12, 2019 Excellent work. Link to comment Share on other sites More sharing options...
OakRiver Posted May 13, 2019 Share Posted May 13, 2019 Awesome work! Link to comment Share on other sites More sharing options...
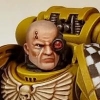
Kierdale Posted May 13, 2019 Share Posted May 13, 2019 Outstanding work! :tu: How do you paint the shaven heads? Link to comment Share on other sites More sharing options...
Freakshow668 Posted May 13, 2019 Share Posted May 13, 2019 These are such amazing work, every time I look at them I expect them to start moving. Link to comment Share on other sites More sharing options...
blackbabyjesus Posted May 13, 2019 Author Share Posted May 13, 2019 Outstanding work! How do you paint the shaven heads? Hey, I add a little grey into the flesh colour and stipple it on with an old brush. It's a effect that needs to be subtle to look good. Link to comment Share on other sites More sharing options...

Recommended Posts
Create an account or sign in to comment
You need to be a member in order to leave a comment
Create an account
Sign up for a new account in our community. It's easy!
Register a new accountSign in
Already have an account? Sign in here.
Sign In Now