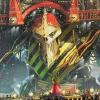
Warsmith Uveron Posted February 10, 2019 Share Posted February 10, 2019 Greetings all. I have decided to start a new thread to be the dedicated location of WIP images of my Titans and Knights as they are collected and painted and also the a location I can write battle reports and talk about campaigns I take part in. But before all of that, how did I get here. Well Middle of last month I had planned to play a very large game of AOS and as such spent the day at my FLGS during the game my opponents copy of Titan Death showed up, as did a few others for another 2 mates who were getting into Titanicus. Well one thing led to another and before the end of the day I had ordered the Titan Battlegroup box set and committed to joining in the campaign that the group was planning on running in a months time! Once I got home I hit the internet and started researching which Legio I wanted to collect. This choice was made quite simple for me. I knew I wanted to collect a force loyal to the Imperium second I I wanted a Red Paint Scheme having always liked the 'classic' Mecanicum look. Then Finaly as a Long time Iron Warriors collector I wasn't scared by chevrons or hazard stripes, thus most of my next week was me trying to find options that were not the Fire Wasps! But at the end of the day I decided not to accept any imitations and started work on practicing some painting techniques. A week later my titans arrived, I then placed an order for another Reaver and some Questoris Support Banners (Though havent a clue what I am going to paint them at the moment). I then spent the rest of the day at my FLGS building some Warhounds. Once they were built I was able to play my first game of Titanicus, a quick simple game (No Advanced Rules) of Two Warhounds fighting another Two Warhounds. WOW!! the game was fun had a great time and a hunger for more games. Well a day later after building my Warlord and working out a number of ways to prime in the humid and cold conditions I was facing I was able to take the following photo and send it to the FB group I had built for my local AT club. Then filled with the restless energy of someone wanting yet more games of AT I spent that evening painting and by the end of the evening was able to get these chaps finished. These were an experiment I wanted to see what Plasma effects would look like if I painted them with Nighthaunt Gloom, I have to say I rather liked the outcome. My only remaining thought is do I put them on bases to match the rest of my collection. At this point it as on to the Titans, I started with a single Warhound to test my plans. And after a day of hard work I was able to get it finished. I dont have a name for it yet, but one will be on the way. As will a small line or two of story. On the whole I was very happy with this first model. I experimented with a number of Techniques and even broke out the transfers both the ones that came with the set and my 'back catalog' of other 40k ones. (The Large Skull came from the old IG Tank one). I applied the number 4 to the titans leg as this will be titan 4 in my battle group. At this stage my plan was to just collect one Axiom Maniple, (I suspect that plan is now out the window). As I was working on the first Warhound I made a start on the second one, and was able to bring it quickly to 'table top standard' (See bellow). Its still got alot of work to go on it I have basicly just base coated it and given the metals a drybrush and wash. But I wanted to get started on the Warlord to get me to a point that I had three painted titans not enough for match play but it will be a start for some more advanced games. So what follows are some WIP images of my Warlord, I have finished the 'body' and Iam now working on the Armour plates, once these are done I will work on the weapons (That are magnetized unlike my reavers and warhounds) and then onto wethering and other 'realism' details. The Second photo is where I finished work last night. The Armour plate that goes above the head is my current concern it doesn't look right. Currently debating making the whole plate black, trying to turn the hazard stripes into chevrons or painting the whole plate red. Guess thats it for now, but more will be on the way. Its a slow day at work so I expect I will be able to paint for a good 12+ hrs today! Xenith, Sandlemad, Brother Dallo and 1 other 4 Back to top Link to comment Share on other sites More sharing options...
Mendi Warrior Posted February 10, 2019 Share Posted February 10, 2019 Welcome on board. It is a pretty good start! Interesting choice for the shoulder armour panels, all those I have seen so far are of the same style left and right, here you mix them. As far as the armour plate going above the head is concerned, I would vote for either all black or chevrons. Warsmith Uveron 1 Back to top Link to comment Share on other sites More sharing options...
Sherrypie Posted February 10, 2019 Share Posted February 10, 2019 Solid start there, the Warlord seems to be shaping up nicely. I think the neck plate is better with some colour in it, as there is already a black panel next to it on the shoulder. I should really get my arc templates painted, those are a pleasure to see. Warsmith Uveron 1 Back to top Link to comment Share on other sites More sharing options...
Warsmith Uveron Posted February 10, 2019 Author Share Posted February 10, 2019 Welcome on board. It is a pretty good start! Interesting choice for the shoulder armour panels, all those I have seen so far are of the same style left and right, here you mix them. As far as the armour plate going above the head is concerned, I would vote for either all black or chevrons. Yeah I am working on the Chevrons now... It does look better! Yeah and as for the Shoulder Panels, yeah, its something I thought about for a bit, The idear is that the titan has been repaired between battles and these were the parts available. (A nod to the idea of the Mark 5 Power Armour aka "Heresy Armour". Solid start there, the Warlord seems to be shaping up nicely. I think the neck plate is better with some colour in it, as there is already a black panel next to it on the shoulder. I should really get my arc templates painted, those are a pleasure to see. Yeah! The plate is looking better with it beeing a chevron now. Just need to finish cleaning it up. Achinadav, Parweke, Cpt. Bannockburn and 2 others 5 Back to top Link to comment Share on other sites More sharing options...
Warsmith Uveron Posted February 12, 2019 Author Share Posted February 12, 2019 Greetings! A quick update this morning. Yesterday I was able to finish the base paint steps of my Warlord getting the Armour Plates on the titan and a light wash applied to it all. Its now in about the same place as my second warhound, lots more detail work highlighting, and smoothing needs to be done to get me to a point that Iam happy with it. But for now its at a level I consider table top my personal minimum. As such Iam moving on to get the reavers and the knights in my collection done. They are still in sub assembly's and I want to get my whole AT collection to a place that I can play games with it. Then I can return and spend time on the detailing steps of each titan without the pressure to get the chaps done so I can move on to the next one. First on that list is getting some paint on some Imperial Knights. Iam going to make my own custom house for my Knights so last nights painting session was spent adding some base coats to a few of the knights to work out a plan I liked. I think Iam going to go with a blue and grey pallet, the inverse of my titans (who uses blue and Grey as a fine detail color). Achinadav 1 Back to top Link to comment Share on other sites More sharing options...
Gamma310 Posted February 12, 2019 Share Posted February 12, 2019 Chevrons on Titans just look cool. I would go mad painting it but somehow the look of your Titans makes me wanna try it. Keep on painting, this is bound to look ace. Warsmith Uveron 1 Back to top Link to comment Share on other sites More sharing options...
Warsmith Uveron Posted February 12, 2019 Author Share Posted February 12, 2019 Chevrons on Titans just look cool. I would go mad painting it but somehow the look of your Titans makes me wanna try it. Keep on painting, this is bound to look ace. Thanks! I have been painting Chevrons for Years. (See this old thread for my past works) and I realized its most effective when only used a little. Gamma310 1 Back to top Link to comment Share on other sites More sharing options...
Mendi Warrior Posted February 13, 2019 Share Posted February 13, 2019 Very nice. The Warlord comes much better with the chevron. Warsmith Uveron 1 Back to top Link to comment Share on other sites More sharing options...
Warsmith Uveron Posted February 17, 2019 Author Share Posted February 17, 2019 Hobby Update! Well its been almost a week, and I have had a odd week. I have made some progress with all my titans it is not the progress I want to make but progress was made all the same. First up all my Knights were given a base coat and hit with a black wash. They are at now what I consider minimum standard to get on the table and dont look horrible when beaning used. The plan will be to return and start adding a few layers of paint and highlights to them. The Plan is go go for almost cream on the shareholder and work in some greens on all the lenses, as well a long pass to pick out details. Following this I set to work on my pair of Reaver Titans and Iam about half way though the base colors again. The hazard striping is still a little rough but it will be cleaned up as other layers are added. Sadly and what has derailed most of my painting for the last few days is that I appear to have lost one of the leg armor plates for one of the titans. This is not ideal and after checking in every location I have been painting for the last week, I have decided that it is lost. As such I have started to gather the needed materials for a press mold to cast my own sparepart, hopefuly it will not look that bad, and any problems with it can be painted up as battle damage. Burni 1 Back to top Link to comment Share on other sites More sharing options...
Achinadav Posted February 17, 2019 Share Posted February 17, 2019 Bad luck on the missing panel! Real shame that it isn't one of the ones you get multiple spares for. Great work on your titans. The chevrons looks great! Warsmith Uveron 1 Back to top Link to comment Share on other sites More sharing options...
Warsmith Uveron Posted February 17, 2019 Author Share Posted February 17, 2019 Bad luck on the missing panel! Real shame that it isn't one of the ones you get multiple spares for. Great work on your titans. The chevrons looks great! Yeah, Guess its time to learn how to cast my own bits. Which is kinda nice as it will help with a few other projects I have planned as well! Link to comment Share on other sites More sharing options...
Mendi Warrior Posted February 18, 2019 Share Posted February 18, 2019 They look very nice. Too bad you lost a leg armour plate. Could it be mixed with other bits, non-AT related? Maybe the reusable mould material called Blue Stuff http://www.greenstuffworld.com/en/reusable-blue-stuff/8-blue-stuff-mold-8-bars.html can be handy here for the one-off odd replacement part impossible to find anywhere. Link to comment Share on other sites More sharing options...
Warsmith Uveron Posted February 18, 2019 Author Share Posted February 18, 2019 They look very nice. Too bad you lost a leg armour plate. Could it be mixed with other bits, non-AT related? Maybe the reusable mould material called Blue Stuff http://www.greenstuffworld.com/en/reusable-blue-stuff/8-blue-stuff-mold-8-bars.html can be handy here for the one-off odd replacement part impossible to find anywhere. Well that is exactly what I have been using. I made a first attempt last night but the putty was not fully cured when I pulled it out. So making a second attempt shorty. Link to comment Share on other sites More sharing options...
Zhiv Posted February 18, 2019 Share Posted February 18, 2019 My experience with blue stuff / green stuff. Let the mold harden for an hour. The 5 minutes they give is not enough for crisp detail. I could not get good casting results with milliputty (fine quality) regardless of what I tried. Greenstuff gives a decent result... after 24 hours of hardening. Warsmith Uveron 1 Back to top Link to comment Share on other sites More sharing options...
Warsmith Uveron Posted February 18, 2019 Author Share Posted February 18, 2019 My experience with blue stuff / green stuff. Let the mold harden for an hour. The 5 minutes they give is not enough for crisp detail. I could not get good casting results with milliputty (fine quality) regardless of what I tried. Greenstuff gives a decent result... after 24 hours of hardening. I have hardened with 20mins in a freezer. And Yeah this is my last attempt with Millputty (Iam using superfine). Sadly I left my Greenstuff back at home and its going to be a week or so I expect before i am home. Link to comment Share on other sites More sharing options...
Gamma310 Posted February 18, 2019 Share Posted February 18, 2019 My experience with blue stuff / green stuff. Let the mold harden for an hour. The 5 minutes they give is not enough for crisp detail. I could not get good casting results with milliputty (fine quality) regardless of what I tried. Greenstuff gives a decent result... after 24 hours of hardening. I have hardened with 20mins in a freezer. And Yeah this is my last attempt with Millputty (Iam using superfine). Sadly I left my Greenstuff back at home and its going to be a week or so I expect before i am home. I had the best results with a 50/50 mix of Greenstuff and Milliput. It hardens faster than only Greenstuff and still takes shapes very well. Good luck with casting the piece :) Warsmith Uveron 1 Back to top Link to comment Share on other sites More sharing options...
Mendi Warrior Posted February 18, 2019 Share Posted February 18, 2019 Did you made a 1-side or 2-sides mold with the Blue Stuff? Link to comment Share on other sites More sharing options...
Warsmith Uveron Posted February 18, 2019 Author Share Posted February 18, 2019 Did you made a 1-side or 2-sides mold with the Blue Stuff? Just one sided. Due to it being a plate section I think I can get away with it. I had the best results with a 50/50 mix of Greenstuff and Milliput. It hardens faster than only Greenstuff and still takes shapes very well. Good luck with casting the piece Fantastic, I will try that when I get my hands on my stockpile of Greenstuff if the current cast doesn't work. Though now I have the bluestuff Iam thinking of casting some extra parts for the terrain boxs. Link to comment Share on other sites More sharing options...
Mendi Warrior Posted February 18, 2019 Share Posted February 18, 2019 It is slightly curved but I think for a one off it is indeed ok. Maybe worth a try with a 2-sides mold. If you go down that road, don't forget to make some guides otherwise the two parts might be misaligned. I did a couple extra parts for terrain (imprints of a recumbent-style panel). I used Milliput (normal one) and it gave relatively decent results. For my first attempt I lost a few details due to being too quick to unmold it, for the second attempt I redid the mold and did not applied enough pressure at some points when making the imprint. Third attempt is quite good. I think it works best for 1-side molds when there are no details to capture on the back of the piece. Planning to add a couple more tu use as debris on the bases. Two-side molds are more tricky. I did a couple torsos, less than stellar results but they will do the trick (for their purpose they are ok). Interested in seeing the results. Link to comment Share on other sites More sharing options...
Warsmith Uveron Posted February 19, 2019 Author Share Posted February 19, 2019 Hobby Update. Well The Bluestuff Mold is still not working great, basicly the millput in the mold is not setting and even after waiting 24hrs its not come out of the mold correctly. Debating what to do next but I suspect its time to break out the greenstuff. On other notes. I am working hard on my pair of reaviers got base coat almost done on the whole model now and started to add in the few layers that I put on before the first wash that the whole model gets. I have also been using the exess Milput from the casting attempts to build texture onto the bases of my tians. Achinadav, Reyner and Gamma310 3 Back to top Link to comment Share on other sites More sharing options...
Mendi Warrior Posted February 19, 2019 Share Posted February 19, 2019 (edited) Nice progress. Is your milliput still good? I did cast two parts yesterday evening and unmolded them at around midday today, leaving them to dry at room temperature. Results are pretty much ok. I'm using the standard yellow-grey milliput and a 2-sided mold. Details are of course less precise but I consider them sufficient as I'm planning to add a complete Warhound head and Reaver power fist as debris for basing (with part of the cast component visible, otherwise no need to go that road of course). Best of luck. I used the excess to cover polystyrene I had used for a first rough texture. Silly question: when you mentioned "I have hardened with 20mins in a freezer." I assume you were speaking of the mold, right? Edited February 19, 2019 by Mendi Warrior Link to comment Share on other sites More sharing options...
Warsmith Uveron Posted February 19, 2019 Author Share Posted February 19, 2019 Nice progress. Is your milliput still good? Silly question: when you mentioned "I have hardened with 20mins in a freezer." I assume you were speaking of the mold, right? Yeah I put the Mold in the Freezer! I hope the Millputs still good, I brought it from the store on sunday! Iam going to try and cast it again today (without Greenstuff). Going to try and build the mold differently and let it completely dry first. Link to comment Share on other sites More sharing options...
Mendi Warrior Posted February 19, 2019 Share Posted February 19, 2019 I didn't put mine into the freezer. (only my greenstuff is in the freezer to lengthen its shelf life as it prevents it from hardening, or more accurately very much slows the process, it is similar for milliput). To fill the mold, did you used a big lump of milliput or several small lumps? I did mine with small lumps, moistened, and pressed into the details of the mold. Same approach for the other side of the mold, then I joined them together (properly aligned) and pressed them together. How long did you mixed the two milliput components? From what I read the colours are pretty much the same for the two components of the superfine milliput which sometimes allows for mistakes when mixing them together. Apart from that I don't see anything else that might cause problem. Or the room temperature being too low? Link to comment Share on other sites More sharing options...
Warsmith Uveron Posted February 20, 2019 Author Share Posted February 20, 2019 PART CASTING SUCCESS! Its not the greatest bit ever, but will paint up with significant battle damage, but it will be better than having the part missing completely! Gamma310 and Achinadav 2 Back to top Link to comment Share on other sites More sharing options...
Gamma310 Posted February 20, 2019 Share Posted February 20, 2019 PART CASTING SUCCESS! Its not the greatest bit ever, but will paint up with significant battle damage, but it will be better than having the part missing completely! Well done, what did you change? Just out of curiosity and asking for a friend who lost a reaver head.... Link to comment Share on other sites More sharing options...

Recommended Posts
Create an account or sign in to comment
You need to be a member in order to leave a comment
Create an account
Sign up for a new account in our community. It's easy!
Register a new accountSign in
Already have an account? Sign in here.
Sign In Now