Eberious Posted March 20, 2019 Share Posted March 20, 2019 The Ouroboros Crusade ~ Creation out of Destruction ~ ~ Life out of Death ~ Greetings brothers, the Templars have been calling me as of late. Strayed into the land of homebrew chapter for a year or so. Struggled to get certain parts right and colour schemes, only to end up making the right choice... the only choice. So busy redoing them into Templars. This will be a Primaris thread mainly, I will have some tanks and a LandRaider or two(rules be dammed)I'll just have to make it bigger. Going to 'reincarnate' some Battle Brothers from my main army across to this one to fit the mashed together fluff I made and posted in the Crusades thread pinned on our sacred sub forum, 'counts as' and of course the odd non codex legal model. To start there won't be much in the way of paint, saving it for the ETL. I've got a fair whack of stuff to rebuild, build etc. Anyways, on with the Pics... and for those who remember me, you know I love my pics..sorry. Dreadnought Brother Rainard Pilot Pics. The base That's all for now, tis good to be back. Agamemnon_Ilias, Dosjetka, Honda and 10 others 13 Back to top Link to comment Share on other sites More sharing options...
Pearson73 Posted March 20, 2019 Share Posted March 20, 2019 Nice pose and basing there, all the extra details and gubbins cement him as a true Templar. The added attention to detail, such as the cracked paving stones, really pays off. Eberious 1 Back to top Link to comment Share on other sites More sharing options...
Crovan Posted March 20, 2019 Share Posted March 20, 2019 That model is GORGEOUS. Very well done! Eberious 1 Back to top Link to comment Share on other sites More sharing options...
Marshal Vespasian Posted March 20, 2019 Share Posted March 20, 2019 Loving every Little bit. Great composution of the piece. The dark model will look absolutely stellar on a light base. Did you do the entire base from plasticard? Eberious 1 Back to top Link to comment Share on other sites More sharing options...
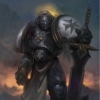
Bjorn Firewalker Posted March 21, 2019 Share Posted March 21, 2019 The customized Redemptor Dreadnought is most impressive, even unpainted. Eberious 1 Back to top Link to comment Share on other sites More sharing options...
SWORD BROTHER RYAN Posted March 21, 2019 Share Posted March 21, 2019 I really love the dread, and see that you've taken inspiration from many sources on the grubbins! The pilot is a nice conversion, and I'd love to know how it was done. Eberious 1 Back to top Link to comment Share on other sites More sharing options...
Marshal Reinhard Posted March 21, 2019 Share Posted March 21, 2019 Every redemptor I see from now on will come across lacking Eberious and Captain Antargo 2 Back to top Link to comment Share on other sites More sharing options...
Eberious Posted March 22, 2019 Author Share Posted March 22, 2019 Thanks everyone, @Marshal Vespasian, yes the main base is made from plasticard. @SWORD BROTHER RYAN, I'll try. 1. starting with a little Heresy, used a wrathmonger for the pilot. Cut the arms off enough to fit into the space. Attached him to a seat(in this case a IG sentinel seat, cut to fit. Attached some tubes and wire for added details, of life support etc. Then stuck the lot to the underside of the Dread's top plate. 2.Test fitting all the way, removed the middle front section of the standard model. The area that the front plate sits flush with and the tubes and wires around the side. Then built it back but wider to allow enough space to see the pilot as much as possible when the front plates are open. Had to add width to the plate with the vision slit to cover the gaps. Luckly I was able to get enough width before the outside armour plate stopped it. Test fitting all the way through by holding it in place and blutacking. Then bit by bit scraping, filing, cutting away until it fit nice'n'snug. Bjorn Firewalker 1 Back to top Link to comment Share on other sites More sharing options...
The Pounder Posted March 22, 2019 Share Posted March 22, 2019 Looks absolutely incredible! Really, can’t wait to see this thing painted! (Roll on the ETL!!!) Eberious 1 Back to top Link to comment Share on other sites More sharing options...
Bjorn Firewalker Posted March 22, 2019 Share Posted March 22, 2019 Thank you for the information on how to customize a Dreadnought to show the interred Marine. Eberious 1 Back to top Link to comment Share on other sites More sharing options...
Othniel's Blade Posted March 22, 2019 Share Posted March 22, 2019 Oh my crap. That is breathtaking. Eberious 1 Back to top Link to comment Share on other sites More sharing options...
SWORD BROTHER RYAN Posted March 23, 2019 Share Posted March 23, 2019 Heresy aside, THAT'S INGENIOUS! I'm impressed! Eberious 1 Back to top Link to comment Share on other sites More sharing options...
Honda Posted March 23, 2019 Share Posted March 23, 2019 I regret that I have but one "like" to give to this dread. Just outstanding brother. More importantly, you have shown what Primaris should look like with the correct livery. Cheers, Eberious and Hadda 2 Back to top Link to comment Share on other sites More sharing options...
Eberious Posted April 9, 2019 Author Share Posted April 9, 2019 Thank you all, more Templary goodness.... Emperors Champion, cause no Crusade is complete without one. DI Intercessors Marshal Reinhard, Firepower, Honda and 2 others 5 Back to top Link to comment Share on other sites More sharing options...
Slackmaster Posted April 9, 2019 Share Posted April 9, 2019 I'm seriously friggin' impressed with your modelling skills, dude. I tried converting up a Primaris EC, but yours just makes me all kinds of jealous. The sword on the 25th anniversary EC is so much better than the newer Black Sword, IMO, so good call on that. Are you able to give some insight as to your modelling techniques, particularly with the greenstuff? Also, how do you make your shoulder pads with the high rims? Eberious 1 Back to top Link to comment Share on other sites More sharing options...
The Pounder Posted April 9, 2019 Share Posted April 9, 2019 I agree, your modelling skills are truly impressive. I’m all thumbs when it comes to building models, great job! Eberious 1 Back to top Link to comment Share on other sites More sharing options...
Eberious Posted April 9, 2019 Author Share Posted April 9, 2019 Many thanks, @Slackmaster, yup, wanted something iconic to us BT's in my army. It truly is a relic weapon. I found this awesome stuff about two years ago. Bluestuff. I'll leave this youtube vid here to check out, better then me trying to explain. https://www.youtube.com/watch?v=WKh195Binjs A good money saver as you can create bits as and when, rather than searching and buying. Also if you have a OOP bit then save it as a master and use this method. Best bit is that you can then reuse the blue stuff over and over. man, I sound like a sales person. The shoulder pads. Take a Mk3 pad cut out the middle leaving the trim. With a regular pad cut away the trim keeping the middle. It then becomes a process of cutting and filing away until it fits. Once you've done it few times becomes easier as you get an eye for exactly where to start from reducing time and work. I can make a step by step and they will be scattered through out the army. Honda 1 Back to top Link to comment Share on other sites More sharing options...
Eberious Posted May 26, 2019 Author Share Posted May 26, 2019 With June and the ETL fast approaching reinforcements arrive. I think the contrast paints will certainly speed up the process. I've seen some very good results with the Black Templar contrast recently so I'm optimistic about it but going to see if I can test the local stores paints before buying into it. Chaplain Hell Blasters I have a unit of Inceptors and a Repulsor on the way. Just making some last minute upgrades. Marshal Reinhard and Marshal Mattias 2 Back to top Link to comment Share on other sites More sharing options...
Marshal Rohr Posted May 27, 2019 Share Posted May 27, 2019 Beautiful as always, Eberious. Link to comment Share on other sites More sharing options...
Marshal Vespasian Posted May 27, 2019 Share Posted May 27, 2019 (edited) That greenstuff work tho... Fantastic. Edited May 27, 2019 by Marshal Vespasian Link to comment Share on other sites More sharing options...
Eberious Posted June 3, 2019 Author Share Posted June 3, 2019 (edited) Cheers both, Some Inceptors. Another Redemptor Dreadnought, however I will be parting ways with this one to a fellow member of the B&C. Long may he serve you in the Emperors light, No pity! No Remorse! No Fear! Edited June 3, 2019 by Eberious Marshal Reinhard and Hymnblade 2 Back to top Link to comment Share on other sites More sharing options...
Marshal Vespasian Posted June 3, 2019 Share Posted June 3, 2019 Your modelling and reposing work is just outstanding. I am at a loss for words. How do you do the little shields and templat crosses? Link to comment Share on other sites More sharing options...
Eberious Posted June 3, 2019 Author Share Posted June 3, 2019 Cheers Marshal Vespasian. For the crosses I use blue stuff molds, the shields I created masters out of plasticard then used bluestuff to take copies from. Hope the molds last, as I can't seem to find the masters. :( Is my own fault as my work area isn't as tidy as it should be. Link to comment Share on other sites More sharing options...
Othniel's Blade Posted June 3, 2019 Share Posted June 3, 2019 Wow. That actually makes the moon boots tolerable. Link to comment Share on other sites More sharing options...
Marshal Vespasian Posted June 3, 2019 Share Posted June 3, 2019 What did you make the blue stuff molds from for the crosses? Or did you sculpt an original Master at some point? Thanks for the pointers, these little details add a ton. Link to comment Share on other sites More sharing options...

Recommended Posts
Create an account or sign in to comment
You need to be a member in order to leave a comment
Create an account
Sign up for a new account in our community. It's easy!
Register a new accountSign in
Already have an account? Sign in here.
Sign In Now